How To Clean Ninja Single Cup Coffee Maker Step By Step
Keeping your Ninja single cup coffee maker clean ensures every cup tastes fresh and brew cycles run smoothly. This step-by-step guide covers everything from daily rinsing to deep descaling, so your machine stays in top shape. With just a few common supplies and under 30 minutes, you can restore your brewer like new.
Your Ninja single cup coffee maker is one of the most convenient kitchen gadgets you own. It brews a perfect cup in seconds, whether you are rushing to work or winding down in the evening. But like any appliance that handles water and coffee grounds daily, it needs regular cleaning to stay in top shape.
Over time, coffee oils, mineral deposits, and residue build up inside your machine. This can change the taste of your coffee and even slow down the brewing process. A quick clean Ninja single cup coffee maker routine solves all of these problems before they start. In this guide, we walk you through every step in simple, easy-to-follow detail.
Whether you are a first-time Ninja owner or have been using one for years, this cleaning guide covers everything you need. From basic daily care to a full deep descale, you will learn exactly how to keep your brewer fresh. Let us get started with the supplies you will need and why cleaning matters so much.
Key Takeaways
- Daily cleaning habits keep your Ninja single cup coffee maker running smoothly and your coffee tasting fresh every morning.
- Descaling every 3 to 6 months removes mineral buildup that affects brew temperature and coffee flavor.
- Vinegar and water solutions are the most effective and affordable way to deep clean your machine.
- Cleaning every removable part including the pod holder, drip tray, and water reservoir prevents mold and bacteria growth.
- Using filtered water slows down mineral buildup and extends the life of your coffee maker.
- Never use harsh chemicals or abrasive scrubbers that can damage internal components and affect coffee taste.
- Regular maintenance takes less than 30 minutes and saves you from costly repairs or replacements.
📑 Table of Contents
- Why Cleaning Your Ninja Single Cup Coffee Maker Matters
- What You Will Need to Clean Your Ninja Coffee Maker
- Step-by-Step Guide to Clean Your Ninja Single Cup Coffee Maker
- How Often Should You Clean Your Ninja Coffee Maker?
- Common Mistakes to Avoid When Cleaning Your Ninja Coffee Maker
- Tips to Keep Your Ninja Coffee Maker Fresh Between Cleanings
- Comparing Cleaning Methods for Single Cup Coffee Makers
- When to Call a Professional or Replace Your Machine
- Final Thoughts on Cleaning Your Ninja Single Cup Coffee Maker
Why Cleaning Your Ninja Single Cup Coffee Maker Matters
Many people skip cleaning their coffee maker until something goes wrong. But regular maintenance keeps your machine running efficiently and your coffee tasting its best. Here is why this simple habit makes a big difference.
Better Tasting Coffee
Coffee oils stick to the inside of your machine after every brew. Over days and weeks, these oils turn rancid and affect flavor. Mineral deposits from water also build up inside the heating element and tubing. This means your coffee can start tasting bitter, flat, or metallic even when you use fresh beans. A thorough cleaning removes all of this buildup so each cup tastes as it should.
Longer Machine Life
Just like any kitchen appliance, your Ninja coffee maker lasts longer when you take care of it. Built-up scale can strain the heating element and pump. This leads to slower brew times, weaker coffee, and eventually mechanical failure. A simple cleaning routine prevents these issues and saves you money on repairs or replacements.
Hygiene and Safety
Warm, moist environments are perfect for mold and bacteria. The water reservoir, pod holder, and drip tray can harbor harmful germs if not cleaned regularly. Keeping every part sanitized ensures your morning coffee is safe and healthy for you and your family.
What You Will Need to Clean Your Ninja Coffee Maker
Before you start, gather everything you need. The good news is that you do not need any special or expensive products. Most of what you need is already in your kitchen.
- White distilled vinegar — this is your best descaling agent and it costs just a few dollars.
- Warm water — you will use this for rinsing and mixing your cleaning solution.
- Mild dish soap — for washing removable parts by hand.
- A soft microfiber cloth — for wiping down the exterior and interior surfaces.
- A small soft brush or old toothbrush — for scrubbing hard-to-reach spots gently.
- A clean sponge — for wiping down the water reservoir and drip tray.
- Fresh, filtered water — for running cleaning cycles and rinsing.
Avoid using harsh chemicals, bleach, or abrasive scrubbers. These can damage the plastic components and leave behind residues that affect coffee taste. Stick to gentle, food-safe cleaning methods.
Step-by-Step Guide to Clean Your Ninja Single Cup Coffee Maker
Now that you have your supplies ready, let us walk through the full cleaning process. Each step is simple and takes just a few minutes. Follow this routine every time for the best results.
Step 1: Unplug and Disassemble the Machine
Always start by unplugging your Ninja coffee maker. Safety comes first. Let the machine cool down completely if you just finished brewing. Then remove all the removable parts. This includes the pod holder, the drip tray, the water reservoir, and any other detachable components. Take a photo or make a mental note of how everything fits back together so reassembly is easy.
Step 2: Wash All Removable Parts
Grab your mild dish soap and warm water. Use a clean sponge to wash each removable part thoroughly. Pay special attention to the pod holder because coffee grounds and oils build up there quickly. The drip tray can collect old coffee spills and residue, so scrub it well too.
Rinse every piece under warm running water until no soap remains. Use your soft brush or toothbrush to clean corners and crevices where grime likes to hide. Let all parts air dry on a clean towel before putting them back together.
Step 3: Wipe Down the Exterior
While your parts are drying, take the microfiber cloth and wipe down the outside of the machine. Use a damp cloth with a little bit of warm water. This removes dust, splatters, and fingerprints from the surface. Do not use rough pads or abrasive cleaners on the exterior. A gentle wipe is all you need to keep it looking great.
Step 4: Clean the Water Reservoir
The water reservoir is one of the most important areas to clean. Pour out any standing water left inside. Use a sponge dampened with warm soapy water to wipe the interior walls. For stubborn residue, dip your soft brush in baking soda paste and gently scrub the inside. Rinse thoroughly with clean water and dry with a soft cloth.
If your reservoir has a filter, remove it and rinse it under running water. Some filters can be soaked in warm soapy water for a deeper clean. Let everything dry completely before reinserting.
Step 5: Run a Descaling Cycle with Vinegar
Descaling is the most important part of deep cleaning your Ninja coffee maker. Mineral deposits from water build up inside the heating system and can block water flow. This affects brew temperature and coffee quality.
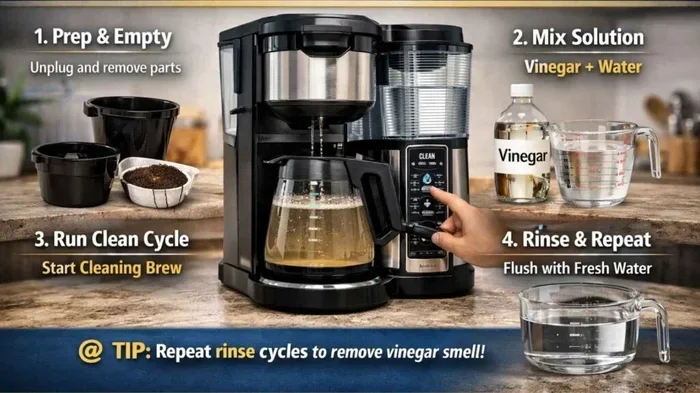
Fill the water reservoir with equal parts white vinegar and warm water. For example, use one cup of vinegar and one cup of water if your reservoir holds two cups. Place a large mug or carafe on the drip tray to catch the solution. Plug the machine back in and run a full brew cycle without a pod. Let the vinegar solution run through the entire machine.
Once the cycle is complete, discard the vinegar solution. Rinse the reservoir thoroughly and refill it with fresh clean water. Run two to three more full brew cycles with just water. This rinses out any remaining vinegar taste and smell. Your machine is now descaled and ready to brew great-tasting coffee again.
Step 6: Clean the Needle and Pod Area
The needle that punctures the coffee pod can get clogged with coffee grounds over time. Use a paperclip or the cleaning needle that comes with your Ninja machine. Gently insert it into the needle hole and move it around to clear any debris. Wipe the area clean with a damp cloth.
This small step makes a big difference. A clogged needle can cause slow brewing, leaks, or uneven extraction. Clean it after every few uses to keep your brewer running smoothly.
Step 7: Reassemble and Test
Once everything is clean and dry, put all the removable parts back together. Make sure the pod holder, drip tray, and reservoir are securely in place. Plug in the machine and run one quick brew cycle with just water. This flushes out any remaining particles and confirms everything is working properly. Your Ninja single cup coffee maker is now fresh, clean, and ready to brew.
How Often Should You Clean Your Ninja Coffee Maker?
Consistency is the key to keeping your coffee maker in excellent condition. Here is a simple schedule to follow.
- After every use: Remove and discard the used pod. Rinse the pod holder and drip tray under warm water. Wipe down the exterior if needed.
- Once a week: Wash all removable parts with warm soapy water. Wipe the water reservoir interior. Check the needle for clogs.
- Every 3 to 6 months: Perform a full descaling cycle with vinegar. This depends on how often you use the machine and the hardness of your water.
- Every 6 months: Do a deep clean of all internal components. Inspect the water line and pump for any buildup.
If you live in an area with hard water, you may need to descale more frequently. Hard water contains more minerals that accelerate buildup inside the machine. Using filtered water in your Ninja coffee maker can slow this process and extend the time between descaling sessions.
Common Mistakes to Avoid When Cleaning Your Ninja Coffee Maker
Even with the best intentions, people sometimes make mistakes that can damage their coffee maker or leave it less clean. Here are the most common errors and how to avoid them.
Using Harsh Chemicals
Never use bleach, oven cleaner, or strong chemical detergents inside your Ninja coffee maker. These substances can leave toxic residues that end up in your coffee. If you ever need to clean a heavily soiled appliance, you might think about how to properly burn off oven cleaner residue, but coffee makers require much gentler methods. Stick to vinegar, baking soda, and mild dish soap.
Skipping the Rinse Cycles
After running a vinegar descaling cycle, always complete at least two to three full rinse cycles with fresh water. Skipping this step leaves a lingering vinegar taste that can ruin your next few pots of coffee. It is worth the extra few minutes to ensure all vinegar is completely flushed out.
Using Abrasive Scrubbers
Steel wool, harsh scouring pads, and rough brushes can scratch the plastic and stainless steel surfaces of your machine. Scratches create tiny grooves where bacteria and coffee oils can hide. Always use soft cloths, sponges, and gentle brushes only.
Forgetting to Clean the Drip Tray
The drip tray is one of the most neglected parts of any coffee maker. Old coffee spills, dust, and moisture collect there and can grow mold if not cleaned regularly. Make it a habit to remove and wash the drip tray at least once a week.
Not Descaling Regularly
Some owners only clean the visible parts and forget about internal scale buildup. This is the most damaging mistake you can make. Scale inside the heating element reduces efficiency and eventually causes permanent damage. Set a calendar reminder to descale every 3 to 6 months so you never forget.
Tips to Keep Your Ninja Coffee Maker Fresh Between Cleanings
Between full cleaning sessions, a few simple habits go a long way in keeping your machine fresh and performing well.
- Empty the water reservoir when you are not using the machine for a day or more. Stagnant water promotes bacteria growth and mineral deposits.
- Use filtered or bottled water instead of tap water. This reduces mineral content and keeps your internal components cleaner longer.
- Wipe the pod area after each use to prevent coffee grounds from accumulating and clogging the needle.
- Leave the lid open after brewing. This allows the interior to air dry and prevents moisture buildup that leads to mold.
- Run a water-only cycle once a week if you use your machine daily. This flushes out residual coffee oils from the tubing.
These small habits take almost no extra time but dramatically extend the life of your machine. Think of them as the daily maintenance that keeps your Ninja coffee maker cleaning routine effective and manageable.
Comparing Cleaning Methods for Single Cup Coffee Makers
There are several ways to clean a single cup coffee maker. Here is how the most common methods compare.
- Vinegar and water: The most affordable and effective method for descaling. Uses ingredients you already have at home. Safe for all internal components. Takes about 30 minutes including rinse cycles.
- Commercial descaling solutions: Specifically formulated for coffee makers. More expensive than vinegar but convenient and mess-free. Follow the product instructions for best results.
- Baking soda paste: Great for scrubbing removable parts and removing stubborn residue. Not strong enough for internal descaling but excellent for external and component cleaning.
- Citric acid: A natural alternative to vinegar for descaling. Dissolves mineral deposits effectively. Some people prefer the taste since it leaves less residual flavor than vinegar.
For most people, the vinegar and water method is the best choice. It is affordable, effective, and uses something you already have in your pantry. If you prefer a store-bought option, a commercial descaler works well too. The important thing is that you descale regularly regardless of which method you choose.
When to Call a Professional or Replace Your Machine
Sometimes cleaning is not enough. If you have followed all the steps and your coffee maker still has issues, it may be time for professional help or a replacement. Signs that your machine needs attention include persistent strange tastes, leaking, very slow brewing, or failure to power on after a full cleaning. If you have tried descaling multiple times and the problem continues, the internal pump or heating element may be damaged beyond what cleaning can fix.
Most Ninja single cup coffee makers last 5 to 7 years with proper care. If your machine is older and requires constant repairs, it may be more cost-effective to replace it. But with the cleaning routine you just learned, your machine should stay in excellent shape for years to come.
Final Thoughts on Cleaning Your Ninja Single Cup Coffee Maker
Cleaning your Ninja single cup coffee maker does not have to be a complicated or time-consuming chore. With the right supplies and a simple routine, you can keep your brewer running like new every single day. The key is consistency. Daily rinsing, weekly washing, and regular descaling take just minutes but deliver big results.
Remember that a clean coffee maker brews better coffee. You will taste the difference in every cup. Your machine will last longer, work more efficiently, and stay hygienic for you and your family. Follow the steps in this guide, make cleaning a habit, and enjoy fresh great-tasting coffee every morning.
Start today. Your Ninja coffee maker will thank you with the perfect cup tomorrow morning. A little care goes a long way, and now you have everything you need to keep your machine in top condition for years to come.
Frequently Asked Questions
Can I use lemon juice instead of vinegar to descale my Ninja coffee maker?
Yes, lemon juice works as a natural descaling alternative to vinegar. It contains citric acid that dissolves mineral deposits effectively. Use the same one-to-one ratio with water and run it through a full brew cycle, followed by two to three rinse cycles with clean water.
How do I know when my Ninja coffee maker needs descaling?
Common signs include slower brewing times, a strange or metallic taste in your coffee, and visible white buildup inside the water reservoir. If you notice any of these, it is time to run a descaling cycle with vinegar and water to restore normal performance.
Is it safe to put the Ninja coffee maker parts in the dishwasher?
Most removable parts are dishwasher safe, but hand washing is recommended for the best longevity. The heat and strong detergent in dishwashers can cause wear over time. Check your user manual to confirm which parts are dishwasher safe before loading them.
What happens if I do not clean my Ninja coffee maker regularly?
Without regular cleaning, mineral scale builds up inside the machine and restricts water flow. Coffee oils turn rancid and affect flavor. Bacteria and mold can grow in moist areas. Eventually, the machine may brew slower, taste bad, or stop working altogether.
Can I use baking soda to clean the inside of my Ninja coffee maker?
Baking soda is safe and effective for cleaning removable parts and the water reservoir. However, it is not strong enough to descale the internal heating system. Use vinegar or a commercial descaler for internal descaling, and baking soda for scrubbing external components and parts.
How long does the cleaning process take for a Ninja single cup coffee maker?
A full cleaning session including disassembly, washing, descaling, and reassembly takes about 25 to 30 minutes. Daily rinsing takes less than five minutes. Weekly washing of removable parts takes about 10 minutes. The vinegar descaling cycle adds another 15 to 20 minutes including rinse cycles.