How To Cook Arm Roast In Oven For Tender Juicy Results
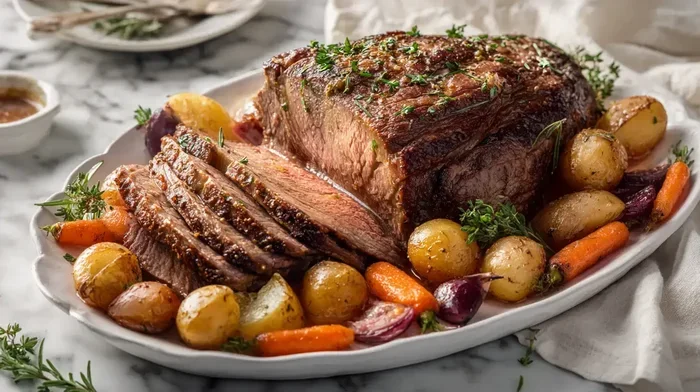
Cooking arm roast in oven is one of the easiest ways to get a tender, juicy beef roast every time. This guide walks you through everything you need to know, from choosing the right cut to nailing the perfect internal temperature. You will learn simple prep steps, seasoning tips, and oven-braising techniques that turn a humble cut into a family favorite meal.
There is something deeply satisfying about pulling a perfectly cooked beef roast out of the oven. The kitchen smells incredible, the meat is tender and juicy, and you know you just made something special. If you have been wondering how to cook arm roast in oven, you are in the right place. This guide covers everything from start to finish, so you can serve a restaurant-quality meal right at home.
Arm roast is one of the most affordable and flavorful cuts of beef you can buy. It comes from the shoulder area, which means it has plenty of connective tissue and marbling. When cooked correctly, those elements break down into rich, melt-in-your-mouth goodness. The key is using gentle, steady heat over a longer period of time. Oven braising is the perfect method for this cut because it surrounds the meat with even, consistent warmth.
Whether you are a beginner cook or someone looking to refine your technique, this article will give you all the tools you need. We will cover how to choose the right roast, what seasonings work best, exact cooking times, and how to tell when your beef is done. By the end, you will feel confident enough to make this dish on any weeknight or holiday occasion.
Key Takeaways
- Low and slow cooking: A 325°F oven temperature ensures even heat and a tender, juicy roast.
- Proper prep matters: Searing the roast first locks in moisture and builds deep flavor.
- Use a meat thermometer: Pulling the roast at the right internal temp prevents overcooking.
- Resting is essential: Letting the roast rest for 15-20 minutes keeps the juices inside.
- Simple seasoning works best: Salt, pepper, garlic, and fresh herbs are all you need for great results.
- Liquid choice affects flavor: Beef broth, wine, or a mix adds richness during braising.
- Timing varies by weight: Plan for about 20-25 minutes per pound for a perfectly cooked arm roast.
📑 Table of Contents
- What Is an Arm Roast and Why Oven Cooking Works So Well
- How To Choose the Right Cut of Beef
- Essential Prep Work Before You Start Cooking
- Step-by-Step Guide To Cooking Arm Roast In Oven
- Temperature, Timing, and Doneness
- Resting, Slicing, and Serving Your Perfect Roast
- Common Mistakes to Avoid When Cooking Arm Roast
- Expert Tips for the Best Arm Roast Every Time
- Conclusion
What Is an Arm Roast and Why Oven Cooking Works So Well
An arm roast comes from the upper shoulder of the cow. It is also sometimes called a beef arm pot roast or cross-cut arm roast. This cut is well known for its rich beefy flavor, but it can be tough if you do not cook it the right way. The secret lies in the collagen and connective tissue within the meat. When you apply low, steady heat for an extended period, that collagen melts into gelatin. This is what gives you that falling-apart tenderness.
Why the Oven Is the Best Tool for This Job
You might wonder why oven cooking is better than other methods. The answer is simple. An oven provides surround heat that reaches the meat from every direction. Unlike a stovetop, where the heat only comes from below, an oven circulates hot air evenly around the roast. This means no hot spots and no uneven cooking.
Oven braising also gives you hands-off cooking time. Once you get the roast in the oven, you can set a timer and focus on other things. You can prep side dishes, set the table, or just relax. That makes it ideal for busy weeknights or when you are hosting guests.
The Dutch oven is the most popular vessel for this method. It traps moisture inside, which creates a self-basting environment. The roast basically cooks in its own juices, which keeps it incredibly moist. If you do not have a Dutch oven, a deep baking dish covered with foil works well too.
How To Choose the Right Cut of Beef
Not all arm roasts are created equal. The quality of the cut you select has a huge impact on your final result. Here are some things to look for when you are at the butcher or grocery store.
Look for Good Marbling
Marbling refers to the thin streaks of white fat running through the meat. More marbling generally means more flavor and more tenderness after cooking. When you are shopping for a beef arm roast, look for pieces with a nice even distribution of fat throughout the muscle. Avoid roasts that look lean or dry, because they are more likely to turn out tough.
Size and Weight Considerations
A typical arm roast weighs between 2 and 4 pounds. For a family of four, a 3-pound roast is usually the sweet spot. It gives everyone a generous portion with enough left over for sandwiches the next day. If you are cooking for a larger group, you can go up to 5 pounds, but you will need to adjust the cooking time accordingly.
Bone-In vs Boneless
You will find arm roasts sold both bone-in and boneless. Bone-in roasts tend to have more flavor because the bone adds richness to the cooking liquid. However, they can be harder to slice evenly. Boneless roasts are easier to handle and slice, which makes them a popular choice for everyday meals. Both options work beautifully in the oven.
Essential Prep Work Before You Start Cooking
Good prep work sets the stage for a perfect roast. Skipping this step is one of the most common mistakes home cooks make. Taking just 15 to 20 minutes before you start can make a big difference in the final dish.
Bring the Roast to Room Temperature
Take your beef arm roast out of the refrigerator about 30 to 45 minutes before cooking. Letting it sit on the counter allows the meat to warm up slightly. This helps it cook more evenly throughout. If you put a cold roast straight into a hot oven, the outside can overcook before the inside catches up.
Season Generously
Seasoning is where you can get creative. A simple blend of coarse salt, black pepper, and garlic powder works wonderfully. You can also add smoked paprika, onion powder, or dried herbs like rosemary and thyme. Rub the seasoning all over the roast, making sure to cover every surface. The salt helps draw out moisture, which then gets reabsorbed and tenderizes the meat.
Sear the Roast for Maximum Flavor
Searing is a step you should never skip. Heat a few tablespoons of oil in a Dutch oven or heavy oven-safe pot over medium-high heat. Once the oil is shimmering, place the roast in the pot. Let it brown on each side for about 3 to 4 minutes. This creates a beautiful crust through the Maillard reaction, which adds deep, complex flavor to your braised beef.
After searing, remove the roast and set it aside. You will notice brown bits stuck to the bottom of the pot. Those are flavor gold. You will use them later when you add your cooking liquid.
Add Aromatics and Liquid
Before placing the roast back in the oven, add aromatic vegetables and liquid to the pot. Onions, carrots, and celery are classic choices. Garlic cloves add a wonderful aroma too. Pour in beef broth, red wine, or a combination of both. The liquid should come about halfway up the sides of the roast. Do not submerge it completely, because you want the roast to braise, not boil.
Step-by-Step Guide To Cooking Arm Roast In Oven
Now that you have prepped your roast, it is time to cook it. Follow these steps for the best results every time.
Step 1: Preheat Your Oven
Set your oven to 325°F. This is the ideal temperature for cooking arm roast in oven. It is low enough to break down connective tissue slowly but high enough to get a nice brown crust on the outside. Preheating ensures the roast starts cooking at the right temperature from the very first minute.
Step 2: Place the Roast in the Pot
If you seared your roast, place it back in the same pot with the aromatics and liquid. If you used a different pan, transfer everything to a Dutch oven or deep baking dish. The roast should sit snugly among the vegetables. Tuck garlic cloves and herb sprigs around the meat for extra flavor.
Step 3: Cover and Place in the Oven
Cover the pot tightly with a lid or a double layer of aluminum foil. The seal is important because it traps steam, which keeps the meat moist. Place the covered pot in the center rack of your preheated oven.
Step 4: Cook for the Right Amount of Time
Plan for about 20 to 25 minutes per pound of meat at 325°F. So a 3-pound roast will take roughly 60 to 75 minutes. Here is a quick reference table to help you plan:
| Roast Weight | Approximate Cook Time | Target Internal Temp |
|---|---|---|
| 2 lbs | 40-50 minutes | 190-200°F |
| 3 lbs | 60-75 minutes | 190-200°F |
| 4 lbs | 80-100 minutes | 190-200°F |
| 5 lbs | 100-125 minutes | 190-200°F |
These times are approximate. Every oven is slightly different, and the actual cook time can vary based on the shape of the roast and how well your oven holds temperature. Always use a meat thermometer to check doneness.
Step 5: Check the Internal Temperature
Insert a meat thermometer into the thickest part of the roast, avoiding any bone. The target internal temperature for a tender, juicy arm roast is 190-200°F. At this range, the collagen has fully broken down, and the meat will be incredibly tender. If the roast has not reached this temperature yet, keep cooking and check every 15 minutes.
Step 6: Remove and Let It Rest
Once the roast hits your target temperature, carefully remove the pot from the oven. Use oven mitts because the pot will be very hot. Transfer the roast to a cutting board and cover it loosely with aluminum foil. Let it rest for at least 15 to 20 minutes before slicing.
Temperature, Timing, and Doneness
Understanding the relationship between temperature and timing is the key to nailing this dish every single time. Let us break it down in simple terms.
Why 325°F Is the Goldilocks Temperature
Too high of a temperature, say 400°F or above, will cause the outside of the roast to dry out before the inside has time to become tender. Too low, like 250°F, will take way too long and may not develop enough flavor on the surface. 325°F hits the sweet spot. It cooks the roast at a gentle pace that allows the collagen to dissolve while still building a flavorful crust.
Internal Temperature Guide
Here is a simple guide to what different internal temperatures mean for your beef roast:
- 145°F: This is medium-rare for steak, but not enough for arm roast. The meat will be pink and chewy at this point.
- 160°F: Medium doneness. Still not ideal for this cut because the connective tissue has not fully broken down.
- 180°F: Getting closer. The roast will be more tender but may still have some resistance.
- 190-200°F: This is the sweet spot. The collagen has melted completely, and the meat will be fork-tender and juicy.
Always remember that the temperature will rise about 5 to 10 degrees after you pull the roast out of the oven. This is called carryover cooking, and it is why you should pull the roast slightly below your target temp.
Resting, Slicing, and Serving Your Perfect Roast
Resting the roast is just as important as cooking it properly. When you slice into a hot roast immediately, all those wonderful juices run out onto the cutting board. You end up with dry, less flavorful meat. Giving the roast time to rest allows the juices to redistribute throughout the fibers.
How To Slice Against the Grain
Once your roast has rested, it is time to slice. Look at the meat and find the direction of the muscle fibers, also called the grain. Use a sharp carving knife and cut perpendicular to the grain. This shortens the muscle fibers, making each slice much easier to chew. If you cut with the grain, the meat will be tough and chewy no matter how well you cooked it.
Making the Pan Gravy
Do not throw away the cooking liquid! It is packed with flavor from the roast, vegetables, and seasonings. Pour the liquid into a saucepan and bring it to a simmer. You can thicken it with a cornstarch slurry or simply reduce it on the stove. Season with salt and pepper to taste, and you have a delicious homemade gravy to drizzle over your slices.
Serving Suggestions
Arm roast pairs beautifully with many sides. Here are some ideas to round out your meal:
- Mashed potatoes for a classic comfort meal
- Roasted root vegetables like carrots, parsnips, and sweet potatoes
- Creamy polenta or buttery egg noodles
- Steamed green beans or broccoli for a lighter option
- Crusty bread to soak up every drop of gravy
Leftover roast makes amazing sandwiches the next day. Pile the sliced beef onto a hoagie roll with some horseradish sauce, lettuce, and tomato. It is one of the best ways to use up leftovers.
Common Mistakes to Avoid When Cooking Arm Roast
Even experienced cooks can make mistakes with this dish. Here are a few pitfalls to watch out for.
Skipping the Sear
Some people skip the searing step to save time. This is a big mistake. Searing adds a layer of flavor that you simply cannot get any other way. It takes only about 15 minutes and makes a noticeable difference in the final dish.
Using Too High a Temperature
It can be tempting to crank up the oven to speed things along. But high heat dries out this tougher cut of beef. Patience is your best friend here. Low and slow is the only way to get truly tender results.
Not Using a Meat Thermometer
Relying on cook time alone is risky. Every oven is different, and every roast is a slightly different size and shape. A meat thermometer takes all the guesswork out of the process. It is an inexpensive tool that will improve your cooking dramatically.
Cutting Too Soon
We have mentioned this before, but it bears repeating. Cutting into the roast as soon as it comes out of the oven releases all the juices. Resist the urge and give it the full 15 to 20 minutes of resting time. Your patience will be rewarded.
Overcrowding the Pot
If you are cooking vegetables alongside the roast, make sure they are not crammed into the pot. Overcrowding causes the vegetables to steam instead of roast, which changes their texture and flavor. Give everything some breathing room.
Expert Tips for the Best Arm Roast Every Time
Here are some extra tips from experienced cooks that will take your roast to the next level.
- Use a Dutch oven: The heavy walls and tight lid create the perfect braising environment.
- Add a splash of vinegar: A small amount of apple cider vinegar in the cooking liquid helps tenderize the meat even more.
- Cook the day before: Arm roast tastes even better the next day after the flavors have had time to meld. Make it ahead and reheat gently.
- Don’t forget to deglaze: After searing, pour a little wine or broth into the hot pot and scrape up those browned bits. That liquid becomes part of your cooking broth.
- Let the roast come to room temperature before cooking: This simple step promotes more even cooking throughout the meat.
- Use fresh herbs: If you have access to fresh rosemary and thyme, add them in the last 30 minutes of cooking for the best flavor.
Conclusion
Learning how to cook arm roast in oven is one of the most rewarding skills you can build in the kitchen. It is a simple method that delivers impressive results with minimal effort. The key is to take your time, use the right temperature, and never skip the resting step. With the tips and techniques in this guide, you can confidently prepare a tender, juicy beef roast that will have everyone asking for seconds.
Remember to choose a well-marbled cut, season it generously, and sear it before braising. Use a meat thermometer to track doneness, and always let the roast rest before you slice it. Whether you are cooking for a family dinner or a special occasion, this method never lets you down.
So the next time you are at the store, grab an arm roast and give this method a try. Once you taste how good it can be, you will never go back to dry, overcooked beef again. Happy cooking!
Frequently Asked Questions
How long does it take to cook arm roast in oven at 325°F?
Plan for about 20 to 25 minutes per pound at 325°F. A 3-pound roast will take roughly 60 to 75 minutes. Always use a meat thermometer to check the internal temperature, which should reach 190-200°F for the best tenderness.
Can I cook arm roast at a higher temperature to save time?
It is not recommended. Higher temperatures dry out the meat before the connective tissue has time to break down. The low and slow approach at 325°F is what gives you that tender, juicy result you are looking for.
Should I cover the roast with foil or leave it uncovered?
Cover the roast during most of the cooking time to trap steam and keep the meat moist. You can uncover it for the last 15 minutes if you want a crispier outer crust. Covering is the key to tender braised beef.
What is the best liquid to use for braising an arm roast?
Beef broth is the most popular choice because it complements the beef flavor. Red wine adds depth and richness. You can also use a combination of both, or substitute with a mix of broth and a splash of vinegar for extra tenderizing power.
How do I know when my arm roast is done?
The best way is to use a meat thermometer. Insert it into the thickest part of the roast and look for an internal temperature of 190-200°F. At this range, the collagen has fully melted, and the meat will be fork-tender and juicy.
Can I make arm roast in a regular baking dish instead of a Dutch oven?
Yes, you can. A deep baking dish covered tightly with aluminum foil works just as well. The Dutch oven is preferred because its heavy lid and thick walls retain heat more effectively, but any oven-safe dish will get the job done.