How To Pan Sear And Oven Bake Steak For Best Results
Learning how to pan sear and oven bake steak gives you restaurant-quality results at home. This method combines a hot skillet for a golden crust with oven finishing for even doneness. You will master temperature control, seasoning, and resting to serve a flawless steak every single time.
There is something deeply satisfying about cooking a steak that rivals what you get at a fancy steakhouse. The sizzle of meat hitting a hot pan, the rich aroma filling your kitchen, and that perfect golden crust on the outside — it all comes together when you know how to pan sear and oven bake steak the right way.
This method, sometimes called the reverse sear or sear and bake technique, combines two cooking methods into one seamless process. You get a caramelized, flavorful crust from the stovetop and a perfectly even interior from the oven. Whether you are cooking for a date night or a family dinner, this approach never disappoints.
The beauty of this technique lies in its simplicity. You do not need fancy equipment or years of experience. Just a good skillet, a hot stove, an oven, and a basic understanding of timing and temperature. By the end of this guide, you will feel confident enough to cook steak like a professional chef every time you step into the kitchen.
Key Takeaways
- Choose the right cut: Ribeye, filet mignon, and strip steak work best for pan searing and oven baking.
- Use a cast iron skillet: It retains heat evenly and creates a beautiful sear on your steak.
- Preheat both pan and oven: A ripping hot skillet and a 400°F oven deliver consistent results.
- Use a meat thermometer: Target temperatures range from 130°F for medium-rare to 145°F for medium.
- Rest your steak for 5-10 minutes: This lets the juices redistribute for a juicy bite every time.
- Butter baste for extra flavor: Basting with garlic butter during oven baking adds richness and aroma.
- Season simply and well: Salt, pepper, and garlic go a long way in letting the beef shine.
📑 Table of Contents
- Why Pan Sear And Oven Bake Steak Works So Well
- Choosing the Best Steak Cuts for Pan Searing and Oven Baking
- Essential Tools and Equipment for Perfect Results
- Step-by-Step: How to Pan Sear and Oven Bake Steak
- Mastering Internal Temperature and Steak Doneness
- Common Mistakes to Avoid When Cooking Steak
- Serving and Enjoying Your Perfect Steak
- Quick Tips for Pan Searing and Oven Baking Steak
- Expert Insights on Perfecting Your Sear and Bake Technique
- How to Store and Reheat Leftover Steak
- Final Thoughts on Mastering the Pan Sear and Oven Bake Method
Why Pan Sear And Oven Bake Steak Works So Well
Combining a stovetop sear with oven finishing is not just a trend. It is a tried-and-true method that delivers consistent, excellent results. Understanding why this approach works helps you appreciate every step of the process.
The Science Behind the Sear
When you place a steak in a screaming hot pan, something magical happens. The Maillard reaction kicks in. This is a chemical process where the amino acids and sugars on the surface of the meat react under high heat. The result is a deeply browned, flavorful crust that adds complexity and texture to every bite.
The sear does not actually seal in juices, despite what many people believe. What it does do is create layers of flavor that make your steak taste incredible. The oven finishing then takes over, gently raising the internal temperature without burning the outside.
Even Cooking From Edge to Edge
One of the biggest challenges with steak is getting consistent doneness throughout. If you only use a pan, the edges tend to overcook while the center reaches the right temperature. The oven solves this problem by surrounding the steak with gentle, even heat.
This means no more gray bands of overcooked meat between the crust and the pink center. Your steak goes from edge to edge with a uniform color and texture. That is the real power of learning how to pan sear and oven bake steak.
Choosing the Best Steak Cuts for Pan Searing and Oven Baking
Not all steaks are created equal when it comes to this cooking method. Some cuts respond beautifully to high heat and oven finishing, while others work better with different techniques. Here is what you need to know.
Top Cuts for Sear and Bake
Thick-cut steaks work best for this method. You want steaks that are at least 1 to 1.5 inches thick. Thinner steaks risk overcooking in the oven before you get a good crust. Here are the top picks:
- Ribeye: Rich marbling means incredible flavor and a juicy result. This is a crowd favorite for a reason.
- Filet Mignon: Lean and tender, this cut cooks evenly and has a delicate, buttery texture.
- New York Strip: A great balance of flavor and tenderness with a firm, satisfying bite.
- Bone-in Ribeye: The bone adds extra flavor during oven baking, though it takes slightly longer to cook.
What to Avoid
Thin-cut steaks under one inch are not ideal for this method. They cook too fast and can dry out before you achieve a proper crust. Also, avoid pre-marinated steaks from the grocery store. They often contain sugar-based marinades that can burn during the high-heat sear. Keep it simple and let the quality of the beef speak for itself.
Essential Tools and Equipment for Perfect Results
You do not need a lot of fancy gear to cook a great steak. But having the right tools makes a noticeable difference in your results. Here is what you should have ready before you start.
The Right Skillet
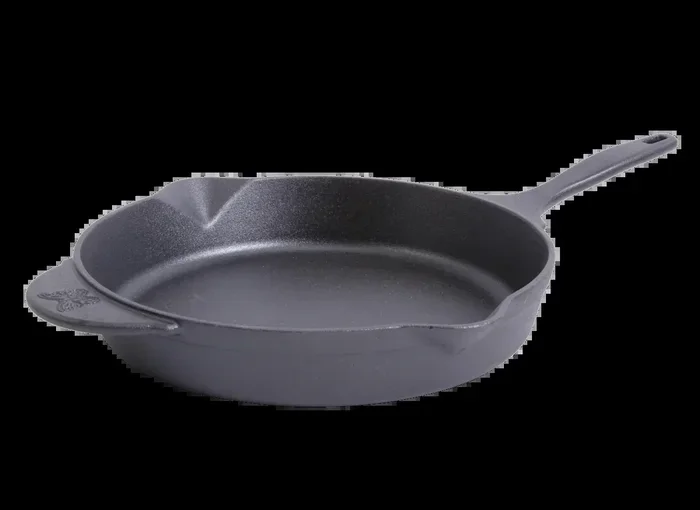
A cast iron skillet is the gold standard for pan searing steak. It holds heat incredibly well and distributes it evenly across the surface. Stainless steel skillets also work well, but avoid nonstick pans for this technique. Nonstick surfaces do not get hot enough to create a proper sear.
If you do not have a cast iron skillet, a heavy stainless steel pan will do the job. The key is that the pan needs to be thick and heavy enough to retain heat when the cold steak hits the surface.
A Meat Thermometer Is Non-Negotiable
guessing the doneness of your steak leads to inconsistent results every time. An instant-read meat thermometer takes all the guesswork out of the equation. Insert it into the thickest part of the steak, avoiding bone or fat, and you will know exactly when your steak is done.
Digital thermometers with quick-read displays are the most convenient. They give you accurate readings in seconds, which matters when you are working with high heat and tight timing.
Other Helpful Tools
- Tongs: For flipping the steak without piercing it and losing juices.
- Fresh herbs and garlic: For butter basting during oven baking.
- A wire rack: Optional but helpful for resting the steak after cooking.
- A paper towel: To pat the steak dry before searing for a better crust.
Step-by-Step: How to Pan Sear and Oven Bake Steak
Now for the part you have been waiting for. Here is the complete process for cooking a perfect steak using the pan sear and oven bake method. Follow these steps closely and you will be amazed at the results.
Step 1: Prep the Steak
Take your steak out of the refrigerator about 30 to 45 minutes before cooking. Leting it come to room temperature helps it cook more evenly. Pat it thoroughly dry with paper towels on both sides. Moisture is the enemy of a good sear, so the drier the surface, the better the crust.
Season generously with coarse salt and freshly cracked black pepper. You can also add garlic powder or a light dusting of smoked paprika if you like. Keep it simple. The quality of the beef should be the star of the show.
Step 2: Preheat the Pan and Oven
Place your cast iron skillet on the stove over high heat. Let it get ripping hot. This usually takes about 3 to 5 minutes. You want the pan so hot that a drop of water sizzles and evaporates instantly.
While the pan heats up, preheat your oven to 400°F. A properly preheated oven ensures the steak starts cooking the moment it goes in. Do not skip this step, as a cold oven will throw off your timing and lead to uneven cooking.
Step 3: Sear the Steak
Add a high smoke-point oil to the hot skillet. Avocado oil or grapeseed oil work great because they can handle high temperatures without burning. Place the steak in the pan and resist the urge to move it.
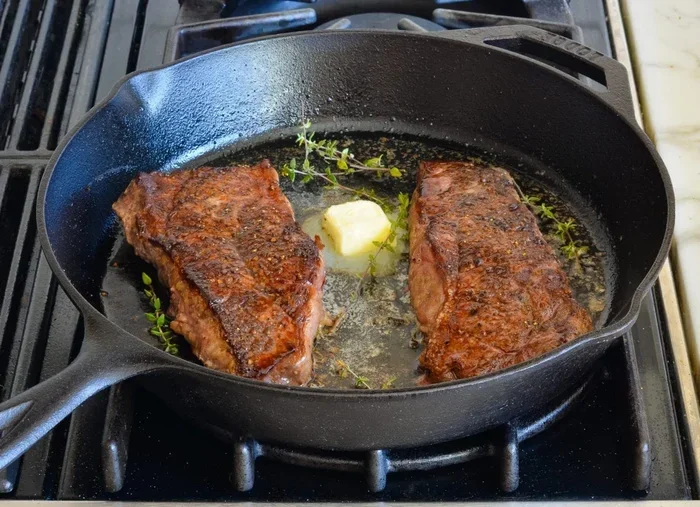
Let it sear undisturbed for about 2 to 3 minutes per side. You want a deep golden-brown crust. Use tongs to hold the steak and sear the edges for about 30 seconds each. This builds flavor all around the steak.
For extra flavor, add a tablespoon of butter, a few crushed garlic cloves, and fresh thyme sprigs to the pan during the last minute of searing. Tilt the pan slightly and spoon the foaming butter over the steak. This is called butter basting, and it adds incredible richness.
Step 4: Transfer to the Oven
Once both sides are beautifully seared, transfer the entire skillet directly into the preheated oven. The skillet goes from stovetop to oven, which is one of the great advantages of using cast iron.
Bake for about 6 to 10 minutes depending on the thickness of your steak and your desired level of doneness. Check the internal temperature with your meat thermometer after about 6 minutes. Here is a quick reference for steak doneness:
- Rare: 120°F to 125°F
- Medium Rare: 130°F to 135°F
- Medium: 135°F to 145°F
- Medium Well: 145°F to 155°F
- Well Done: 155°F and above
Remember that the temperature will rise about 5 degrees after you remove the steak from the oven. This is called carryover cooking, and it is important to factor it in. Pull the steak a few degrees below your target temperature to account for this.
Step 5: Rest the Steak
This step is just as important as the cooking itself. Remove the steak from the oven and let it rest on a cutting board or warm plate for at least 5 to 10 minutes. During resting, the juices inside the steak redistribute evenly throughout the meat.
If you cut into the steak immediately, all those juices will run out onto the board, leaving you with a dry piece of meat. Patience here pays off big time. A well-rested steak is a juicy steak.
Mastering Internal Temperature and Steak Doneness
Understanding steak doneness is one of the most important skills you can develop in the kitchen. It is what separates a good steak from a great one. Let us break down each level so you can cook exactly the way you like.
What Each Doneness Level Looks and Feels Like
Rare steak has a cool red center and a very soft texture. It is not for everyone, but steak lovers swear by it. The internal temperature sits between 120°F and 125°F.
Medium rare steak is the most popular choice for a reason. It has a warm red center with a slightly firmer texture. At 130°F to 135°F, this is where most steaks taste their best. The marbling has melted enough to deliver maximum flavor without drying out the meat.
Medium steak has a pink center and a more noticeable firmness. The temperature range is 135°F to 145°F. It is still juicy but less red than medium rare.
Medium well and well done steaks have little to no pink left. These are personal preferences, but they do tend to lose some of the juiciness and tenderness that make steak special.
Using Touch as a Backup
Over time, you will learn to judge doneness by touch. Press the center of the steak with your finger. A rare steak feels like the fleshy part of your thumb when your hand is relaxed. Medium rare feels like touching your thumb to your index finger. Medium feels like thumb to middle finger, and so on. This is not a replacement for a thermometer, but it is a handy skill to develop.
Common Mistakes to Avoid When Cooking Steak
Even experienced home cooks make mistakes with steak. Being aware of these common pitfalls helps you avoid them and achieve better results every time.
Starting with a Cold Steak
Putting a cold steak straight from the fridge into a hot pan leads to uneven cooking. The outside overcooks while the center stays cold. Always let your steak temper at room temperature for 30 to 45 minutes before cooking.
Not Drying the Surface
Moisture creates steam, and steam prevents browning. If your steak is wet, you will get a gray, steamed surface instead of a beautiful golden crust. Always pat your steak dry with paper towels before seasoning and searing.
Moving the Steak Too Much
Once the steak hits the hot pan, leave it alone. Moving it around prevents a proper crust from forming. Trust the process and let the heat do its work. You should only flip it once during the searing phase.
Skipping the Rest Period
Cutting into a steak right after cooking is one of the biggest mistakes home cooks make. The juices need time to settle. A few minutes of resting makes a dramatic difference in the final result.
Using the Wrong Oil
Olive oil has a low smoke point and will burn in a hot pan, leaving a bitter taste. Stick to high smoke-point oils like avocado oil, grapeseed oil, or vegetable oil for searing.
Serving and Enjoying Your Perfect Steak
Now that your steak is cooked to perfection, it is time to serve it right. Presentation and accompaniments can elevate the entire dining experience.
Slicing Tips
Always slice against the grain. This means cutting perpendicular to the muscle fibers, which makes each slice more tender and easier to chew. Use a sharp slicing knife and cut at a slight angle for the most tender result.
Great Side Dishes to Pair
- Crispy roasted potatoes or garlic mashed potatoes
- A simple side salad with a bright vinaigrette
- Grilled asparagus or roasted broccolini
- Creamed spinach or sautéed mushrooms
- Corn on the cob or grilled vegetables in summer
Finishing Touches
A drizzle of flaky sea salt on top of the sliced steak adds a beautiful crunch and burst of flavor. A small pat of herb butter melting over the hot slices is another restaurant-quality touch. A splash of steak juices from the resting board over the sliced meat brings everything together beautifully.
Quick Tips for Pan Searing and Oven Baking Steak
- Bring steak to room temperature before cooking for even results.
- Pat the steak dry thoroughly with paper towels for the best crust.
- Use a cast iron skillet for superior heat retention and even searing.
- Preheat the oven to 400°F before you start searing so it is ready when you are.
- Use a meat thermometer and pull the steak 5 degrees below your target temp.
- Rest the steak for at least 5 minutes to let juices redistribute.
- Butter baste with garlic and herbs for an extra layer of flavor and aroma.
- Season generously with salt at least 15 minutes before cooking to draw out moisture.
Expert Insights on Perfecting Your Sear and Bake Technique
Professional chefs have been using this method for decades, and for good reason. It gives them complete control over the final result. Here are some expert insights that can take your steak game to the next level.
Chef’s tip on salting: Many chefs recommend salting the steak at least 15 minutes before cooking, or even the night before. This draws out moisture, which you then pat dry. The result is a drier surface that sears better and a more seasoned steak throughout.
On oven temperature: Some chefs prefer a slightly lower oven temperature of 375°F for thicker cuts. This slower oven finish gives you more control and reduces the risk of overcooking the outer layers while waiting for the center to reach temperature.
On the reverse sear approach: For very thick cuts over 2 inches, some cooks reverse the order. They start in the low oven at 250°F until the steak is about 10 degrees below target, then sear in a hot pan for 30 seconds per side. Both methods work beautifully, but the traditional sear-then-oven approach is faster and more beginner-friendly.
How to Store and Reheat Leftover Steak
If you happen to have leftovers, you can still enjoy great steak the next day. Store cooked steak in an airtight container in the refrigerator for up to 3 days. To reheat, place the steak in a cast iron skillet over medium-low heat with a little butter. Cover with a lid to keep moisture in. Warm it gently for 3 to 4 minutes per side, just enough to take the chill off without overcooking it.
Avoid reheating steak in the microwave. It tends to dry out the meat and make the texture rubbery. A gentle stovetop reheat preserves the juices and texture much better.
Final Thoughts on Mastering the Pan Sear and Oven Bake Method
Cooking steak at home does not have to be intimidating. Once you understand the basic principles of how to pan sear and oven bake steak, you will find that it becomes second nature. The combination of a crispy, flavorful crust from the stovetop and a perfectly cooked interior from the oven is something every steak lover should experience.
Start with a quality cut of meat, use the right tools, and follow the steps outlined in this guide. Pay attention to temperature, give your steak time to rest, and do not be afraid to experiment with seasoning and butter basting. Each time you cook, you will learn something new and refine your technique further.
The best part is that this method works for almost any thick steak cut. Whether you prefer a fatty, marbled ribeye or a lean, tender filet mignon, the pan sear and oven bake approach delivers outstanding results. So fire up your stove, preheat that oven, and get ready to cook the best steak of your life. Your kitchen — and your taste buds — will thank you.
Frequently Asked Questions
Can I use a stainless steel skillet instead of cast iron?
Yes, stainless steel skillets work well for pan searing steak. The key is to choose a heavy-bottomed pan that can handle high heat without warping. Avoid thin, lightweight pans, as they lose heat too quickly when the cold steak hits the surface.
How thick should my steak be for this method?
For the best results, use steaks that are at least 1 to 1.5 inches thick. Thinner steaks can overcook in the oven before developing a proper crust. Thicker cuts give you more control over the doneness and allow for a longer sear without burning the outside.
Do I need to oil the steak or the pan?
It is best to oil the steak lightly rather than the pan. This ensures an even coating on the surface for browning and prevents the oil from smoking excessively in the hot pan. Use a high smoke-point oil like avocado or grapeseed oil for the best results.
What is carryover cooking and why does it matter?
Carryover cooking refers to the rise in internal temperature that continues after you remove the steak from the heat source. The residual heat in the meat raises the temperature by about 5 degrees. This is why you should pull the steak off a few degrees below your target temperature to account for this final rise.
Can I add seasoning after the steak is cooked?
You can, but seasoning before cooking allows the salt to penetrate the meat and enhance the flavor throughout. If you prefer to season after, a finishing salt like flaky sea salt sprinkled on top right before serving adds a nice crunch and burst of flavor.
How long can I store leftover pan-seared and oven-baked steak?
Cooked steak can be stored in the refrigerator in an airtight container for up to 3 days. Make sure the steak has cooled to room temperature before storing it. When reheating, use a low-heat stovetop method with butter to preserve the texture and juiciness of the meat.
=== CONCLUSION ===
Mastering how to pan sear and oven bake steak is one of the most rewarding skills you can develop in the kitchen. It combines the best of both worlds — a flavorful, caramelized crust from the stovetop and a perfectly even interior from the oven. The process is straightforward, the results are impressive, and the technique works beautifully with almost any thick-cut steak.
Remember to choose quality cuts, dry the surface before searing, use a cast iron skillet, and always rely on a meat thermometer for accuracy. Give your steak time to rest, and do not skip the butter baste if you want to take the flavor up another level. With a little practice and attention to detail, you will consistently cook steaks that rival any restaurant on the planet.
So next time you crave a perfect steak, skip the takeout and head to your kitchen. Follow the steps in this guide, trust the process, and enjoy every single bite of your homemade masterpiece.