How To Cook Ribs In The Oven Fast With Foil Easily
Learning how to cook ribs in the oven fast with foil is the easiest way to get restaurant-quality ribs at home. This method locks in moisture, speeds up cooking, and gives you tender, flavorful ribs in under two hours. You will learn the best foil techniques, oven temperatures, and seasoning tips. Whether you are a beginner or a seasoned cook, this guide makes it simple. Follow these steps and enjoy crispy, juicy ribs any night of the week.
There is nothing quite like ribs on a weekend evening. They are juicy, flavorful, and absolutely perfect for feeding a crowd. But here is the problem — many people think ribs take all day to cook. That is simply not true anymore. You can cook ribs in the oven fast with foil and still get amazing results. This method is a game changer for busy weeknights and weekend gatherings alike.
Using foil to cook ribs in the oven is one of the most underrated techniques out there. It traps moisture, speeds up the process, and keeps your ribs tender from edge to edge. Whether you are cooking pork ribs, beef ribs, or baby back ribs, this approach works beautifully. In this guide, I will walk you through every single step. By the end, you will know exactly how to make oven baked ribs that taste like they came from a top BBQ pit.
Let us be real for a second. Not everyone has hours to spend tending a smoker. Sometimes you just want delicious ribs on the table fast. That is where this easy ribs recipe comes in. It is simple, forgiving, and incredibly reliable. You do not need any fancy equipment — just a basic oven, some foil, and a little patience. Let us dive in.
Key Takeaways
- Foil wrapping speeds up cooking: It traps steam and heat, cutting rib cook time significantly.
- Low and slow is not required: You can get fall-off-the-bone ribs in under two hours in a standard oven.
- The right temperature matters: 275°F to 300°F is the sweet spot for tender oven ribs.
- Seasoning before wrapping adds deep flavor: A good rib rub applied early makes a big difference.
- Unwrapping at the end creates a crispy bark: This gives your ribs that perfect smoky, caramelized exterior.
- A meat thermometer is essential: Internal temperature of 195°F to 205°F ensures perfectly cooked ribs.
- Resting ribs after cooking is critical: Letting them rest for 10 to 15 minutes locks in juices.
📑 Table of Contents
- Why Cook Ribs In The Oven With Foil?
- Choosing The Right Ribs For Oven Cooking
- Step By Step Guide To Cooking Ribs In The Oven With Foil
- Best Oven Temperatures And Cook Times For Ribs
- Rib Rub And Sauce Ideas For Oven Ribs
- Common Mistakes To Avoid When Cooking Ribs In The Oven
- Expert Tips For Next Level Oven Ribs
- How To Know When Ribs Are Done
- Storing And Reheating Leftover Ribs
- Conclusion
Why Cook Ribs In The Oven With Foil?
You might be wondering why foil is such a big deal when it comes to oven ribs. The answer is simple — science. Foil creates a sealed environment around the meat. This traps steam and heat, which does two important things. First, it cooks the ribs faster. Second, it keeps the meat incredibly moist. Without foil, ribs can dry out quickly in an oven, especially if you are pushing for speed.
Here are the main reasons why this method works so well:
- Faster cook time: Foil-wrapped ribs cook about 30 to 40 percent faster than unwrapped ribs.
- More tender results: The steam breaks down collagen in the meat, making ribs fall off the bone.
- Less monitoring needed: Once wrapped, you can set a timer and forget about the ribs for a while.
- Easy cleanup: Foil catches all the drippings, so your baking dish stays clean.
- Works in any oven: You do not need a special oven or toaster — a standard home oven works perfectly.
The Science Behind Foil-Wrapped Ribs
When you wrap ribs in aluminum foil, you create what cooks call a “moist heat” environment. The heat circulates around the meat while the steam keeps the surface wet. This is different from dry heat cooking, which can cause the outer layer to dry out before the inside is done. The foil essentially braises the ribs inside the oven. This is the same principle used in slow cooking, but much faster. The result is tender ribs with a clean, pure pork or beef flavor.
Many pitmasters use a version of this technique during competitions. They call it the “Texas crutch.” It is not cheating — it is smart cooking. By the time you unwrap the ribs at the end, the meat is already falling apart. Then a quick blast of high heat adds that beautiful crispy bark on the outside.
Choosing The Right Ribs For Oven Cooking
Not all ribs are created equal when it comes to oven cooking. Some cuts work better than others for a fast foil method. Let us look at the most popular options and what makes each one special.
Pork Baby Back Ribs
Baby back ribs are the most popular choice for oven baked ribs. They come from the top of the pig ribcage, near the spine. These ribs are leaner and more tender than other cuts. They also cook faster, which makes them ideal for the foil method. A rack of baby back ribs usually takes about 2 to 2.5 hours using the foil technique.
These ribs have a mild, sweet flavor that pairs well with almost any rub or sauce. They are also smaller, so they fit nicely in standard baking dishes. If you are cooking for a family of four, one full rack or two half racks is usually plenty.
Spare Ribs
Spare ribs come from the belly side of the ribcage. They are fattier and meatier than baby backs. This extra fat makes them incredibly juicy when cooked properly, but they also need a bit more time. Plan for about 2.5 to 3 hours for foil wrapped ribs using spare ribs. The result is rich, bold flavor with a satisfying chew.
Spare ribs are great if you like a more robust pork taste. They also hold up well to heavy rubs and thick sauces. Just make sure you trim any excess fat before wrapping them in foil.
Beef Ribs
Beef ribs are a fantastic option if you want something really impressive. They are larger, thicker, and packed with flavor. Beef back ribs or short ribs both work well in the oven with foil. Because they are thicker, they may need closer to 3 to 3.5 hours. But the payoff is huge — deeply beefy, melt-in-your-mouth meat.
Beef ribs pair wonderfully with a smoky rib rub and a tangy BBQ sauce. They are perfect for a dinner party or a special occasion. Do not be intimidated by the size — the foil method handles them just fine.
Step By Step Guide To Cooking Ribs In The Oven With Foil
Now let us get into the actual cooking process. This is where the magic happens. Follow these steps carefully, and you will have fall off the bone ribs every single time. I have broken this down into clear, simple stages so there is no guesswork involved.
Step 1: Prep Your Ribs
Start by removing the membrane from the back of the ribs. This thin, translucent layer can be tough and chewy. Use a butter knife to loosen one corner, then grab it with a paper towel and peel it off. It only takes a few seconds and makes a huge difference in texture.
Next, pat the ribs dry with paper towels. This helps the rub stick better. Then apply your favorite rib rub generously on all sides. I like to let the rubbed ribs sit at room temperature for about 30 minutes before cooking. This helps the flavors penetrate the meat.
Step 2: Preheat The Oven
Set your oven to 275°F. This is the ideal temperature for slow cook ribs in oven using foil. Preheating is important — do not skip it. A steady, consistent temperature ensures even cooking throughout the rack.
If your oven runs hot or cold, use an oven thermometer to verify the actual temperature. Small variations can affect your cook time. Most home ovens have a variance of 10 to 25 degrees, so this small step can save you from overcooked or undercooked ribs.
Step 3: Wrap The Ribs In Foil
Tear off a large sheet of heavy-duty aluminum foil. You want something sturdy that will not tear during cooking. Place the ribs meat-side down on the foil. Add a splash of liquid to create steam. Apple cider vinegar, apple juice, beer, or even water all work well.
Fold the foil tightly around the ribs, creating a sealed packet. Make sure there are no gaps where steam can escape. The tighter the seal, the more moisture stays trapped. Some cooks like to double-wrap for extra security, and that is a great idea if you are using thinner foil.
Step 4: Cook Until Tender
Place the foil-wrapped ribs on a baking sheet or in a roasting pan. Cook them in the preheated oven for about 2 to 2.5 hours for pork ribs. Beef ribs may need 3 to 3.5 hours. The key is not to peek too often — every time you open the foil, you lose steam and heat.
After about two hours, carefully open the foil and check for tenderness. The meat should pull back from the bones slightly. You can also use a meat thermometer — the internal temperature should be around 195°F to 205°F. If the meat is not yet tender, rewrap and cook for another 30 to 45 minutes.
Step 5: Unwrap And Add Sauce
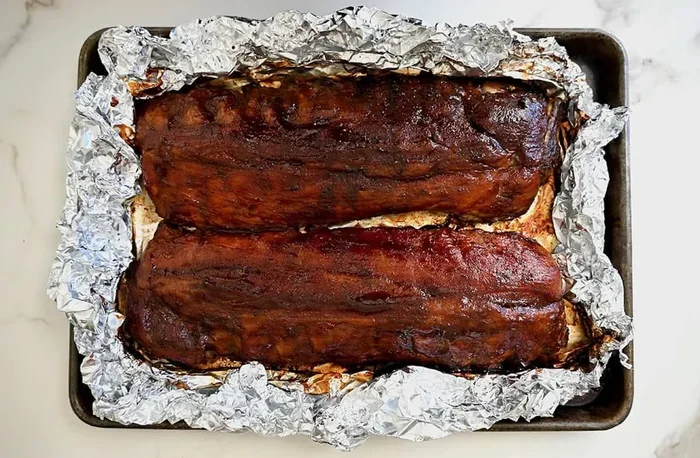
This is the exciting part. Remove the foil and brush your favorite rib sauce generously over the meat. Now you have a choice — you can either return the ribs to the oven unwrapped for 10 to 15 minutes, or you can broil them for 3 to 5 minutes for a crispy finish.
The high heat caramelizes the sauce and creates that gorgeous, slightly charred exterior. Watch them closely during this step because sauce can burn quickly. You want a glossy, sticky glaze, not blackened sauce.
Step 6: Rest And Serve
Take the ribs out of the oven and let them rest for 10 to 15 minutes. This resting period allows the juices to redistribute throughout the meat. If you cut into them too soon, the juices will run out and the ribs will be drier.
Slice between the bones and serve immediately. Pair them with coleslaw, cornbread, baked beans, or whatever sides you love. These oven ribs pair perfectly with a cold drink and good company.
Best Oven Temperatures And Cook Times For Ribs
Getting the temperature and timing right is the most important part of how to cook ribs in the oven fast with foil. Too high and the meat dries out. Too low and it takes forever. Here is a quick reference guide to help you nail it every time.
| Rib Type | Oven Temp | Foil Cook Time | Final Glaze Time | Total Time |
|---|---|---|---|---|
| Pork Baby Back Ribs | 275°F | 2 – 2.5 hours | 10 – 15 minutes | About 2.5 hours |
| Pork Spare Ribs | 275°F | 2.5 – 3 hours | 10 – 15 minutes | About 3 hours |
| Beef Back Ribs | 275°F | 3 – 3.5 hours | 10 – 15 minutes | About 3.5 hours |
| Beef Short Ribs | 300°F | 2.5 – 3 hours | 5 – 10 minutes | About 3 hours |
These times are guidelines. Every oven is slightly different, and every rack of ribs varies in thickness. Always use a meat thermometer to check doneness. The internal temperature of 195°F to 205°F is your best indicator that the ribs are ready.
Quick Tips For Perfect Temperature Control
- Use the middle rack: This ensures even heat distribution around the ribs.
- Avoid opening the oven door frequently: It drops the temperature and extends cook time.
- Rotate the pan halfway through: This compensates for any hot spots in your oven.
- Let the oven recover: If you must open the door, wait 5 minutes before checking the ribs again.
Rib Rub And Sauce Ideas For Oven Ribs
The seasoning is what takes your BBQ ribs in oven from good to outstanding. A great rub creates a flavor foundation that penetrates deep into the meat. And a good sauce adds the finishing touch that ties everything together.
Simple Sweet And Smoky Rub
Here is a basic rub recipe that works beautifully on any type of rib:
- 2 tablespoons brown sugar
- 1 tablespoon smoked paprika
- 1 tablespoon garlic powder
- 1 teaspoon onion powder
- 1 teaspoon chili powder
- 1 teaspoon black pepper
- 1 teaspoon salt
- ½ teaspoon cumin
Mix all the ingredients together and rub it generously over the ribs. The brown sugar caramelizes during cooking, creating a beautiful sticky surface. The smoked paprika adds that classic BBQ depth without needing a smoker.
Homemade BBQ Sauce
While store-bought sauce works fine, a homemade version elevates your ribs to the next level. Here is a quick and easy recipe:
- 1 cup ketchup
- 2 tablespoons apple cider vinegar
- 2 tablespoons brown sugar
- 1 tablespoon Worcestershire sauce
- 1 teaspoon garlic powder
- ½ teaspoon smoked paprika
- Salt and pepper to taste
Simmer all ingredients in a saucepan over medium heat for 10 minutes. Stir occasionally until the sauce thickens slightly. Brush it on during the final unwrapped phase of cooking. The heat caramelizes the sugars and creates a rich, glossy glaze.
Common Mistakes To Avoid When Cooking Ribs In The Oven
Even with a simple method like this, it is easy to make mistakes. Here are the most common errors people make when cooking ribs in oven fast with foil, and how to avoid them.
Skipping The Membrane Removal
This is the number one mistake home cooks make. The membrane on the back of the ribs blocks seasoning from penetrating the meat. It also creates a chewy, unpleasant texture. Always remove it before applying your rub. It takes just a few seconds and makes a noticeable difference.
Using Too Much Foil And Over-Tight Wrapping
You want the foil snug, not crushed tight. If you wrap the ribs too tightly, you squeeze out all the juices and steam. This can actually make the meat steamed rather than braised, resulting in a boiled texture instead of tender and juicy. Leave a little room inside the foil packet.
Opening The Foil Too Often
Every time you open the foil, you release precious steam and heat. This extends your cook time and can dry out the ribs. Resist the urge to check on them constantly. Trust the process and let the foil do its job. Check only once or twice during the cook.
Not Letting Ribs Rest After Cooking
Resting is not optional — it is essential. When you take ribs out of the oven, the juices inside the meat are under high pressure. Cutting too soon releases all those juices onto the cutting board instead of staying in the meat. Give them at least 10 minutes to rest before slicing.
Using Too High A Temperature
It is tempting to crank up the oven to save time. But ribs need low, steady heat to break down the connective tissue properly. Going above 325°F with the foil method can cause the meat to seize up and become tough. Stick to 275°F for the best results.
Expert Tips For Next Level Oven Ribs
Once you have mastered the basics, these expert tips will take your oven ribs to a whole new level. These are the small details that separate good ribs from absolutely incredible ones.
Use A Rib Rack For Even Cooking
A rib rack is a small metal rack designed to hold ribs upright in the oven. It allows hot air to circulate around the meat more evenly. This is especially helpful if you are cooking multiple racks at once. You can find rib racks for under fifteen dollars, and they are worth every penny.
Add Wood Chips For A Smoky Flavor
Want to add a smoky dimension without a smoker? Soak wood chips in water for 30 minutes, then wrap them in foil with a few holes poked in the top. Place the foil packet on the oven floor during the first 30 minutes of cooking. Hickory, applewood, and cherry wood chips all work wonderfully with pork ribs.
Double Rub For Extra Flavor
Apply your first layer of rub the night before cooking and refrigerate the ribs uncovered. This dries out the surface slightly, which helps create a better bark. Then apply a second layer of rub right before cooking. The double rub creates deeper, more complex flavor.
Try Different Liquids Inside The Foil
The liquid you add inside the foil packet affects the final flavor significantly. Apple cider vinegar adds tanginess. Beer adds malt notes. Bourbon adds sweetness and depth. Cola adds caramelized sweetness. Each option creates a slightly different flavor profile, so feel free to experiment.
How To Know When Ribs Are Done
Knowing when your foil wrapped ribs are perfectly done is crucial. Undercooked ribs are tough and chewy. Overcooked ribs are mushy and fall apart too easily. Here are the three best ways to check for doneness.
Method 1: The Bend Test. Pick up the rack of ribs from one end using tongs or oven mitts. If the meat cracks slightly on the surface and bends, they are done. If they bend without cracking, they need more time.
Method 2: The Toothpick Test. Insert a toothpick or skewer between two bones. If it goes in smoothly with little resistance, the ribs are tender and ready.
Method 3: The Meat Thermometer. This is the most reliable method. Insert the thermometer into the thickest part of the meat without touching bone. You are looking for an internal temperature of 195°F to 205°F. This is when the collagen has fully broken down and the meat is beautifully tender.
Storing And Reheating Leftover Ribs
Got leftovers? Good — oven ribs taste even better the next day. Store them in an airtight container in the refrigerator for up to 4 days. To reheat, wrap them in foil and warm them in the oven at 250°F for about 15 to 20 minutes. This keeps them moist and prevents the meat from drying out.
You can also freeze cooked ribs for up to 3 months. Wrap them tightly in foil and then place them in a freezer bag. Thaw overnight in the refrigerator before reheating. The foil method actually makes these ribs even better for leftovers because the meat retains its moisture so well.
Conclusion
Cooking ribs in the oven fast with foil is one of the easiest and most reliable methods for getting incredible ribs at home. It is fast, it is simple, and it produces results that rival any smoker or BBQ pit. Whether you choose pork baby backs, spare ribs, or beef ribs, the foil technique delivers tender, juicy, flavorful meat every time.
Remember the key steps — prep your ribs, use the right temperature, wrap them tightly in foil, cook low and slow, then unwrap for a crispy finish. Avoid common mistakes like skipping the membrane or opening the foil too often. With a little practice, you will be making BBQ ribs in oven like a pro.
Now it is your turn. Grab a rack of ribs, some foil, and your favorite rub. Follow this guide and enjoy delicious, fall-off-the-bone ribs in less than half the time you thought possible. Your family and guests will be impressed, and you will wonder why you ever bothered waiting for a smoker. Happy cooking!
Frequently Asked Questions
Can I use regular aluminum foil instead of heavy-duty foil?
Yes, you can, but heavy-duty foil is recommended because it is stronger and less likely to tear during cooking. Regular foil can develop holes when you are wrapping and unwrapping hot ribs. If you only have regular foil, simply double-wrap the ribs for extra durability and to keep the steam sealed in properly.
How long does it take to cook ribs in the oven with foil at 275°F?
Pork baby back ribs typically take 2 to 2.5 hours at 275°F when wrapped in foil. Spare ribs need about 2.5 to 3 hours. Beef ribs may require 3 to 3.5 hours. Always use a meat thermometer to check doneness. The internal temperature should reach 195°F to 205°F for perfectly tender ribs.
Do I need to flip the ribs while cooking them in foil?
No, you do not need to flip the ribs while they are wrapped in foil. The steam and heat circulate evenly around the meat inside the sealed packet. However, you can rotate the pan halfway through cooking if your oven has hot spots. Once you unwrap the ribs for the final glaze, you may want to flip them meat-side up for even browning.
Can I cook ribs in the oven with foil without any sauce?
Absolutely. Many people prefer their ribs without sauce, especially when using a great rub. The foil method works perfectly for unsauced ribs. The rub caramelizes naturally during cooking, creating a flavorful bark. You can always serve sauce on the side for those who want it, or skip it entirely and let the seasoning shine.
What is the best liquid to add inside the foil when cooking ribs?
Apple cider vinegar is a popular choice because it adds a subtle tang that complements pork. Apple juice works well for a sweeter flavor. Beer adds a malty depth. Even plain water or broth works fine. The liquid creates steam that keeps the ribs moist during cooking. Choose based on your flavor preferences and what you have on hand.
Can I cook ribs in the oven with foil on a baking sheet instead of a roasting pan?
Yes, a baking sheet works perfectly fine for this method. Just line it with foil for easy cleanup and place a wire rack on top if you have one. The rack allows air to flow underneath the ribs, promoting more even cooking. If you do not have a rack, the ribs will still cook beautifully directly on the baking sheet — just be careful when flipping or moving them at the end.