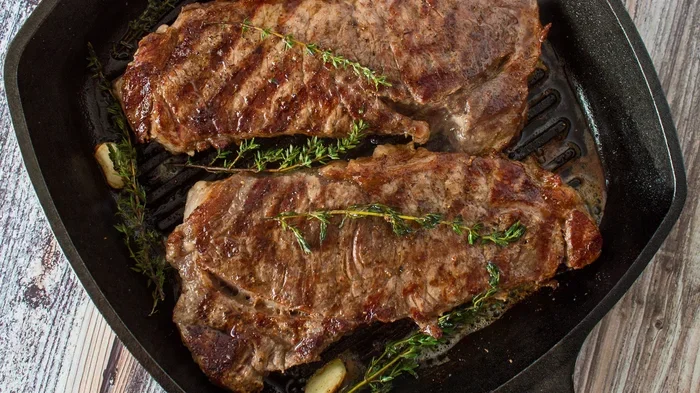
How To Cook A Perfect NY Strip Steak In The Oven Today
Cooking a NY Strip Steak in the oven is easier than you think. This guide walks you through every step, from seasoning to slicing. You will learn how to get a crispy crust, a juicy pink center, and restaurant-quality flavor right in your kitchen. Whether you are a beginner or a seasoned cook, these methods work every time.
There is something truly special about a perfectly cooked NY Strip Steak fresh out of the oven. The sizzle when it hits the pan. The gorgeous brown crust that forms on the outside. And then, that first bite — juicy, tender, and packed with beefy flavor. If you have been wondering how to get restaurant-quality steak at home, you are in the right place. This guide will show you exactly how to cook a NY Strip Steak in the oven like a pro.
Many people think cooking steak in the oven is complicated. They picture fancy restaurants with expensive equipment and years of training. But here is the truth — it is much simpler than you think. With the right cut, the right tools, and a little patience, you can make an incredible oven-broiled steak that rivals anything on a restaurant menu. I have been cooking steaks for years, and the methods I am about to share work every single time.
In this article, you will learn everything you need to know. We will cover how to pick the best thick cut steak, what tools you need, two proven cooking methods, and how to get the perfect level of doneness. By the end, you will feel confident enough to cook a juicy steak for yourself, your family, or even guests. Let us get started.
Key Takeaways
- Choose the right cut: A thick NY Strip Steak (1.5 inches or more) gives the best oven results.
- Bring steak to room temperature: Letting it sit out for 30-45 minutes ensures even cooking throughout.
- Use a cast iron skillet: It holds heat beautifully and creates an amazing crispy crust.
- Check internal temperature: A meat thermometer is the single most important tool for perfect doneness every time.
- Always rest your steak: Letting it rest for 5-10 minutes keeps all those delicious juices locked inside.
- Season simply but well: Salt, pepper, garlic, and fresh herbs go a long way with a quality cut of beef.
- The reverse sear method works great: Low oven heat followed by a hot pan sear gives you perfect edge-to-edge doneness.
📑 Table of Contents
- Why Cook NY Strip Steak In The Oven?
- Choosing the Right NY Strip Steak
- Tools and Ingredients You Will Need
- Two Proven Methods for Cooking NY Strip Steak In The Oven
- Understanding Steak Doneness and Internal Temperatures
- Resting and Serving Your NY Strip Steak
- Common Mistakes to Avoid When Cooking NY Strip Steak
- Quick Tips for the Perfect NY Strip Steak Every Time
- Final Thoughts on Cooking NY Strip Steak In The Oven
Why Cook NY Strip Steak In The Oven?
The NY Strip Steak is one of the most popular cuts of beef for a reason. It comes from the short loin area of the cow, which means it is naturally tender and full of flavor. Unlike some cuts that need a lot of work to become delicious, a bone-in steak or boneless strip steak is ready to shine with minimal effort.
Benefits of Oven Cooking
Cooking steak in the oven offers several advantages over other methods:
- Even heat distribution: The oven surrounds the steak with consistent heat, which means it cooks more evenly than a grill or open flame.
- Better control: You can set a precise oven temperature and monitor the process closely. This is especially helpful for thicker cuts.
- Hands-off cooking: Once your steak is in the oven, you can focus on sides, drinks, or just relaxing.
- Great for busy nights: The reverse sear method is perfect for weeknight dinners because it is mostly hands-off.
- Consistent results: When you follow the steps, you get the same great outcome every time.
The NY Strip Steak also has a nice amount of marbling — those thin white lines of fat running through the meat. This marbling melts during cooking and keeps the steak moist and flavorful. It is what separates a great steak from an average one.
Choosing the Right NY Strip Steak
Not all steaks are created equal. The first step to a perfect oven-broiled steak starts at the butcher counter or grocery store. Here is what you need to look for when picking out your beef steak.
Thickness Matters
For oven cooking, thickness is everything. You want a thick cut steak that is at least 1.5 inches thick. Thinner steaks can overcook quickly in the oven, and you will end up with a dry, tough piece of meat. A 2-inch thick NY Strip Steak is the sweet spot. It gives you enough room to get a beautiful crust without overcooking the inside.
Marbling and Color
Look for a steak with fine marbling throughout. The fat should look white or creamy, not yellow. Yellow fat usually means the cow was older, which can affect the texture. The meat itself should be a deep red color with a fresh appearance. Avoid steaks that look brown or gray, as this means they have been sitting too long.
Bone-In vs Boneless
You can use either a bone-in steak or a boneless NY Strip Steak. Bone-in steaks have a bit more flavor because the bone conducts heat slowly and evenly. Boneless steaks are easier to slice and serve. Both work great in the oven. Choose whichever you prefer.
| Feature | Bone-In | Boneless |
|---|---|---|
| Flavor | Slightly more beefy | Clean, pure beef taste |
| Even Cooking | Bone slows heat, more forgiving | Cooks a bit faster |
| Slicing Ease | Need to work around bone | Easy, uniform slices |
| Presentation | Rustic, impressive look | Clean, modern look |
| Price | Usually slightly more | Often more affordable |
Tools and Ingredients You Will Need
One of the best things about cooking a NY Strip Steak in the oven is that you do not need fancy equipment. A few basic tools will get you excellent results.
Essential Tools
- Cast iron skillet: This is the gold standard for searing steak. It holds heat incredibly well and creates an even, beautiful crust. If you do not have one, a heavy stainless steel pan works too.
- Meat thermometer: This is non-negotiable. A meat thermometer takes all the guesswork out of cooking. You will know exactly when your steak has reached the perfect internal temperature.
- Oven-safe pan or baking sheet: For the reverse sear method, you need a pan that can go from oven to stovetop.
- Tongs: You will use these to flip the steak without piercing it and losing juices.
- Aluminum foil: For resting the steak after cooking.
Simple Seasoning
When it comes to steak seasoning, less is more. A quality cut of beef does not need much to shine. Here is what I use:
- Kosher salt: About 1 teaspoon per side. Salt draws out moisture and then gets reabsorbed, seasoning the meat from the inside.
- Freshly cracked black pepper: About 1/2 teaspoon per side. Fresh pepper has more flavor than pre-ground.
- Garlic powder or fresh minced garlic: Just a small pinch adds depth.
- Fresh herbs (optional): Thyme or rosemary sprigs can be added during the final sear for extra aroma.
- Butter (optional): A tablespoon of butter during the last 30 seconds of searing adds richness and a butter baste effect.
Keep your steak seasoning simple and let the quality of the meat speak for itself. The goal is to enhance the natural flavor, not mask it.
Two Proven Methods for Cooking NY Strip Steak In The Oven
There are two main ways to cook a NY Strip Steak in the oven. Both methods produce fantastic results. I will walk you through each one step by step so you can choose the one that fits your style and schedule.
Method 1: The Sear and Bake (Classic Method)
This is the traditional approach. You sear the steak on the stovetop first to develop a crispy crust, then transfer it to the oven to finish cooking gently. This method works beautifully for steaks that are 1.5 to 2 inches thick.
Step-by-step instructions:
- Preheat your oven to 400°F (200°C). This is the ideal oven temperature for the sear and bake method.
- Take the steak out of the fridge 30-45 minutes before cooking. Letting it reach room temperature is crucial. A cold steak in a hot oven will cook unevenly, with the outside overcooked and the center still cold.
- Pat the steak dry with paper towels. Dry surface = better crust. Moisture is the enemy of a good sear.
- Season generously with salt, pepper, and any other desired spices. Do this right before cooking for the best results.
- Heat your cast iron skillet over medium-high heat until it is smoking hot. Add a high-smoke-point oil like avocado oil or grapeseed oil.
- Place the steak in the skillet and do not touch it for 2-3 minutes. Let the crust form. You will hear a satisfying sizzle.
- Flip the steak and add butter and herbs if using. Tilt the pan and spoon the melted butter over the steak for 30 seconds.
- Transfer the entire skillet to the preheated oven. Bake for 6-10 minutes depending on thickness and desired doneness.
- Check the internal temperature with a meat thermometer. This is the only reliable way to know your steak is done perfectly.
- Remove and let the steak rest on a cutting board for 5-10 minutes. This step is absolutely essential.
Method 2: The Reverse Sear (Low and Slow)
The reverse sear method is my personal favorite. You cook the steak slowly in the oven first, then finish it with a quick, intense sear in a hot pan. The result is a steak that is perfectly pink from edge to edge with an incredible crispy crust.
Step-by-step instructions:
- Preheat your oven to 275°F (135°C). This low temperature gently brings the steak up to the target internal temperature without overcooking the edges.
- Remove the steak from the fridge 45 minutes to 1 hour before cooking. The longer room temperature rest helps with even cooking.
- Season the steak with salt, pepper, and any desired spices. Keep it simple.
- Place the steak on a wire rack set over a baking sheet. The wire rack allows air to circulate around the steak for even cooking.
- Put the steak in the oven and cook until it reaches about 10-15 degrees below your target doneness temperature. For example, if you want medium-rare (130°F), pull the steak out at 115-120°F.
- Remove the steak and let it rest briefly while you heat your cast iron skillet to the highest heat possible.
- Sear the steak for 45-60 seconds per side. Add a little oil and butter to the pan. You will get an amazing crispy crust in a very short time.
- Check the final internal temperature and remove from heat.
- Let the steak rest for 5-10 minutes before slicing.
Which Method Should You Choose?
Both methods produce excellent results. Here is a quick comparison to help you decide:
- Sear and Bake: Best for weeknight dinners when you want a faster cook time. Total time is usually 15-20 minutes.
- Reverse Sear: Best when you want perfect edge-to-edge doneness with no gray band. Total time is 25-35 minutes, but the results are slightly more impressive.
- For thick steaks (2+ inches): The reverse sear is hard to beat.
- For thinner steaks (1-1.5 inches): The sear and bake method works better because the reverse sear can dry out thinner cuts.
Understanding Steak Doneness and Internal Temperatures
Knowing your steak doneness temperatures is the key to cooking a NY Strip Steak exactly the way you like it. Many people guess, but a meat thermometer removes all guesswork. Here is a clear guide:
Temperature Guide for NY Strip Steak
- Rare: 120-125°F internal temperature. Cool red center. Very soft texture.
- Medium Rare: 130-135°F internal temperature. Warm red center. This is the most popular and recommended doneness for NY Strip Steak.
- Medium: 140-145°F internal temperature. Pink center with a hint of gray. Slightly firmer texture.
- Medium Well: 150-155°F internal temperature. Little pink left. Much firmer.
- Well Done: 160°F and above. Gray throughout. Very firm. Not recommended for NY Strip Steak as it loses a lot of juiciness.
Medium-rare is the sweet spot for NY Strip Steak. It brings out the best balance of juiciness, tenderness, and beefy flavor. The juicy steak experience is hard to beat at this level of doneness. If you are new to cooking steak, start with medium-rare and adjust from there in future cooks.
Remember: Carryover Cooking
Here is an important detail many beginners miss. Your steak’s internal temperature will rise 5-10 degrees after you remove it from the heat. This is called carryover cooking. So if you pull your steak at 125°F, it will reach about 130-135°F while resting. Always pull your steak a few degrees below your target temperature to account for this.
Resting and Serving Your NY Strip Steak
The resting step is just as important as the cooking step. When you take your NY Strip Steak out of the oven or skillet, the juices inside are under pressure. If you cut into it immediately, all those flavorful juices will run out onto the cutting board instead of staying in the meat.
How Long to Rest
Rest your steak rest time for at least 5 minutes for a thinner steak and up to 10 minutes for a thicker cut. You can tent it loosely with aluminum foil to keep it warm. Do not wrap it tightly, as that will trap steam and soften the crust you worked so hard to create.
How to Slice
When it is time to serve, use a sharp knife and slice against the grain. The grain is the direction of the muscle fibers. Cutting against them makes each slice shorter and much more tender. If you cut with the grain, even a perfectly cooked steak will be chewy and tough.
Serving Suggestions
Here are some easy sides that pair beautifully with NY Strip Steak:
- Creamy mashed potatoes: A classic pairing that complements the rich beef flavor.
- Roasted vegetables: Asparagus, broccoli, or carrots roasted with olive oil and salt.
- Garlic butter mushrooms: Sautéed mushrooms with butter and garlic are a steak lover’s dream.
- Simple side salad: Fresh greens with a light vinaigrette cut through the richness of the steak.
- Crispy fries or onion rings: For a more indulgent, comfort-food style meal.
The beauty of NY Strip Steak is that it pairs well with almost anything. Keep your sides simple so the steak remains the star of the plate.
Common Mistakes to Avoid When Cooking NY Strip Steak
Even experienced cooks make mistakes. Here are the most common ones I see, and how to avoid them:
Mistake 1: Cooking a Cold Steak
Never put a cold steak straight from the fridge into a hot oven or pan. The outside will burn before the inside cooks. Always let your steak come to room temperature first. This simple step makes a huge difference in even cooking.
Mistake 2: Skipping the Dry Surface
Moisture is the enemy of a good sear. If your steak is wet, it will steam instead of sear. Always pat it dry thoroughly with paper towels before seasoning and cooking.
Mistake 3: Not Using a Meat Thermometer
guessing the doneness of a steak by time alone is unreliable. Every oven, every pan, and every steak is different. A meat thermometer is the only way to guarantee perfect results every time. It is a cheap tool that completely transforms your cooking.
Mistake 4: Cutting Into the Steak Too Early
Resist the urge to peek inside your steak while it is resting. Every time you cut into it, you release precious juices. Trust the process and let it rest undisturbed.
Mistake 5: Over-Salting at the Wrong Time
Salt your steak at least 40 minutes before cooking, or right right before. If you salt it and then leave it sitting for an hour, the salt draws out moisture and then reabsorbs, which actually improves the texture. But salting too long before or too late can cause issues. When in doubt, salt right before cooking.
Quick Tips for the Perfect NY Strip Steak Every Time
Here are some quick tips I swear by for consistently amazing results:
- Buy your steak from a reputable butcher whenever possible. The quality of the meat makes a noticeable difference.
- Preheat your oven fully before putting the steak in. An oven that is not up to temperature will cook the steak unevenly.
- Let your cast iron skillet get ripping hot before adding the steak. The sizzle should be immediate and loud.
- Do not move the steak while it sears. Let it sit undisturbed to develop that beautiful crispy crust.
- Use a wire rack for the reverse sear. It promotes air circulation and prevents the bottom from getting soggy.
- Write down your cook times for your specific oven and pan. Over time, you will build a personal reference that makes cooking effortless.
- Experiment with finishing flavors. A butter baste with fresh thyme and rosemary takes your steak to the next level.
These small details add up to make a big difference. They separate a good steak from an unforgettable one.
Final Thoughts on Cooking NY Strip Steak In The Oven
Cooking a NY Strip Steak in the oven is one of the most rewarding things you can do in the kitchen. It does not require expensive equipment or years of practice. It just requires the right cut of meat, a little patience, and attention to detail.
The reverse sear method and the sear and bake method both deliver fantastic results. Pick whichever fits your schedule and comfort level. Use a meat thermometer to nail the internal temperature every time. Let your steak rest properly before slicing. And serve it with simple sides that let the juicy steak shine.
Once you master this technique, you will never go back to dry, overcooked steak again. You will have the confidence to cook a flavorful steak that impresses everyone at the table. So go ahead, pick up a beautiful NY Strip Steak from your local butcher, and give it a try. You will be amazed at what you can create in your own kitchen.
Good luck, and happy cooking. Your perfect oven-broiled steak is just a few steps away.
Frequently Asked Questions
What is the best oven temperature for cooking NY Strip Steak?
For the sear and bake method, preheat your oven to 400°F (200°C). For the reverse sear method, set your oven to 275°F (135°C). Both temperatures work well depending on the method you choose. The lower temperature in the reverse sear gives you more control over steak doneness.
How long should I cook a 2-inch NY Strip Steak in the oven?
In a 400°F oven using the sear and bake method, a 2-inch steak typically needs 6-10 minutes after searing. For the reverse sear at 275°F, it takes about 20-25 minutes to reach the target temperature. Always use a meat thermometer to check the internal temperature rather than relying on time alone.
Do I need to sear the NY Strip Steak before putting it in the oven?
It depends on the method. The sear and bake method starts with a hot pan sear on the stovetop, then moves to the oven. The reverse sear method does the opposite — oven first, then a quick sear at the end. Both methods produce a beautiful crispy crust and a juicy interior.
How do I know when my NY Strip Steak is done?
The only reliable way to know your steak is done is by checking the internal temperature with a meat thermometer. For medium-rare, aim for 130-135°F. Remember that the temperature will rise 5-10 degrees during the steak rest time due to carryover cooking.
Can I cook a frozen NY Strip Steak in the oven?
It is best to thaw your steak before cooking for even results. If you cook from frozen, the outside will overcook before the inside thaws. If you must cook from frozen, use the reverse sear method at a lower temperature and allow extra time. However, thawing in the fridge overnight gives you the best juicy steak results.
What is the best way to rest a NY Strip Steak after cooking?
Place your cooked steak on a cutting board and loosely tent it with aluminum foil. Let it rest for 5-10 minutes depending on thickness. This allows the juices to redistribute throughout the meat. Do not wrap it tightly, as trapped steam will soften the crispy crust you worked hard to create.