How To Clean A Microwave Oven With Vinegar Easily
Learning how to clean a microwave oven with vinegar is one of the easiest and most affordable cleaning hacks you can use. Vinegar cuts through grease, removes food splatters, and eliminates stubborn odors in minutes. You only need white vinegar, water, and a microwave-safe bowl to get started. This guide walks you through every step with clear instructions and helpful tips. You will have a sparkling clean microwave in no time.
Have you ever opened your microwave and seen a mess of splattered food staring back at you? It happens to everyone. Spicy pasta sauce, popped popcorn grease, and leftover soup splashes can build up fast. A dirty microwave not only looks bad but can also affect how well your microwave oven works. The good news is that you do not need expensive cleaners to fix this.
How to clean a microwave oven with vinegar is a question many homeowners ask, and for good reason. White vinegar is cheap, safe, and incredibly effective. It cuts through grease, lifts stains, and kills odor-causing bacteria. Best of all, you probably already have it in your kitchen pantry. In this guide, you will learn the exact steps, helpful tips, and common mistakes to avoid.
Whether your microwave is covered in splatters or just needs a quick refresh, vinegar makes the job simple. You can have a spotless microwave in under fifteen minutes. Let us dive in and show you how.
Key Takeaways
- Vinegar is a powerful, natural cleaner that breaks down grease and grime inside your microwave without toxic chemicals.
- The steam method is the fastest way to loosen stuck-on food and make wiping easy.
- You only need a few household items like white vinegar, water, a microwave-safe bowl, and a soft cloth.
- Regular cleaning prevents buildup and keeps your microwave smelling fresh every day.
- Adding lemon juice boosts the cleaning power and leaves a pleasant citrus scent behind.
- Don’t forget the turntable, door, and exterior — these areas collect dirt too.
📑 Table of Contents
- Why Vinegar Is the Best Cleaner for Your Microwave
- What You Need Before You Start
- Step-by-Step Guide to Cleaning Your Microwave With Vinegar
- How to Remove Tough Stains and Odors
- Cleaning the Outside and Accessories
- How Often Should You Clean Your Microwave
- Common Mistakes to Avoid When Cleaning Your Microwave
- Expert Insights on Microwave Cleaning
- Key Takeaways
- Frequently Asked Questions
- Conclusion
Why Vinegar Is the Best Cleaner for Your Microwave
Before we get into the steps, let us talk about why vinegar works so well. Vinegar cleaning has been a household staple for decades, and there is solid science behind it. White distilled vinegar contains acetic acid, which is a natural solvent. This means it can dissolve grease, grime, and food residue without scratching surfaces.
Here are some reasons why vinegar is perfect for microwave cleaning:
- It is all-natural and free from harsh chemicals. You do not have to worry about toxic fumes inside your kitchen.
- It is inexpensive. A bottle of white vinegar costs just a few dollars and lasts for many cleaning sessions.
- It kills bacteria. Studies show that vinegar can reduce common household germs by up to 99 percent.
- It removes odors effectively. If your microwave smells like last night’s fish dinner, vinegar neutralizes those smells quickly.
- It is safe for most surfaces. Unlike some chemical cleaners, vinegar will not damage the interior walls of your microwave interior.
When you combine vinegar with steam, the cleaning power doubles. The steam softens dried food splatters, making them easy to wipe away. This steam and vinegar combination is the foundation of the method we will walk you through next.
How Vinegar Compares to Commercial Cleaners
Many people reach for store-bought microwave cleaners when they see a mess. While these products work, they often contain strong chemicals that can leave behind residues. You do not want those residues touching your food. Vinegar offers a safer alternative that works just as well, if not better.
Commercial cleaners can also be expensive. A single bottle might cost five to ten dollars, and you use only a small amount each time. Vinegar, on the other hand, costs less than two dollars per bottle and goes a long way. For eco-friendly cleaning enthusiasts, vinegar is a clear winner.
What You Need Before You Start
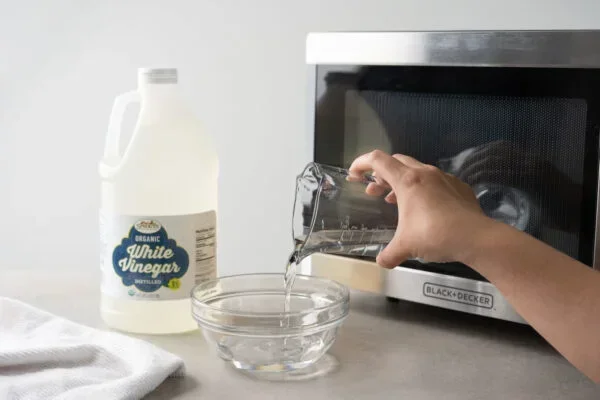
One of the best things about this method is how simple it is. You do not need a lot of supplies. Everything you need is probably already in your kitchen. Here is your shopping list for microwave maintenance:
- White distilled vinegar — one cup is plenty for a single cleaning session.
- Water — two cups of water mixed with the vinegar.
- A microwave-safe bowl — glass or ceramic works best. Make sure it is labeled microwave safe.
- A clean cloth or sponge — a soft microfiber cloth is ideal for wiping without scratching.
- A small bowl of warm water — for cleaning the turntable and other removable parts.
- Mild dish soap — optional, for washing detachable parts by hand.
- Lemon juice — optional, but it adds extra cleaning power and a fresh scent.
That is it! You do not need special tools or expensive products. This is what makes how to clean a microwave oven with vinegar such a popular cleaning hack. Anyone can do it, regardless of experience level.
Quick Tips Before You Begin
- Always unplug your microwave before cleaning the interior or exterior.
- Never use metal bowls or metal scrubbers inside the microwave.
- If your microwave has a charcoal filter on the back, remove it before cleaning.
- Wear gloves if you have sensitive skin, even though vinegar is gentle.
Step-by-Step Guide to Cleaning Your Microwave With Vinegar
Now let us get to the fun part. Follow these steps carefully, and your microwave will look and smell brand new. This method works for all types of microwaves, including countertop models and over-the-range units.
Step One: Prepare the Vinegar Solution
Start by pouring one cup of white vinegar into a microwave-safe bowl. Then add two cups of water. Stir the mixture gently. If you want extra cleaning power, squeeze half a lemon into the solution. The lemon adds citric acid, which helps break down grease even faster.
Place the bowl on the turntable inside the microwave. Make sure the turntable is seated properly so it can rotate freely during the heating process.
Step Two: Heat the Solution
Close the microwave door and turn the appliance on high power. Let it run for three to five minutes. You want the solution to boil vigorously and produce a lot of steam. The steam is what does the heavy lifting here.
During this time, the steam will coat the walls, ceiling, and floor of the microwave interior. It loosens dried food splatters, grease spots, and stubborn stains. After three to five minutes, carefully open the door. Be careful — the bowl and the steam will be very hot.
Step Three: Let It Sit
Leave the door closed for two to three minutes after heating. This allows the steam to continue working on the grime. The trapped steam inside the microwave softens even the toughest baked-on food residue. This waiting period is the secret to making microwave cleaning so effortless.
Step Four: Wipe Down the Interior
After waiting, carefully remove the bowl. Use a damp cloth or sponge to wipe the walls, ceiling, and floor of the microwave. The softened grime should come off easily. You may need to apply a little gentle pressure on stubborn spots, but most stains will wipe away without much effort.
If you still see some microwave stains that refuse to budge, dip your cloth in the leftover vinegar solution and scrub gently. For really tough grease stains, you can make a paste with baking soda and a little water. Apply it to the stain, let it sit for a few minutes, then wipe it off.
Step Five: Clean the Turntable and Accessories
Remove the turntable and any other removable parts from the microwave. Wash them in warm, soapy water. Use a soft sponge to scrub away any food residue. Rinse them thoroughly and dry them with a clean towel before placing them back inside.
If the turntable has stuck-on food, soak it in warm water for ten minutes before scrubbing. This softens the grime and makes cleaning much easier.
Step Six: Wipe the Exterior
Do not forget the outside of your microwave! Use a damp cloth with a little vinegar solution to wipe down the exterior surfaces. Pay special attention to the handle, the door edges, and the control panel. These areas collect fingerprints, grease, and dust throughout the day.
For the microwave door glass, spray a little vinegar solution directly onto the glass and wipe it clean with a microfiber cloth. This leaves the glass streak-free and sparkling.
How to Remove Tough Stains and Odors
Sometimes, regular cleaning is not enough. You might face baked-on food, stubborn grease, or lingering odors that just will not go away. Here are some advanced tips to handle these challenges.
Dealing with Baked-On Food
Baked-on food is the worst kind of microwave stains. It happens when you heat food for too long or forget to cover your dish. To remove baked-on residue, try this method:
- Mix two tablespoons of baking soda with one tablespoon of water to form a paste.
- Apply the paste directly to the stubborn stain.
- Let it sit for ten to fifteen minutes.
- Dampen a cloth with vinegar and scrub the area gently.
- The chemical reaction between the baking soda and vinegar helps lift the stain away.
This method works because the baking soda acts as a mild abrasive, while the vinegar dissolves the grease. Together, they form a powerful cleaning solution that tackles even the worst messes.
Eliminating Lingering Odors
Odor removal is one of the biggest benefits of using vinegar. If your microwave smells bad after heating fish or strong-smelling foods, here is what to do:
- Heat a bowl of pure vinegar (no water) in the microwave for two minutes.
- Leave the door closed for another five minutes after heating.
- Wipe the interior with a damp cloth.
- The vinegar will neutralize the odor molecules trapped inside the microwave interior.
For extra freshness, you can also place a small bowl of activated charcoal inside the microwave overnight. Charcoal absorbs odors naturally and works wonders for persistent smells.
Preventing Future Buildup
The best way to keep your microwave clean is to prevent buildup in the first place. Here are some simple habits that make a big difference:
- Always cover your food with a microwave-safe lid or a paper towel when heating.
- Wipe up spills immediately before they have time to harden and stick.
- Heat food in short intervals to prevent splattering.
- Do not overheat liquids — they can bubble over and create a mess.
- Do a quick wipe-down once a week to keep things fresh.
These small habits will save you a lot of deep cleaning time in the long run. They are the foundation of good microwave maintenance and keep your kitchen appliance looking and working its best.
Cleaning the Outside and Accessories
While the interior gets most of the attention, the outside and accessories of your microwave need care too. A clean exterior not only looks better but also extends the life of the appliance.
The Turntable and Roller Ring
The turntable is the glass plate that rotates inside the microwave. It takes a lot of abuse from hot food and spills. To clean it properly:
- Remove the turntable and the roller ring underneath it.
- Soak both pieces in warm, soapy water for five to ten minutes.
- Scrub them gently with a non-abrasive sponge.
- Rinse thoroughly and dry completely before reassembling.
If the turntable has a strong odor, soak it in a solution of one part vinegar to four parts warm water. This will neutralize any trapped smells.
The Door and Seal
The microwave door seal is a spot where dirt and grime love to hide. Over time, food particles can build up along the rubber seal, which can affect the door’s ability to close properly. To clean it:
- Dip a cloth in vinegar solution and wring it out so it is damp, not dripping.
- Wipe along the entire length of the door seal carefully.
- Use a cotton swab dipped in vinegar to reach tight corners and crevices.
- Dry the seal with a clean, dry cloth afterward.
Keeping the door seal clean ensures your microwave operates efficiently and safely. A dirty seal can cause energy loss and uneven heating.
The Control Panel
The control panel is another area that gets dirty fast from frequent touching. Use a lightly dampened cloth with a few drops of vinegar to wipe it down. Avoid spraying liquid directly onto the panel — always apply the solution to the cloth first. This prevents moisture from seeping into the electronics.
How Often Should You Clean Your Microwave
Consistency is key when it comes to microwave cleaning. A quick cleaning session once a week takes only five minutes and prevents buildup from becoming a major chore. Here is a simple schedule you can follow:
- Daily: Wipe up any spills immediately after they happen.
- Weekly: Do a quick wipe-down of the interior with a damp cloth.
- Monthly: Perform the full vinegar steam cleaning method described in this guide.
- Quarterly: Deep clean the exterior, door seal, and all removable parts.
Following this schedule keeps your microwave in top condition and ensures it continues to heat food evenly. A well-maintained kitchen appliance also lasts longer, saving you money in the long run.
Remember, the longer you wait to clean, the harder the job becomes. Food splatters that sit for days can harden and bond to the surfaces, making them much more difficult to remove. Stay on top of it, and how to clean a microwave oven with vinegar will always be a quick and easy task.
Common Mistakes to Avoid When Cleaning Your Microwave
Even with a simple method like vinegar cleaning, people make mistakes that can cause problems. Here are some common errors to watch out for:
- Using the wrong type of vinegar. Stick with white distilled vinegar. Apple cider vinegar or other varieties can leave behind residues or discolor the interior.
- Skipping the steam step. Some people try to wipe the microwave dry without steaming first. This is much harder and less effective. The steam is what loosens the grime.
- Using abrasive scrubbers. Steel wool or harsh scrub brushes can scratch the microwave interior. Always use soft cloths or sponges.
- Not unplugging the microwave. Safety should always come first. Unplug the appliance before cleaning to avoid any electrical hazards.
- Using too much water. Excess water can drip into the vents or onto the electrical components. Use damp cloths, not soaking wet ones.
Avoiding these mistakes ensures your deep clean goes smoothly and safely. It also protects your microwave from damage.
Expert Insights on Microwave Cleaning
Professional cleaning experts agree that vinegar is one of the most effective and versatile household cleaners available. According to cleaning specialists, the steam method is the gold standard for microwave cleaning because it works with the appliance’s own heating system to loosen dirt. You are essentially using the microwave to clean itself.
Experts also recommend adding a few drops of essential oil to the vinegar solution if you want a pleasant scent. Lavender, tea tree, and orange essential oils all work well. However, the essential oil is purely for fragrance — it does not add cleaning power.
Another expert tip is to clean your microwave right after using it. If you notice a spill while the food is still warm, wipe it up immediately. The warmth makes the residue soft and easy to remove. This habit alone can cut your cleaning time in half over the long run.
Key Takeaways
- Vinegar is a powerful, natural cleaner that breaks down grease and grime inside your microwave without toxic chemicals.
- The steam method is the fastest way to loosen stuck-on food and make wiping easy.
- You only need a few household items like white vinegar, water, a microwave-safe bowl, and a soft cloth.
- Regular cleaning prevents buildup and keeps your microwave smelling fresh every day.
- Adding lemon juice boosts the cleaning power and leaves a pleasant citrus scent behind.
- Don’t forget the turntable, door, and exterior — these areas collect dirt too.
Frequently Asked Questions
Can I use apple cider vinegar instead of white vinegar?
You can, but white distilled vinegar is recommended for microwave cleaning. Apple cider vinegar has a darker color and a stronger smell that can leave residues or discolor the interior. White vinegar is clear, odorless after drying, and works just as effectively for steam cleaning your microwave oven.
Is it safe to heat vinegar inside the microwave?
Yes, it is completely safe. Heating vinegar with water creates steam that loosens grime and sanitizes the interior. Just make sure you use a microwave-safe bowl and do not let the solution boil over. The steam can be hot when you open the door, so use caution and wear oven mitts if needed.
How long does the vinegar smell last after cleaning?
The vinegar smell fades quickly, usually within thirty minutes to an hour after cleaning. If you want to speed up the process, leave the microwave door open for a few minutes after cleaning. Adding lemon juice to your vinegar solution also helps mask any remaining scent and leaves a fresh citrus aroma behind.
Can vinegar damage my microwave?
No, vinegar will not damage your microwave when used properly. It is a gentle, natural acid that is safe for the glass, plastic, and paint surfaces inside the appliance. Just avoid using vinegar on any painted exterior surfaces that are not rated for vinegar-based cleaners. Always test on a small, hidden area first if you are unsure.
How often should I clean my microwave with vinegar?
A monthly deep clean with the vinegar steam method is ideal for most households. However, if you use your microwave daily or frequently heat messy foods like soups and sauces, you may want to clean it every two weeks. A quick weekly wipe-down with a damp cloth also goes a long way in maintaining a fresh and stain-free microwave interior.
Can I mix vinegar with baking soda for extra cleaning power?
Yes! Mixing vinegar with baking soda creates a fizzing reaction that is excellent for tackling tough microwave stains and grease stains. Apply the paste to stubborn spots, let it sit for a few minutes, then wipe it away. This combination works great for deep clean sessions and removes even the most stubborn baked-on food residue.
Conclusion
How to clean a microwave oven with vinegar is a skill that everyone should know. It is simple, affordable, and incredibly effective. Vinegar tackles grease, lifts stains, removes odors, and sanitizes surfaces — all without harsh chemicals. With just a few household items and fifteen minutes of your time, you can transform a dirty, smelly microwave into a sparkling clean appliance.
The key is consistency. Regular cleaning prevents buildup and makes each session faster and easier. Follow the step-by-step guide in this article, avoid the common mistakes, and adopt the weekly maintenance habits we shared. Your microwave will stay in excellent condition for years to come.
Now that you know the secrets of vinegar cleaning, there is no excuse to let that microwave stay dirty any longer. Grab a bottle of white vinegar, follow the steps, and enjoy the satisfaction of a spotless kitchen appliance. Your microwave — and your nose — will thank you!