How To Make A Concrete Coffee Table With These Tips
Building a concrete coffee table is easier than you think. With the right materials, a simple mold, and a bit of patience, you can create a beautiful concrete coffee table that lasts for years. This guide walks you through every step from mixing to polishing.
There is something deeply satisfying about building your own furniture. A concrete coffee table brings a modern, industrial vibe into any living space. It is sturdy, stylish, and surprisingly simple to make. Whether you are a seasoned DIYer or a complete beginner, this project is well within your reach.
Concrete furniture has exploded in popularity over the past few years. People love the clean, minimalist look it brings to a room. A DIY concrete coffee table adds character and charm without breaking the bank. Plus, you get the pride of saying you built it yourself.
In this guide, we will walk you through every single step. From gathering your materials to applying the final sealant, we have you covered. You will learn the best concrete mix ratios, how to choose the right mold, and how to achieve a smooth, professional finish. Let us get started.
Key Takeaways
- Simple Materials: You only need concrete mix, a mold, and basic tools to start.
- Customization Is Key: Choose from many finishes, colors, and shapes to match your home.
- Patience Pays Off: Proper curing and sealing make your table strong and long-lasting.
- Budget-Friendly: A DIY concrete table costs a fraction of store-bought options.
- Safety First: Always wear protective gear when working with concrete.
- Maintenance Matters: Regular cleaning and resealing keep your table looking new.
📑 Table of Contents
Why Build a Concrete Coffee Table?
A concrete coffee table offers benefits that other materials simply cannot match. It is incredibly durable and can last for decades with proper care. Unlike wood, concrete does not warp, crack from humidity, or scratch easily. It also handles heavy loads with ease, making it perfect for holding books, drinks, and decorative items.
The design possibilities are nearly endless. You can create a sleek, modern look or a rustic, textured finish. Some people embed objects like stones or glass into the surface for a unique touch. The concrete tabletop can be any shape or size you want, which makes it a perfect fit for any living room.
Cost is another big advantage. Store-bought concrete tables can be expensive. But when you build one yourself, the material costs are quite low. A single bag of concrete mix can make multiple projects. This makes it a fantastic option for anyone looking to furnish their home on a budget.
Materials and Tools You Will Need
Before you start, gather everything you need. Having all your materials ready saves time and prevents frustrating delays. Here is a complete list of what you will need for your concrete coffee table build.
Concrete Mix and Aggregates
The foundation of any concrete furniture project is the mix itself. A standard concrete mix ratio of 1 part cement to 2 parts sand to 3 parts gravel works well for tabletops. You can buy pre-mixed concrete bags at most hardware stores, which makes the process much simpler.
For a lighter table, consider using a fine aggregate like crushed stone or sand only. This creates a smoother surface that is easier to finish. If you want a more textured look, coarse gravel adds character and strength. The choice depends on the style you are going for.
Mold Materials
Your mold shapes the entire table. Melamine boards are the most popular choice because they create a smooth surface on the concrete. You can build a box shape using screws and silicone caulk to seal the edges. Some makers use plastic storage bins or even cardboard boxes lined with plastic sheeting.
Make sure your mold is sturdy and level. Any wobble will result in an uneven table surface. Take your time setting up the mold because it directly affects the final result. A well-built mold means less work sanding and finishing later.
Essential Tools
You do not need a fancy workshop for this project. A few basic tools are all it takes. A drill with a mixing paddle makes blending the concrete much easier. A trowel helps you spread the mix evenly inside the mold. A level ensures your table comes out flat and even.
Other useful tools include rubber gloves, safety goggles, a dust mask, and a bucket for mixing. A float helps you smooth the surface before it sets. If you want a polished look, you will also need sandpaper in various grits and a concrete sealer.
Step-by-Step Guide to Building Your Table
Now for the fun part. Building a concrete coffee table is a straightforward process, but each step matters. Follow along carefully and you will have a beautiful piece of concrete furniture in just a few days.
Step 1: Prepare Your Workspace
Set up your workspace in a well-ventilated area. Concrete work can be messy, so cover your floor with plastic sheeting or old tarps. Wear your safety gear at all times. Concrete dust and wet mix can irritate your skin and lungs.
Make sure your workspace is level. If you are working indoors, a garage or workshop floor works great. Outdoors, choose a flat surface away from direct sunlight, which can cause the concrete to dry too quickly. Proper preparation sets you up for success.
Step 2: Build and Prepare the Mold
Construct your mold using melamine boards. Cut the boards to your desired table dimensions. A standard coffee table is about 18 to 20 inches wide and 36 to 48 inches long. Screw the boards together and seal all inside edges with silicone caulk to prevent leaks.
Before pouring, rub a thin layer of cooking oil or mold release spray on the inside surfaces. This helps the concrete release cleanly from the mold once it has cured. Take extra time on this step because it makes demolding much easier and cleaner.
Step 3: Mix the Concrete
Follow the instructions on your concrete mix bag for the water ratio. Generally, you want a consistency similar to thick pancake batter. Too much water weakens the concrete, while too little makes it hard to pour and smooth.
Use a drill mixer to blend the dry ingredients and water together. Mix until there are no dry pockets or lumps. The mix should flow smoothly but hold its shape. If you are adding color, now is the time to blend it into the wet concrete evenly.
Step 4: Pour and Vibrate the Mix
Pour the concrete into your prepared mold. Fill it to the top edge for a table with a flat top surface. Use a trowel to spread the mix and push it into all corners of the mold.
Vibrating the mix removes air bubbles that can weaken the structure and create an uneven surface. You can use a handheld concrete vibrator or simply tap the sides of the mold with a rubber mallet. Work systematically around the entire mold for the best results.
Step 5: Smooth the Surface
Once the concrete is poured, use a float to smooth the top surface. Wait until the concrete has set enough to hold its shape but is still slightly wet. This usually takes about 30 minutes to an hour, depending on the conditions.
For a polished finish, wait a bit longer and use a steel trowel. This compresses the surface and creates a sleek, smooth look. Some makers spray water on the surface and trowel repeatedly for an extra-smooth finish. Experiment to find the look you prefer.
Step 6: Cure the Concrete
Curing is the most important step for building a strong concrete coffee table. Cover the mold with plastic sheeting and let it cure for at least 48 to 72 hours. The concrete needs moisture during this time to reach its full strength.
Temperature plays a big role in curing. Just as you need to monitor conditions carefully, you should learn how to tell if your oven is not heating properly when working with any temperature-sensitive materials. Keep your curing area between 50 and 85 degrees Fahrenheit for the best results. Avoid direct sunlight and cold drafts during the curing period.
After the initial cure, remove the mold and let the table air-dry for another week. This allows the concrete to continue gaining strength and reduces the risk of cracking later.
Finishing and Sealing Your Concrete Table
Finishing is what transforms a rough concrete slab into a stunning piece of furniture. This is where your concrete coffee table really comes to life. There are several finishing options to choose from depending on the look you want.
Sanding for a Smooth Finish
Start with coarse sandpaper around 80 grit to remove any rough spots or imperfections. Gradually work your way up to finer grits like 200 or 400 for a silky-smooth surface. Wet sanding works especially well for concrete and produces less dust.
Take your time with this step. Rushing through sanding can leave swirl marks or uneven patches. A well-sanded surface takes sealant more evenly and looks much more professional in the end.
Adding Color and Texture
Concrete accepts color beautifully. You can add integral color to the mix before pouring, or apply a color hardener to the surface after pouring. Stained concrete offers rich, earthy tones that complement any decor style.
For texture, try stamping the surface while the concrete is still wet. You can use rubber stamps or even household items like burlap or leaves to create patterns. A textured concrete tabletop adds visual interest and can also provide a non-slip surface.
Applying Concrete Sealer
Sealing protects your table from stains, moisture, and daily wear. Choose a high-quality concrete sealer designed for furniture use. Apply it evenly with a roller or sprayer and let it dry completely before using the table.
Most sealers need two to three coats for full protection. Allow each coat to dry according to the manufacturer’s instructions. A good sealer not only protects the surface but also enhances the natural beauty of the concrete. It brings out the color and gives the surface a subtle sheen.
Maintaining Your Concrete Coffee Table
Once your table is complete, keeping it in great shape is simple. Regular maintenance extends the life of your concrete furniture and keeps it looking its best for years to come.
Wipe up spills quickly to prevent staining. Concrete is porous, so liquids like coffee, wine, or oil can seep in if left too long. Use a soft cloth and mild soap for routine cleaning. Avoid harsh chemical cleaners that can damage the sealer and the concrete surface underneath.
For deeper cleaning, you can use a mild concrete cleaner. If you ever deal with stubborn residue, the approach is similar to how you would handle tough oven messes. Just as you would how to clean a Whirlpool oven using gentle but effective methods, treat your concrete table with care. Avoid abrasive scrubbers and always rinse thoroughly after cleaning.
Reseal your table once a year or whenever you notice the surface looking dull or dry. This simple step makes a huge difference in maintaining the appearance and durability of your DIY creation.
Common Mistakes to Avoid
Even experienced DIYers make mistakes when working with concrete. Knowing what to avoid saves you time, money, and frustration. Here are the most common errors people make when building a concrete coffee table.
- Using too much water in the mix. This is the number one mistake. Extra water weakens the concrete and causes cracking as it dries. Always follow the recommended water-to-mix ratio on the bag.
- Skipping the curing process. Concrete needs time and moisture to reach full strength. Rushing demolding or using the table too soon leads to cracks and a weaker structure.
- Neglecting to seal the surface. Unsealed concrete stains easily and absorbs moisture. This leads to discoloration and can weaken the table over time.
- Using a flimsy mold. A weak mold can shift or collapse during pouring, ruining the shape of your table. Make sure your mold is sturdy and properly sealed.
- Not vibrating the mix enough. Air bubbles trapped in the concrete create weak spots and an unattractive surface. Take the time to vibrate or tap out all the bubbles.
- Ignoring safety precautions. Concrete is caustic when wet and produces harmful dust when dry. Always wear gloves, goggles, and a dust mask throughout the process.
Expert Tips for a Professional-Quality Finish
Want your DIY coffee table to look like it came from a boutique furniture store? These expert tips will help you achieve a polished, high-end result.
First, consider adding fiberglass mesh or steel reinforcement to your mix. This significantly increases the strength of the table and reduces the chance of cracking. It is especially important for larger tabletops that will bear heavy loads.
Second, experiment with different finishing techniques. Polishing the surface with a concrete grinder creates a stunning, glossy finish that looks almost like stone. You can also expose the aggregate by removing the top layer of cement for a natural, textured look.
Third, if you are working with colored concrete, test your mix on a small sample piece first. Colors can look very different once they dry compared to when they are wet. A small test batch saves you from ruining a full pour.
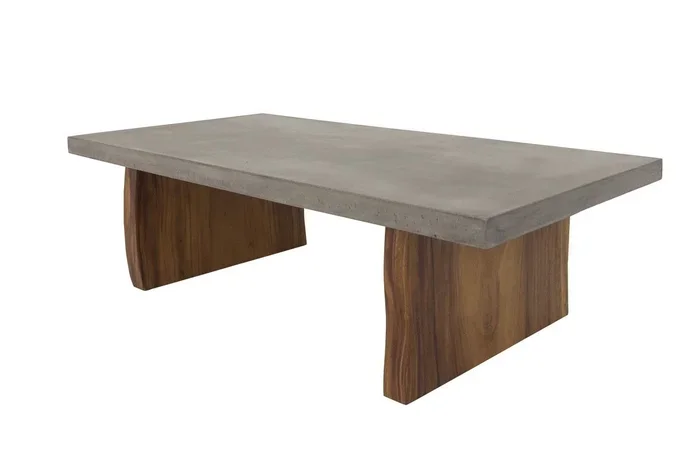
Finally, do not be afraid to get creative with the base. A concrete coffee table does not need a traditional four-leg base. Consider using hairpin legs, a wooden base, or even a single pedestal for a modern, unique look. The base is just as important as the tabletop in defining the overall style of the piece.
For those who enjoy exploring other creative uses of materials, you might also enjoy learning how to make a solar oven with aluminum foil. It is another rewarding project that shows how versatile simple materials can be when you apply a little creativity.
Key Takeaways
- Plan Your Design: Decide on size, shape, and finish before you start mixing concrete.
- Use Quality Materials: A good concrete mix and proper sealer make all the difference in durability.
- Prepare Your Mold Carefully: A well-built mold with proper release agent ensures easy demolding and a smooth finish.
- Mix and Pour with Precision: Follow the right water ratio, vibrate out air bubbles, and smooth the surface patiently.
- Cure Properly: Give your table adequate time and moisture to cure fully before demolding and using it.
- Seal and Maintain: Regular sealing and gentle cleaning keep your concrete table looking beautiful for years.
- Avoid Common Pitfalls: Too much water, skipping the cure, and ignoring safety can all compromise your project.
Building a concrete coffee table is one of the most rewarding DIY projects you can tackle. It combines creativity with practical craftsmanship and results in a piece of furniture that you will be proud to show off. The process is simpler than most people expect, and the end result is a table that is both functional and beautiful.
Start with a small practice piece if you are new to working with concrete. This helps you get comfortable with the material and the process before committing to your final project. Once you see how satisfying it is to create something with your own hands, you will want to build more.
Gather your materials, set up your workspace, and follow the steps in this guide. Your very own DIY concrete coffee table is closer than you think. Enjoy the process, take your time, and most importantly, have fun with it. The best furniture is the kind you make with your own two hands.
Frequently Asked Questions
How long does it take to make a concrete coffee table?
The actual building process takes about 2 to 3 hours on a single day. However, the concrete needs 48 to 72 hours to cure in the mold, and another week to fully air-dry after demolding. Plan for about one week from start to finish for the best results.
What kind of concrete mix should I use for a coffee table?
A standard all-purpose concrete mix works great for most coffee tables. For a smoother finish, use a mix with fine aggregate only. If you want extra strength, consider adding a fiber or mesh reinforcement to the mix. Always follow the water ratio recommended on the bag for the best consistency.
Do I need special tools to build a concrete coffee table?
No special tools are required. A drill with a mixing paddle, a trowel, a float, sandpaper, and a level are all you need. Most of these items are basic and affordable, making this a very accessible project for beginners and experienced builders alike.
Can I add color to my concrete coffee table?
Absolutely. You can add integral color to the mix before pouring, or apply a color hardener to the wet surface. Concrete stains and dyes also work well for adding rich, vibrant tones. Always test your color on a small sample first to make sure you are happy with the result before committing to the full pour.
How do I prevent cracks in my concrete coffee table?
The best way to prevent cracks is to use the correct water-to-mix ratio and not add extra water. Proper curing with consistent moisture also prevents cracking. Adding fiberglass mesh or steel reinforcement to the mix significantly increases strength and reduces the likelihood of cracks forming over time.
How often should I reseal my concrete coffee table?
Reseal your table once a year or whenever the surface starts to look dull or absorbs water during cleaning. High-quality sealers can last 12 to 18 months depending on use and exposure. Regular resealing keeps the table protected from stains and moisture damage while maintaining its beautiful appearance.