How To Cook Spare Ribs In The Oven For Perfect Results
Cooking spare ribs in the oven is easier than you think. With the right temperature, a simple rub, and a little patience, you can make restaurant-quality ribs at home. This guide walks you through every step for perfect oven-baked ribs that are tender, smoky, and full of flavor.
Key Takeaways
- Low and slow is the way to go: Cooking ribs at 275°F to 300°F ensures tender, juicy meat that pulls away from the bone easily.
- Remove the membrane first: Peeling off the thin membrane on the back of the rack lets seasoning penetrate deeper and improves texture.
- A simple rub goes a long way: Brown sugar, paprika, garlic powder, and salt create a delicious sweet and savory crust.
- Wrap in foil partway through: The foil trap method keeps moisture locked in and speeds up the cooking process.
- Use a meat thermometer: Internal temperature of 195°F to 205°F is the sweet spot for fall-off-the-bone tenderness.
- Glaze at the end: A brush of BBQ sauce in the last 15 to 20 minutes adds a caramelized, sticky finish.
- Rest your ribs before slicing: Letting them sit for 10 minutes keeps the juices inside and makes cutting easier.
📑 Table of Contents
Why Oven-Baked Spare Ribs Are Worth It
There is something magical about how to cook spare ribs in the oven. The oven gives you consistent heat, easy cleanup, and hands-off cooking. You do not need a smoker or a fancy grill. A basic home oven can produce ribs that rival any barbecue joint.
Oven-baked ribs are perfect for weeknights, holidays, and weekend gatherings. They are forgiving, and even beginners can nail them. The slow heat breaks down the collagen in the meat, turning tough cuts into tender, juicy bites. Once you master this method, you will never go back to overcooked, dry ribs again.
The best part? You can customize the flavor however you like. Whether you prefer a sweet and sticky glaze or a spicy dry rub, the oven handles it all with ease. Let us get into the details.
Ingredients and Tools You Need
Before you start, gather everything you need. Having your ingredients ready makes the whole process smoother and more enjoyable. Here is what you will want on hand.
For the Rib Rub
- 1/4 cup brown sugar
- 2 tablespoons smoked paprika
- 1 tablespoon garlic powder
- 1 tablespoon onion powder
- 1 teaspoon cumin
- 1 teaspoon black pepper
- 1 teaspoon salt
- 1/2 teaspoon cayenne pepper (optional for heat)
For the Glaze
- 1 cup BBQ sauce (your favorite brand)
- 2 tablespoons apple cider vinegar
- 1 tablespoon honey
Tools You Will Need
- A baking sheet or roasting pan
- Aluminum foil
- A sharp knife
- A meat thermometer
- Paper towels
- Basting brush
Using bone-in spare ribs gives you the best results. The bone adds flavor and protects the meat from drying out. Look for ribs with a good pink color and some marbling. Avoid ribs that look gray or dry at the store.
How To Prep Your Ribs Like a Pro
Prepping your ribs is the most important step. It sets the foundation for everything that follows. Take your time here, and the results will speak for themselves.
Removing the Membrane
Every rack of ribs has a thin, papery membrane on the bone side. This membrane does not soften during cooking. It can make your ribs chewy and blocks seasoning from reaching the meat. Removing it is simple and makes a huge difference.
Flip the ribs bone-side up. Use a butter knife to loosen the membrane at one edge. Once you have a grip, gently peel it off with a paper towel for better traction. It should come off in one piece. If it tears, just pick at the remaining bits and pull them away.
Applying the Rib Rub
Pat your ribs dry with paper towels. This helps the rub stick better. Sprinkle the rub generously over both sides of the ribs. Press it into the meat with your hands so it adheres well.
For the best flavor, let the rubbed ribs sit in the fridge for at least one hour. Overnight is even better. The salt draws out moisture and helps the seasonings sink deep into the meat. This step is what separates good ribs from great ones.
The Best Oven Temperature and Timing
Getting the temperature right is everything when you bake ribs in the oven. Too hot and the meat dries out. Too low and the cooking takes forever. The sweet spot for spare ribs is between 275°F and 300°F.
Low and Slow vs. High Heat
The low and slow method is the gold standard for oven ribs. Cooking at 275°F for about 2.5 to 3 hours gives you tender, fall-off-the-bone meat. The fat renders slowly, and the connective tissue breaks down completely.
Some people prefer a higher heat of 350°F to speed things up. This works in a pinch, but the results are different. The meat can dry out more easily, and you lose some of that melt-in-your-mouth texture. If you go this route, wrap the ribs in foil to keep them moist.
Here is a quick comparison to help you decide.
| Method | Temperature | Time | Result |
|---|---|---|---|
| Low and Slow | 275°F – 300°F | 2.5 – 3.5 hours | Tender, juicy, fall-off-the-bone |
| Moderate Heat | 325°F – 350°F | 2 – 2.5 hours | Good balance of speed and tenderness |
| High Heat | 375°F – 400°F | 1.5 – 2 hours | Firmer texture, faster cook |
For first-timers, stick with the low and slow approach. It is nearly foolproof and produces the most consistent results. Patience pays off big time here.
Step-by-Step Cooking Process
Now for the fun part. Let us walk through the entire cooking process step by step. Follow these instructions and you will have amazing ribs every time.
Step 1: Set Up Your Pan
Line a baking sheet with aluminum foil. Place a wire rack on top if you have one. The rack allows air to circulate around the ribs, which helps them cook evenly. If you do not have a rack, you can place the ribs directly on the foil. Just flip them halfway through.
Step 2: Place the Ribs in the Oven
Put the ribs bone-side down on the pan. The bone side faces up during cooking. This keeps the meat protected and lets the fat baste the ribs naturally. Slide the pan into the preheated oven on the middle rack.
Step 3: Cook for the First Hour
Let the ribs cook undisturbed for the first hour. The oven does all the work. The meat will start to pull back from the bones, and you will notice a nice color forming on the surface. Resist the urge to open the oven door too often. Every time you open it, you lose heat and extend the cooking time.
Step 4: Wrap in Foil
After the first hour, pull the pan out. The ribs should look slightly dried out on the surface. This is normal. Now, carefully wrap the entire rack in a tight layer of aluminum foil. The foil creates a steam pocket that keeps the ribs moist and tender.
Return the wrapped ribs to the oven. Continue cooking for another 1.5 to 2 hours. The internal temperature should reach about 190°F to 195°F when they are done at this stage.
Step 5: Unwrap and Glaze
Remove the foil carefully. Watch out for the steam. Now brush a generous layer of BBQ sauce on both sides of the ribs. Mix your glaze ingredients together first for an even coat.
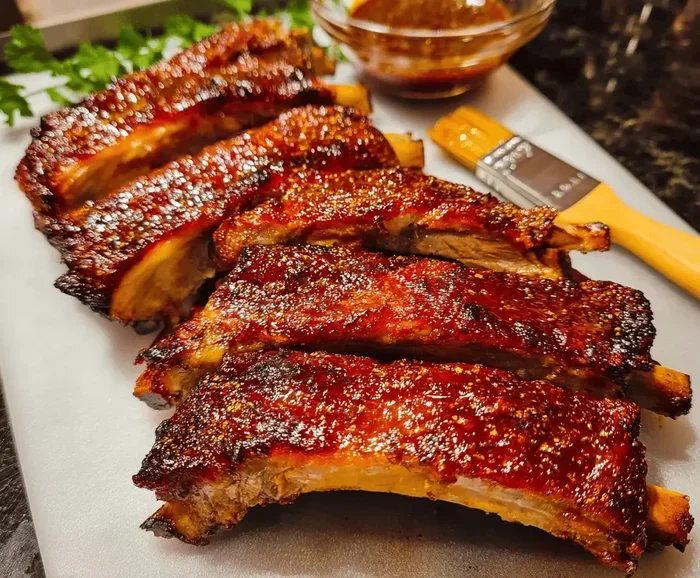
Return the unwrapped ribs to the oven for the final 15 to 20 minutes. This is when the sauce caramelizes and forms a beautiful sticky crust. Watch them closely so they do not burn.
Step 6: Rest and Serve
Take the ribs out of the oven and let them rest for 10 minutes. This is a step many people skip, but it matters. Resting lets the juices redistribute throughout the meat. When you cut into them, they stay moist and flavorful.
Use a sharp knife or heavy-duty scissors to cut between the bones. Serve with extra BBQ sauce on the side and your favorite sides like coleslaw, cornbread, or baked beans.
Glazing, Serving, and Common Mistakes
The glaze is what gives oven ribs that professional finish. It adds a glossy, caramelized layer that looks and tastes incredible. A simple mix of BBQ sauce, apple cider vinegar, and honey works wonders. Brush it on during the last 15 to 20 minutes of cooking.
Do not add the glaze too early. The sugar in the sauce can burn if it is on for too long. Keep it for the final stretch only. You can also brush on a second layer right after the ribs come out of the oven while they are still hot.
Common Mistakes to Avoid
- Skipping the membrane removal: This is the number one mistake people make. The membrane blocks flavor and creates a chewy texture. Always peel it off.
- Cooking at too high a temperature: High heat dries out ribs quickly. Low and slow is the secret to tender meat.
- Not using a meat thermometer: Guessing the doneness leads to undercooked or overcooked ribs. Aim for an internal temperature of 195°F to 205°F.
- Adding BBQ sauce too early: The sugars in sauce burn during long cooks. Save it for the last 15 to 20 minutes.
- Cutting too soon: Resting the ribs for 10 minutes keeps the juices inside. Skip this step and your ribs will be dry.
- Using too much rub: A heavy hand with salt can make ribs taste overly salty. Measure your rub and adjust to taste.
Quick Tips for Perfect Ribs
- Place a drip pan under the ribs to catch drips and make cleanup easier.
- Add a small bowl of water to the oven to keep the environment moist.
- Use apple juice or apple cider vinegar in the foil wrap for extra tenderness.
- Let the ribs come to room temperature for 30 minutes before cooking for more even results.
- Save the foil juices and drizzle them over the ribs before serving.
Expert Insights
Professional pitmasters often say that the oven is a great equalizer. You do not need expensive equipment to make outstanding ribs. The key is controlling heat and moisture. The foil wrap method mimics what a smoker does with a water pan. It creates a humid environment that keeps the meat juicy.
Another expert tip is to double your rub recipe. Having extra on hand means you can be generous without worrying about running out. And do not be afraid to experiment. Try adding a little mustard powder or coffee grounds to your rub for a deeper, more complex flavor profile.
Many home cooks also swear by the “3-2-1 method” adapted for the oven. That means 3 hours unwrapped, 2 hours wrapped in foil, and 1 hour glazed. It gives you layers of flavor and texture that are hard to beat.
Storing and Reheating Leftover Ribs
If you have leftovers, store them in an airtight container in the fridge within two hours of cooking. They will keep for up to 4 days. To reheat, wrap the ribs in foil and warm them in the oven at 250°F for about 15 to 20 minutes. This keeps them moist and prevents the meat from drying out.
You can also freeze cooked ribs for up to 3 months. Wrap them tightly in plastic wrap and foil before freezing. Thaw overnight in the fridge and reheat using the same method above.
Conclusion
How to cook spare ribs in the oven is a skill anyone can learn. With the right temperature, a great rub, and a little patience, you can create ribs that are tender, juicy, and full of flavor. The low and slow method is your best friend here. It transforms a tough cut of meat into something truly special.
Remember to remove the membrane, apply your rub generously, and wrap the ribs in foil partway through. Add your glaze at the end, let them rest before cutting, and enjoy every bite. Whether you are cooking for a family dinner or a weekend gathering, these oven ribs will be the star of the table.
Now that you know the secrets, it is time to fire up your oven and give it a try. Once you make these oven-baked ribs at home, you will wonder why you ever ordered takeout. Happy cooking!
Frequently Asked Questions
How long does it take to cook spare ribs in the oven?
At 275°F to 300°F, spare ribs take about 2.5 to 3.5 hours to cook through. Wrapping them in foil after the first hour helps speed things up and keeps the meat moist. Always use a meat thermometer to check for doneness.
What temperature should spare ribs be when done?
The ideal internal temperature for spare ribs is 195°F to 205°F. At this range, the collagen in the meat has broken down completely, giving you that tender, fall-off-the-bone texture you are looking for.
Do I need to wrap ribs in foil when cooking them in the oven?
Wrapping ribs in foil is not mandatory, but it is highly recommended. The foil traps steam and moisture, which keeps the meat tender and speeds up the cooking process. Most pitmasters use this technique for the best results.
Can I use baby back ribs instead of spare ribs?
Absolutely. Baby back ribs cook faster than spare ribs because they are leaner and smaller. They work great with this oven method too. Just reduce the cooking time by about 30 to 45 minutes and check for doneness early.
How do I know if my ribs are done without a thermometer?
You can check by pressing the rack gently with tongs. If the ribs bend and the surface cracks slightly, they are likely done. Another test is to insert a toothpick between the bones. If it goes in easily, your ribs are ready to eat.
What is the best BBQ sauce for oven ribs?
Any good-quality BBQ sauce works well for oven ribs. Choose one you enjoy eating on its own. For a homemade touch, mix store-bought sauce with a splash of apple cider vinegar and a bit of honey. This adds tang and sweetness that complements the pork perfectly.