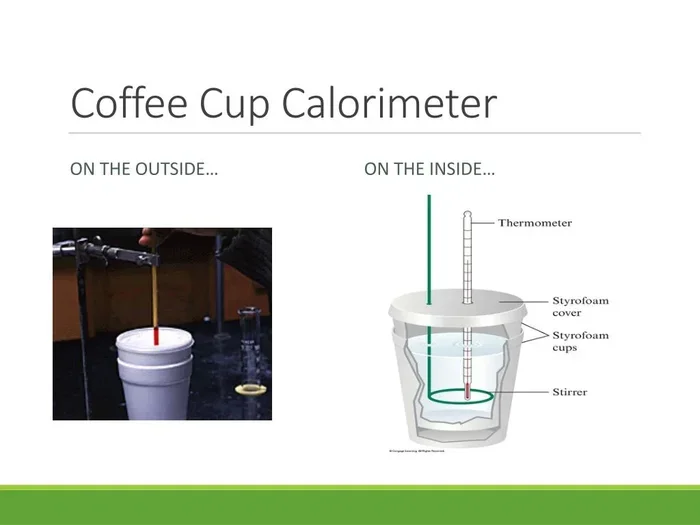
How To Make A Coffee Cup Calorimeter For Beginners
A coffee cup calorimeter is a simple, affordable tool that measures heat changes during chemical or physical reactions. This beginner-friendly guide walks you through building your own coffee cup calorimeter using everyday household items like styrofoam cups, a thermometer, and basic insulation. By the end, you will understand calorimetry basics, how to conduct a calorimeter experiment, and how to calculate specific heat and heat of reaction with confidence.
Have you ever wondered how scientists figure out how much heat is released or absorbed during a reaction? The answer is simpler than you think. A coffee cup calorimeter is one of the most accessible tools for measuring heat energy in everyday settings. You do not need a fancy laboratory or expensive equipment. In fact, you probably have everything you need right now in your kitchen.
This guide will show you exactly how to make a coffee cup calorimeter from scratch. Whether you are a student working on a science project, a curious hobbyist, or just someone who loves hands-on experiments, this tutorial has you covered. We will cover everything from the basic calorimetry principles to practical tips for getting reliable results every time.
By the time you finish reading, you will know how to build, use, and understand your very own coffee cup calorimeter. Let us dive in and make some science happen.
Key Takeaways
- Simple Setup: A coffee cup calorimeter uses basic materials like styrofoam cups and a thermometer to measure heat transfer accurately.
- Affordable Science: You can build a working calorimeter for just a few dollars using items already in your kitchen.
- Core Principle: The device relies on thermal insulation to prevent heat loss, ensuring accurate calorimetry results.
- Versatile Use: You can use it to study exothermic reactions, endothermic reactions, and calculate specific heat capacity.
- Easy to Master: Even beginners can follow the step-by-step guide and start measuring heat energy in minutes.
- Great for Learning: This project is perfect for students, hobbyists, and anyone curious about thermal energy and heat transfer.
📑 Table of Contents
What Is A Coffee Cup Calorimeter?
A coffee cup calorimeter is a simple device used to measure the heat exchanged during a chemical or physical process. It got its name because the original version was literally made from a styrofoam coffee cup. The idea is brilliant in its simplicity. You trap heat inside an insulated container and measure the temperature change of the contents.
The science behind this is called calorimetry. Calorimetry is the study of heat transfer during reactions or physical changes. A coffee cup calorimeter works best for processes that happen in solution, like dissolving salt in water or mixing two liquids together. It is called a “constant pressure” calorimeter because the reaction takes place at the same pressure as the surrounding environment.
The key concept here is heat capacity. Every substance has a specific amount of energy required to raise its temperature. Water, for example, has a very high specific heat, which means it absorbs a lot of energy before its temperature changes much. This property makes water an excellent medium for measuring heat transfer in a coffee cup calorimeter.
How Does Heat Transfer Work In A Calorimeter?
When you place a warm object into cool water inside the calorimeter, heat flows from the warm object to the water. This is called heat transfer. The warm object cools down, and the water warms up. Eventually, both reach the same temperature, known as thermal equilibrium.
By measuring the temperature change of the water, you can calculate exactly how much heat was exchanged. The formula is straightforward:
q = m × c × ΔT
Here, q is the heat energy, m is the mass of the water, c is the specific heat of water, and ΔT is the change in temperature. This simple equation is the heart of every calorimeter experiment.
Why Build A Coffee Cup Calorimeter?
You might be wondering why you should bother building one. There are actually many great reasons. A coffee cup calorimeter is an excellent educational tool. It helps you understand thermal energy, enthalpy, and heat of reaction in a hands-on way that textbooks alone cannot provide.
Here are some of the top reasons to build one:
- Hands-On Learning: Building and using a calorimeter gives you real experience with scientific measurement and heat transfer concepts.
- Affordable Experimentation: Unlike professional lab equipment, a coffee cup calorimeter costs almost nothing to make.
- Safe And Simple: There are no dangerous chemicals or complex setups required. It is safe for all ages.
- Versatile Applications: You can use it to study exothermic reactions (which release heat) and endothermic reactions (which absorb heat).
- Perfect For Science Fairs: A homemade calorimeter makes an impressive and educational science fair project.
Another great reason is that it connects to real-world science. The principles you learn with a coffee cup calorimeter apply directly to professional calorimetry used in chemistry labs, food science, and even environmental studies. When you understand how a basic calorimeter works, you are building a foundation for more advanced scientific concepts.
Materials You Will Need To Build One
The beauty of a coffee cup calorimeter is that you need very few materials. Most of these items are probably sitting in your kitchen right now. Here is what you will need:
- Two styrofoam cups: These serve as the insulated chamber. Styrofoam is an excellent insulator, which means it slows down heat transfer to the outside environment.
- A lid: A piece of cardboard or a styrofoam cup lid helps trap heat inside. Reducing heat loss is critical for accurate calorimetry results.
- A thermometer: You need a thermometer that can measure small temperature changes accurately. A digital thermometer works great, but a regular laboratory thermometer also works well.
- A stirrer: A wooden dowel or plastic spoon helps mix the contents evenly so the temperature reads consistently throughout the solution.
- Water: Distilled water is best because it contains no impurities that could affect the specific heat measurements.
- A ruler or measuring cup: You need to measure volumes accurately for reliable calculations.
- Tape or a rubber band: To secure the lid and hold the thermometer in place.
If you want to get a little fancier, you can also add a second layer of styrofoam around the cups for extra insulation. Some people wrap the entire setup in aluminum foil to further reduce heat loss. The goal is to create as close to a perfect insulation system as possible.
Interestingly, the concept of using simple materials for thermal energy measurement is similar to how a solar oven with aluminum foil uses basic materials to trap and measure heat energy from the sun. Both rely on smart insulation to get accurate results.
Step-By-Step Guide To Making A Coffee Cup Calorimeter
Now for the fun part. Let us walk through building your coffee cup calorimeter step by step. Follow these instructions carefully, and you will have a working calorimeter in no time.
Step 1: Prepare Your Cups
Take your two styrofoam cups. Nest one inside the other. This double-cup setup creates an air gap that improves thermal insulation. If your cups have a seam or opening at the bottom, line them up so the openings face the same direction. This prevents heat from escaping through the bottom.
Use a rubber band or a piece of tape to hold the two cups together securely. You want them to stay snug during the experiment.
Step 2: Add the Lid
Cut a piece of cardboard to fit snugly over the top of the cups. Poke a small hole through the lid for your thermometer. The hole should be just big enough for the thermometer to slide through without leaving large gaps. Any open space allows heat loss, which will throw off your calorimeter experiment results.
If you are using a styrofoam cup lid instead, poke the hole in the center. Make sure the lid fits tightly with no gaps around the edges.
Step 3: Insert the Thermometer and Stirrer
Slide your thermometer through the hole in the lid. Make sure the bulb of the thermometer is submerged in the liquid you will be using. Use a rubber band or tape to hold the thermometer in place so it does not shift during stirring.
Insert your stirrer through a second small hole if needed, or simply leave it loose on top. A wooden stirrer is ideal because it does not conduct thermal energy the way metal does.
Step 4: Add Your Materials
Pour a measured amount of water into the inner cup. Record the starting temperature of the water using your thermometer. Wait about 30 seconds to make sure the reading is stable before proceeding.
Now you are ready to add your reaction materials. This could be warm water mixed with cold water, a dissolving salt, or any solution reaction you want to study. Quickly replace the lid and start stirring gently.
Watch the thermometer closely and record the highest or lowest temperature the solution reaches. That peak temperature is your key data point for calculating heat of reaction.
Step 5: Record Your Data
Write down the following information:
- The starting temperature of each substance
- The final temperature change after mixing
- The mass of each substance used
- The type of reaction or process you observed
Good record-keeping is essential for any calorimetry experiment. The more accurate your data, the more accurate your calculations will be.
For those who enjoy precision in measurement, this attention to temperature accuracy is similar to the care needed when checking whether your oven is not heating properly — in both cases, accurate temperature readings are the foundation of reliable results.
How To Use Your Coffee Cup Calorimeter
Once your coffee cup calorimeter is built, you can start conducting experiments. Here are some of the most popular and educational things you can do:
Measuring The Heat Of Dissolution
Dissolving salt in water either releases or absorbs heat energy. Try dissolving table salt in room-temperature water and watch the temperature change. You will notice the temperature drops slightly, meaning the process is endothermic — it absorbs heat from the surroundings.
Now try dissolving calcium chloride. The temperature should rise, showing an exothermic reaction that releases heat. Comparing these two experiments gives you a clear picture of how different solution reactions behave.
Measuring Specific Heat Of Different Liquids
You can also use your calorimeter to compare the specific heat of different liquids. Try warming equal amounts of water, oil, and alcohol to the same starting temperature. Then place each one separately into room-temperature water inside your calorimeter. Record the temperature change for each.
You will find that water causes the smallest temperature change in the surrounding water. This is because water has the highest specific heat capacity of common liquids. It takes more energy to change water’s temperature than oil or alcohol.
Studying Neutralization Reactions
Mixing an acid and a base is a classic calorimeter experiment. When you combine vinegar (an acid) with baking soda dissolved in water (a base), the reaction produces thermal energy that you can measure. The temperature will rise, confirming the reaction is exothermic.
This type of experiment teaches you about enthalpy, which is the total heat content of a system at constant pressure. Neutralization reactions always release energy, making them perfect for demonstrating exothermic behavior in your coffee cup calorimeter.
Tips For Getting Accurate Results
Getting good results from your coffee cup calorimeter takes a little practice. Here are some expert tips to improve your accuracy:
- Use room-temperature cups: If your styrofoam cups are cold from the pantry, let them warm up to room temperature first. Cold cups absorb heat energy from your solution and skew your results.
- Stir gently and consistently: Vigorous stirring can introduce air bubbles and affect the temperature change reading. Gentle, steady stirring gives the most accurate measurements.
- Work quickly: The faster you mix your reactants and seal the calorimeter, the less heat loss you will experience. Speed matters in calorimetry.
- Repeat your experiments: Doing each experiment at least twice helps you identify outliers and calculate an average temperature change.
- Use distilled water: Tap water contains minerals that can slightly affect the specific heat and thermal energy measurements.
- Insulate the top: Placing a second layer of cardboard or cloth on top of the lid further reduces heat loss through the opening.
If you are serious about precision, consider placing your coffee cup calorimeter inside a larger container filled with additional insulation. Some advanced setups use a reheat oven method to pre-warm the entire setup before starting the experiment, ensuring no cold materials absorb unexpected heat energy.
Common Mistakes To Avoid
Even with the best intentions, beginners often make a few common errors when using a coffee cup calorimeter. Here are the mistakes to watch out for:
- Skipping the lid: An open calorimeter loses heat energy rapidly. Always use a snug-fitting lid to maintain accurate temperature change readings.
- Using a metal stirrer: Metal conducts thermal energy and can absorb or release heat during the experiment. Stick with wood or plastic.
- Not accounting for the cup’s heat absorption: The styrofoam cups themselves absorb some heat energy. For the most accurate calorimetry, you should factor in the heat absorbed by the cups in your calculations.
- Reading the thermometer too early: The reaction may still be ongoing when you take your first reading. Wait for the temperature change to fully stabilize before recording your final value.
- Using too much or too little water: Consistency in volumes is key. Use the same measuring tools each time to keep your solution reaction conditions the same.
Avoiding these simple mistakes will dramatically improve the reliability of your coffee cup calorimeter experiments. Over time, you will develop an intuitive sense for what makes results accurate and what introduces error.
Quick Tips For Beginners
- Start simple: Begin with basic warm-water-and-cold-water mixing experiments before moving on to chemical reactions.
- Label everything: Mark your cups and lids so you always know which is the inner cup and which is the outer insulator.
- Keep a lab notebook: Record every temperature change, every mass, and every observation. This is how real scientists work.
- Compare results: After each experiment, check if your calculated heat of reaction matches published values. This is the best way to check your accuracy.
- Have fun: The best calorimeter experiment is one you enjoy doing. Try different substances and see what happens.
Conclusion
Building a coffee cup calorimeter is one of the most rewarding beginner science projects you can do. It takes just a few household items and about five minutes to set up. Once you have your calorimeter ready, the world of calorimetry opens up to you. You can measure heat of reaction, explore specific heat capacity, and understand thermal energy and heat transfer firsthand.
The coffee cup calorimeter proves that you do not need expensive lab equipment to do real science. The principles of calorimetry that professionals use in research labs are the same principles you will practice at your kitchen table. Every temperature change you measure, every solution reaction you observe, and every calculation you make builds your understanding of how energy works in the world around you.
So grab those styrofoam cups, find a thermometer, and start your first calorimeter experiment today. Once you see the heat energy reveal itself through a simple temperature change, you will never look at a cup of coffee the same way again.
Frequently Asked Questions
What exactly is a coffee cup calorimeter used for?
A coffee cup calorimeter measures the heat exchanged during chemical reactions or physical changes in solution. It is commonly used in chemistry classes and science experiments to determine specific heat capacity, heat of reaction, and whether a process is exothermic or endothermic. It works by trapping heat inside an insulated container and measuring the resulting temperature change.
Can I use a regular mug instead of a styrofoam cup?
You can, but styrofoam is much better because it provides superior thermal insulation. A regular mug, especially one made of ceramic or metal, will absorb and conduct heat energy away from your solution. This leads to inaccurate calorimetry results. For the best accuracy, always use styrofoam cups when building your coffee cup calorimeter.
How accurate is a homemade coffee cup calorimeter?
A homemade coffee cup calorimeter is reasonably accurate for educational purposes and basic experiments. It will not match the precision of professional lab calorimeters, but it gives excellent results for measuring temperature change and understanding heat transfer principles. Using good insulation and careful measurement techniques will improve your accuracy significantly.
What is the difference between an exothermic and endothermic reaction in a calorimeter?
An exothermic reaction releases heat energy into the solution, causing the temperature change to rise. An endothermic reaction absorbs heat energy from the solution, causing the temperature to drop. Your coffee cup calorimeter makes it easy to observe both types by simply watching the thermometer before and after mixing your reactants.
Do I need any special equipment to build a coffee cup calorimeter?
No special equipment is needed. You only need two styrofoam cups, a lid, a thermometer, a stirrer, water, and a few household items. This is what makes the coffee cup calorimeter such an accessible project for beginners, students, and science enthusiasts. Everything you need can be found in your kitchen for under a few dollars.
Can I use my coffee cup calorimeter to measure the energy in food?
Yes, you can! Burning a small food item and capturing the released heat energy in your calorimeter is a classic experiment. You measure the temperature change of the water and calculate the energy content. This is a simplified version of what professional labs do when determining the caloric content of food. Just be sure to follow all safety precautions when working with open flames.