Can You Use A Coffee Grinder For Wheat Flour At Home
Yes, you can use a coffee grinder to make wheat flour at home. Both blade and burr grinders can turn whole wheat berries into usable flour for baking bread, rolls, and more. This guide walks you through every step, from choosing the right grinder to storing your fresh flour properly.
Have you ever wondered whether a coffee grinder can handle wheat? Maybe you ran out of flour mid-recipe, or you want to try making whole wheat flour from scratch at home. The good news is that a coffee grinder can absolutely grind wheat into flour. It is one of the easiest and most affordable ways to get fresh homemade flour without buying a dedicated grain mill.
In this guide, we will walk you through everything you need to know about using a coffee grinder for wheat. We will cover the different types of grinders, step-by-step instructions, tips for the best flour texture, and common mistakes to avoid. Whether you are a baking enthusiast or just curious about home milling, this article has you covered.
Key Takeaways
- Coffee grinders work for wheat: Both blade and burr models can grind wheat berries into flour, though burr grinders give a more consistent result.
- Fresh flour tastes better: Home-ground wheat flour retains more nutrients and flavor than store-bought options that sit on shelves for weeks.
- Grind size matters: Fine, medium, and coarse grinds serve different baking purposes, so adjusting your grinder settings is key.
- Small batches are best: Overloading your coffee grinder leads to uneven grinding and can burn out the motor.
- Store flour properly: Fresh wheat flour spoils faster than commercial flour, so keep it airtight and cool.
- Clean your grinder after each use: Wheat starch builds up and can affect the taste of future batches if you skip cleaning.
- Use it in your next bake: Try your homemade wheat flour in homemade bread or toaster oven rolls for the best results.
📑 Table of Contents
What Happens When You Grind Wheat In A Coffee Grinder
When you put wheat berries into a coffee grinder, the machine breaks them down into smaller particles. The result is wheat flour that you can use right away for baking. But the process is not always perfect. Coffee grinders are designed for coffee beans, which are smaller and drier than wheat berries. This means you may need to work in smaller batches and accept a slightly less uniform flour consistency than a purpose-built grain mill would give you.
The good thing is that wheat berries are hard and dry, much like roasted coffee beans. So the grinding mechanism handles them well. You will end up with fresh wheat flour that still has the bran, germ, and endosperm intact. That is a big nutritional win over refined white flour found in most grocery stores.
Why People Grind Wheat At Home
There are several reasons people turn to home milling with a coffee grinder:
- Freshness: Home-ground flour retains natural oils and nutrients that degrade quickly in store-bought flour.
- Flavor: Fresh whole wheat flour has a nuttier, richer taste that elevates baked goods.
- Cost savings: Buying wheat berries in bulk is often cheaper per pound than buying pre-milled flour.
- Control: You decide the grind size, from coarse to fine, depending on what you are baking.
- No additives: Your flour contains nothing but pure wheat, with no preservatives or bleaching agents.
Blade Grinder vs Burr Grinder For Wheat Flour
Not all coffee grinders are created equal when it comes to grinding wheat. The two main types are blade grinders and burr grinders. Each has its strengths and weaknesses for wheat grinding. Let us break them down.
Blade Grinders
A blade grinder uses a spinning blade at the bottom of the chamber to chop wheat berries into smaller pieces. These grinders are affordable and widely available. Most people already own one in their kitchen. However, blade grinders produce an uneven flour texture. You will get a mix of fine powder and larger chunks. This can work fine for rustic breads or pancakes, but it is not ideal for delicate pastries where a smooth flour consistency matters.
Blade grinders also tend to generate more heat during grinding. Too much heat can affect the flour quality by partially cooking the wheat particles. Keep grinding sessions short with a blade grinder to avoid this problem.
Burr Grinders
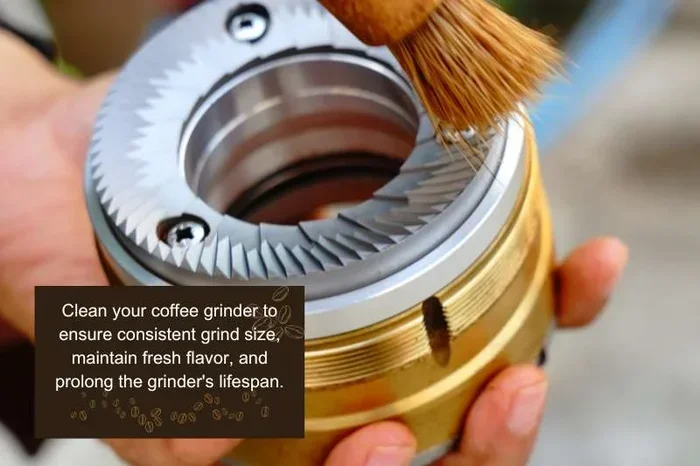
A burr grinder crushes wheat berries between two abrasive surfaces, called burrs. This produces a much more even grind size compared to a blade grinder. If you want high-quality homemade flour, a burr grinder is the better choice. The flour texture is more consistent, which leads to better results in baking.
Burr grinders come in two varieties: manual and electric. Both work well for grinding wheat. Electric burr grinders are faster and more convenient, while manual ones give you more control over the grind size. The trade-off is price. Burr grinders cost more than blade grinders, but they deliver noticeably better results for wheat flour production.
Quick Comparison
| Feature | Blade Grinder | Burr Grinder |
|---|---|---|
| Price | Low ($15-$40) | Medium to High ($50-$200+) |
| Grind Consistency | Uneven | Even and adjustable |
| Heat Generation | Higher | Lower |
| Best For | Casual, small-batch use | Regular home milling |
| Ease of Cleaning | Easy | Moderate |
| Motor Durability | Lower under heavy use | Higher with proper use |
Step-By-Step: How To Grind Wheat Into Flour At Home
Grinding wheat into flour with a coffee grinder is simple. Follow these steps for the best results every time.
Step 1: Choose Your Wheat Berries
Start with whole wheat berries. You can find them at health food stores, bulk bins, or online. Hard red wheat berries work best for bread flour because they have higher protein content. Soft white wheat berries are better for pastries and cakes. Make sure your wheat berries are dry and free of debris before grinding.
Step 2: Measure Your Batch
Do not fill the grinder to the top. For most coffee grinders, a quarter cup of wheat berries at a time is the sweet spot. Overloading the grinder strains the motor and produces uneven flour texture. Work in small batches for the best flour consistency.
Step 3: Grind in Bursts
Pulse the grinder in short bursts of 5 to 10 seconds. This prevents overheating and gives you more control over the grind size. After each burst, shake the grinder gently to redistribute the particles. Continue pulsing until you reach your desired texture.
Step 4: Check the Texture
Stop and check the flour texture regularly. Run your fingers through the ground wheat. If you feel larger pieces, keep grinding. For fine wheat flour, you want a texture similar to store-bought all-purpose flour. For a heartier whole wheat look, a slightly coarser grind works perfectly.
Step 5: Sift If Needed
If you want ultra-smooth flour, pass the ground wheat through a fine mesh sieve. The larger pieces that stay on top can go back into the grinder for another round. This step is optional but it makes a real difference in baking results.
Step 6: Store Properly
Transfer your fresh wheat flour into an airtight container. Glass jars or sealed plastic containers work well. Store in a cool, dark place. Fresh homemade flour does not contain preservatives, so it spoils faster than commercial flour. Use it within 1 to 2 weeks for the best flavor and nutrition. You can also refrigerate or freeze it to extend shelf life.
Tips For Getting The Best Flour Texture
Getting the right flour texture from a coffee grinder takes a little practice. Here are some expert tips to help you succeed.
- Chill the wheat berries first: Put them in the freezer for 30 minutes before grinding. Cold wheat berries grind more evenly and produce less dust.
- Do not rush the process: Patience leads to better flour consistency. Grinding too fast generates heat and uneven particles.
- Clean between batches: Residual flour can clump and affect your next grind. A quick brush-out keeps your coffee grinder running smoothly.
- Experiment with grind sizes: Coarse flour works well for crusty breads. Fine flour is better for cakes and muffins. Adjust your pulsing time to control the texture.
- Use a brush to collect flour: After grinding, use a small brush to sweep all the flour out of the grinder. Some flour sticks to the sides and bottom.
- Combine with store-bought flour: If your first batch has some larger chunks, mix it with regular flour. This is a great trick for beginners getting used to home milling.
Quick Tips for Better Results
Here are a few more quick tips that make a big difference:
- Grind in a well-ventilated area to reduce dust inhalation.
- Label your containers with the date so you use the freshest flour first.
- Do not wash your grinder with water. Use a dry brush instead to avoid moisture damage.
- If your grinder smells like wheat after use, that is normal. A quick wipe with a dry cloth removes excess starch.
Common Mistakes To Avoid When Grinding Wheat
Even though grinding wheat in a coffee grinder is straightforward, some common mistakes can ruin your results. Watch out for these pitfalls.
Overloading the Grinder
The most common mistake is putting too many wheat berries in at once. This overloads the motor and produces a mix of powder and large chunks. Stick to small batches for the best flour quality. Your grinder will thank you, and so will your baked goods.
Grinding for Too Long
Running the grinder continuously generates excessive heat. This can partially cook the wheat particles and affect the flavor of your flour. Always use short pulses and give the grinder breaks between sessions. Your coffee grinder is not designed for continuous heavy-duty grinding.
Skipping the Sieve
Some people skip sifting and accept whatever comes out of the grinder. While this works for rustic baking, sifting dramatically improves flour consistency. It removes larger pieces and bran chunks that can make your baked goods gritty. A simple sieve makes a noticeable difference.
Ignoring Moisture
Wheat berries must be completely dry before grinding. Any moisture can cause the flour to clump and spoil faster. Store your wheat berries in a dry place and check them before you start grinding.
Using the Wrong Wheat
Not all wheat is the same. Hard wheat varieties have more protein and produce stronger flour for bread. Soft wheat has less protein and works better for cakes and pastries. Choose the right type for what you plan to bake. This one decision has a big impact on your final results.
Can You Bake With Coffee Grinder Wheat Flour?
Absolutely. Once you have your fresh wheat flour, the baking possibilities are wide open. You can use it in bread, pancakes, muffins, cookies, and cakes. Homemade wheat flour behaves slightly differently than commercial flour because it still contains the bran and germ. This means it absorbs more water, so you may need to adjust your recipes by adding a little extra liquid.
For best results, start with simple recipes like homemade bread or basic pancakes. These recipes are forgiving and let you get comfortable working with fresh wheat flour. As you gain confidence, you can tackle more complex baked goods. Try making rolls in a toaster oven for a quick and satisfying bake using your homemade flour.
When you bake with fresh whole wheat flour, expect a denser, heartier texture compared to white flour. This is normal and part of the appeal. The nutty flavor and higher nutrient content make it well worth the extra effort. If you want a lighter texture, try blending your homemade wheat flour with some all-purpose flour. This gives you the best of both worlds.
One thing to keep in mind is that fresh flour has a shorter shelf life. Use it promptly or store it in the freezer for longer storage. Always check for any rancid smell before using your flour. Fresh wheat flour should smell mildly sweet and wheaty. If it smells off, it is time to grind a new batch.
For those who love experimenting in the kitchen, consider using your homemade flour for oven-safe baking. Whether you are using a Dutch oven, a glass dish, or a standard baking pan, fresh wheat flour brings a depth of flavor that store-bought flour simply cannot match. Just make sure your oven-safe bowls and pans are properly preheated for the best rise and texture.
Final Thoughts
Using a coffee grinder for wheat flour is one of the simplest and most rewarding kitchen experiments you can try. It costs almost nothing, requires no special equipment, and gives you control over the quality of your flour. Whether you are a seasoned baker or just starting out, home milling with a coffee grinder opens up a world of possibilities.
Remember to start small, work in batches, and experiment with different grind sizes. The learning curve is gentle, and the results are worth it. Fresh whole wheat flour transforms your baking with better flavor, better nutrition, and a deeper connection to the food you prepare. So grab some wheat berries, fire up your coffee grinder, and start grinding today.
Once you have your flour, the world of home baking is wide open. From crusty artisan loaves to soft dinner rolls, your homemade wheat flour can do it all. Enjoy the process, and happy baking.
Frequently Asked Questions
Can any coffee grinder grind wheat into flour?
Most coffee grinders can grind wheat, but results vary. Blade grinders produce an uneven texture, while burr grinders deliver a more consistent flour consistency. Either type works, but burr grinders give better results for regular home milling.
How long does it take to grind wheat berries in a coffee grinder?
It typically takes 30 to 60 seconds of pulsing to grind a quarter cup of wheat berries into flour. The exact time depends on your grinder type and the grind size you want. Pulsing in short bursts prevents overheating and ensures a better flour texture.
Is wheat flour from a coffee grinder as good as store-bought flour?
Fresh homemade flour from a coffee grinder is nutritionally superior because it retains the bran and germ. The flavor is also richer and more natural. However, the flour consistency may be less uniform than commercial flour, which is perfectly fine for most baking applications.
Can you grind other grains in a coffee grinder besides wheat?
Yes, coffee grinders can also grind oats, barley, rye, and millet. The process is the same as grinding wheat. Just make sure to clean the grinder between different grains to avoid cross-contamination and maintain the best flour quality for each type.
How should I store fresh wheat flour made in a coffee grinder?
Store your fresh wheat flour in an airtight container in a cool, dark place. It will last 1 to 2 weeks at room temperature. For longer storage, refrigerate or freeze the flour. Always use a dry container to prevent moisture from spoiling your homemade flour.
Will grinding wheat damage my coffee grinder?
Grinding wheat occasionally should not damage a standard coffee grinder. However, frequent heavy use can wear out the motor faster than grinding coffee beans. To protect your grinder, stick to small batches, pulse in short intervals, and clean it thoroughly after each use.
=== CONCLUSION ===
Grinding wheat into flour with a coffee grinder is easy, affordable, and incredibly rewarding. You now know the difference between blade and burr grinders, the step-by-step process, and the tips that lead to the best flour texture. You also understand the common mistakes that can trip you up and how to avoid them. With a little practice, you will be producing high-quality whole wheat flour right in your own kitchen.
Start small, experiment often, and enjoy the process of home milling. Your baked goods will taste better, and you will have the satisfaction of knowing exactly what goes into your food. Grab those wheat berries and let your coffee grinder do the work. Happy grinding and happy baking!