How To Make Frothy Coffee With Milk Frother At Home
Making frothy coffee with a milk frother at home is simple, fast, and incredibly rewarding. Whether you use a handheld frother, a steam wand, or a standalone electric frother, you can create silky steamed milk and rich coffee foam in minutes. This guide walks you through every step, from choosing the right milk to mastering latte art.
There is something magical about a cup of frothy coffee in the morning. The creamy foam on top, the rich aroma, and the smooth texture turn an ordinary drink into a comforting ritual. If you have been wondering how to make frothy coffee with a milk frother at home, you are in the right place.
This guide is designed for beginners and coffee lovers alike. We will cover everything from choosing the right frother to mastering the perfect milk texture. By the end, you will be making barista-style drinks in your own kitchen. No expensive coffee shop visits required. Just great frothy coffee whenever you want it.
A milk frother is one of the simplest kitchen tools to upgrade your morning routine. It takes seconds to warm and aerate milk, turning it into a velvety foam that sits beautifully on top of espresso or brewed coffee. The process is straightforward, but the results feel luxurious. Let us dive into everything you need to know.
Key Takeaways
- Choose the Right Frother: Handheld, electric, and steam wand frothers each produce different foam textures for frothy coffee.
- Milk Temperature Matters: Heating milk to 140-155°F creates the creamiest froth without scalding.
- Technique Is Key: Proper frothing technique, including the right angle and depth, makes a huge difference in foam quality.
- Experiment with Milk Types: Whole milk, oat milk, and almond milk each froth differently and affect the final taste.
- Clean Your Frother Regularly: Proper maintenance ensures consistent frothy results every time.
📑 Table of Contents
- What Is a Milk Frother and Why Use One for Frothy Coffee
- Types of Milk Frothers for Making Frothy Coffee
- How To Make Frothy Coffee Step by Step
- Tips for the Perfect Frothy Coffee
- Common Mistakes to Avoid When Making Frothy Coffee
- Creative Frothy Coffee Variations to Try at Home
- Frothy Coffee and Breakfast Pairings
- Maintaining Your Milk Frother for Long-Lasting Performance
- Frequently Asked Questions About Frothy Coffee
- Conclusion
What Is a Milk Frother and Why Use One for Frothy Coffee
A milk frother is a small device that heats and beats milk to create a light, airy foam. It works by introducing tiny air bubbles into the milk, which gives it that creamy, thick texture we love in cappuccinos and lattes. You can use a frother with almost any type of milk, from dairy to plant-based options.
Using a milk frother at home has several advantages. First, it saves money. A daily coffee shop visit adds up fast. With a frother, you get cafe-quality drinks for pennies. Second, it gives you full control over ingredients. You choose the milk, the sweetness, and the temperature. Third, it is incredibly fast. Most frothing takes less than a minute.
How Does Frothing Work
Frothing works by combining heat and air. The frother spins a whisk or steam wand through the milk, injecting tiny bubbles. At the same time, the heat warms the milk, which makes the proteins stretch and hold the bubbles in place. The result is a stable, creamy foam that stays on top of your coffee.
The quality of the foam depends on a few factors. Milk fat content plays a big role. Higher fat milk produces a richer, more stable foam. Temperature matters too. Milk that is too hot will scorch and lose its sweetness. And the technique you use affects the texture. We will cover all of this in detail below.
Types of Milk Frothers for Making Frothy Coffee
Not all frothers are the same. Different types produce different foam textures and require different techniques. Understanding your options helps you choose the best one for your needs. Here is a closer look at the most popular types.
Handheld Milk Frothers
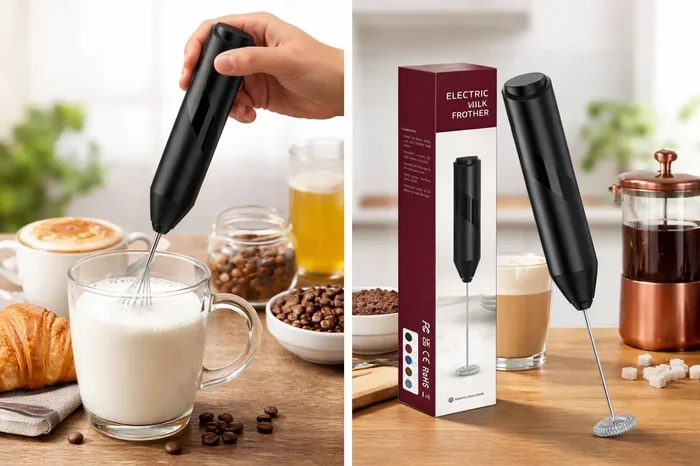
A handheld frother is a small, battery-powered wand that you dip into a cup of milk. You press a button, and the small whisk spins rapidly, creating foam right in your cup. These frothers are affordable, portable, and easy to use.
Handheld frothers are great for beginners. They are lightweight and require almost no cleanup. However, they usually do not heat the milk on their own. You will need to warm the milk separately, either in the microwave or on the stove. The foam they produce is light and airy, perfect for topping off drip coffee or adding a touch of creaminess to any hot drink.
If you want a simple way to make frothy coffee without investing in a big machine, a handheld frother is an excellent choice. They typically cost between $10 and $25, making them the most budget-friendly option.
Electric Standalone Frothers
An electric standalone frother is a countertop device that both heats and froths milk. You pour cold milk into the carafe, press a button, and the machine handles everything. These frothers often come with settings for different foam densities, so you can choose between light froth and thick cream.
Electric frothers produce more consistent results than handheld models. They heat the milk to the ideal temperature automatically, which prevents scorching. Many models also let you make cold foam for iced coffee drinks. If you drink frothy coffee regularly, an electric frother is a worthwhile investment.
Steam Wand Frothers (Espresso Machines)
A steam wand is the classic method for frothing milk. It is built into most espresso machines and uses pressurized steam to heat and aerate the milk. This method produces the most professional-quality foam, with a fine, silky texture that is perfect for latte art.
Steam wand frothing has a learning curve. You need to control the steam pressure, the angle of the wand, and the depth of the milk pitcher. But once you master it, the results are unmatched. Baristas in coffee shops use this technique every day, and you can learn it at home too.
How To Make Frothy Coffee Step by Step
Now that you understand the basics, let us walk through the actual process. Making frothy coffee with a milk frother is simple once you know the steps. Follow this guide for consistently great results every morning.
Step 1: Choose Your Milk
The milk you choose has a big impact on the final foam. Different types of milk froth differently, so pick one that matches your taste and dietary needs.
- Whole Milk: Produces the richest, creamiest foam. The fat content helps stabilize the bubbles and creates a sweet, smooth texture.
- 2% Milk: A good middle ground. It froths well and is lighter than whole milk.
- Oat Milk: One of the best plant-based options. It froths beautifully and has a naturally creamy taste that pairs well with coffee.
- Almond Milk: Light and nutty. It froths well but produces a thinner foam than dairy milk.
- Coconut Milk: Creates a rich foam with a tropical flavor. Great for a twist on traditional frothy coffee.
Always use cold milk straight from the refrigerator. Cold milk froths better than warm milk because the proteins have more time to stretch and trap air. Start with about 4 to 6 ounces of milk for a single serving.
Step 2: Heat the Milk
If your frother does not heat the milk, warm it first. You can use a microwave or a small saucepan on the stove. Heat the milk to between 140°F and 155°F. This is the sweet spot where the milk is hot enough to taste warm but not so hot that it scalds or loses its sweetness.
Use a thermometer if you have one. If not, watch the milk carefully. You will see small bubbles forming around the edges and steam rising. That is when it is ready. Remove it from the heat immediately. Scorched milk tastes bitter and will not froth well.
Step 3: Froth the Milk
Now comes the fun part. Submerge the frother wand just below the surface of the milk. Turn it on and hold it at a slight angle. This position helps create a whirlpool effect, which pulls more air into the milk.
For a light, airy foam, keep the wand near the surface. You will hear a gentle hissing sound as air gets incorporated. For a thick, creamy foam, push the wand deeper into the milk. This heats the milk without adding as much air.
Froth for 20 to 30 seconds for a single serving. You will notice the milk volume increasing and the texture becoming smooth and glossy. Once you reach the desired consistency, remove the frother and give the milk a gentle swirl. This helps blend any larger bubbles into a uniform texture.
Step 4: Pour Over Your Coffee
Prepare your coffee as usual. Whether you use espresso, a strong brewed coffee, or even instant coffee, the frothy milk will elevate it. Pour the coffee into your cup first, then gently add the frothed milk on top.
For a cappuccino-style drink, use equal parts coffee and foam. For a latte-style drink, use more steamed milk and a thinner layer of foam. If you want to get creative, try pouring the milk slowly from a low height to create simple latte art patterns.
Step 5: Add Flavor (Optional)
Frothy coffee tastes amazing on its own, but a little flavor can take it to the next level. Try adding a drizzle of vanilla extract, a sprinkle of cinnamon, or a pump of caramel syrup. A dash of cocoa powder on top of the foam adds a beautiful touch and a rich chocolate flavor.
If you enjoy sweet frothy coffee, stir in a small amount of sugar, honey, or your favorite sweetener before frothing. This ensures the sweetness mixes evenly throughout the drink.
Tips for the Perfect Frothy Coffee
Getting the perfect foam takes a little practice, but these tips will help you improve quickly. Here are some tried-and-true techniques that make a real difference.
- Always start with cold milk. Cold milk froths better because it has more time to incorporate air before overheating.
- Use fresh milk. Older milk does not froth as well because the proteins break down over time.
- Do not overheat. Milk above 160°F loses its sweetness and can develop a burnt taste.
- Clean your frother after every use. Residual milk dries and affects future frothing performance.
- Experiment with frothing times. Shorter frothing creates lighter foam. Longer frothing creates thicker foam. Find what you like best.
- Practice your pouring technique. Pouring slowly and from a low height helps you control the foam-to-coffee ratio.
- Try different milk brands. Different brands of the same type of milk can froth differently. Oat milk brands, in particular, vary widely in frothing ability.
Quick Tips for Better Foam
Want to level up your frothy coffee game fast? Here are a few quick tips that deliver immediate results.
First, skim the fat from the top of heated milk before frothing if you want extra-light foam. Second, add a tiny drop of dish soap to the milk when testing your frother technique. It creates bubbles just like milk, so you can practice without wasting milk. Third, tap the frothing pitcher gently on the counter a few times after frothing. This pops large bubbles and creates a smoother, more velvety texture.
Common Mistakes to Avoid When Making Frothy Coffee
Even experienced home baristas make mistakes. Knowing what to avoid saves time and milk. Here are the most common errors and how to fix them.
Using Milk That Is Too Warm Before Frothing
One of the biggest mistakes is starting with warm or room-temperature milk. Warm milk cannot hold as much air, so your foam will be thin and flat. Always start with cold milk from the fridge. This gives the frother time to work its magic and creates a much better texture.
Overfrothing the Milk
It is easy to go too far. Over-frothing creates large, unstable bubbles that collapse quickly. You want small, uniform bubbles that give the foam a silky appearance. If your foam looks dry and stiff, you have probably froth too long. Start with shorter intervals and check the texture frequently.
Not Cleaning the Frother Properly
Milk residue builds up quickly on frother wands and whisks. This residue affects the frother’s performance and can introduce off-flavors into your drinks. Rinse the frother under warm water immediately after each use. For a deeper clean, run the frother through a cycle with warm water and a drop of dish soap.
For more thorough cleaning of kitchen appliances, check out our guide on how to clean a Cosori air fryer toaster oven for tips on maintaining kitchen equipment properly.
Using the Wrong Type of Milk
Not all milks froth equally. Skim milk froths the most air but produces a dry, thin foam. Heavy cream froths poorly because the fat content is too high. Finding the right balance is key. Whole milk and oat milk are generally the best choices for a balanced, creamy frothy coffee.
Creative Frothy Coffee Variations to Try at Home
Once you master the basic frothy coffee, it is time to get creative. These variations add new flavors and textures that will keep your morning routine exciting.
Caramel Frothy Coffee
Add a pump of caramel syrup to your coffee before pouring in the frothed milk. Drizzle extra caramel on top of the foam for a beautiful presentation. This drink tastes like a dessert but gives you the caffeine boost you need.
Vanilla Latte Style
Stir a half teaspoon of vanilla extract into your coffee. Froth your milk as usual and pour it over the vanilla coffee. The result is a smooth, sweet vanilla latte that rivals anything from your favorite coffee shop. For extra richness, use a splash of vanilla-flavored creamer.
Spiced Frothy Coffee
Add a pinch of cinnamon, nutmeg, and a tiny pinch of cardamom to your coffee before frothing. This creates a warm, aromatic drink that is perfect for cooler mornings. The spices complement the creamy milk foam beautifully and add complexity to every sip.
Iced Frothy Coffee
Frothy coffee is not just for hot drinks. Make cold foam by frothing cold milk without heating it. Pour your coffee over ice, add the cold foam on top, and sweeten to taste. This is a refreshing summer drink that is light and satisfying.
For more ways to enjoy roasted nuts and coffee pairings, you might enjoy our guide on how to roast whole almonds in oven to create a crunchy topping for your coffee.
Mocha Frothy Coffee
Add a tablespoon of cocoa powder and a splash of chocolate syrup to your coffee. Froth the milk and pour it over the mocha base. This is a rich, indulgent treat that combines chocolate and creamy foam in every cup. It is especially delightful on weekend mornings when you have extra time to savor it.
For a citrus twist, try infusing your milk with dried lemon balm before frothing. You can learn how to prepare dried lemon balm in our guide on how to dry lemon balm in oven for a unique flavor addition to your morning brew.
Frothy Coffee and Breakfast Pairings
Frothy coffee pairs wonderfully with a good breakfast. The creamy texture and rich flavor complement a wide range of morning foods. Here are some ideas to complete your breakfast routine.
- Fresh Bread: A warm slice of bread with butter is a classic pairing. For a quick option, try making bread without an oven and yeast using a stovetop method.
- Garlic Bread: If you enjoy savory breakfast options, garlic bread with frothy coffee is an unexpected but delightful combination.
- Fruit and Yogurt: The acidity of fruit balances the richness of frothy coffee. Try a bowl of berries with Greek yogurt alongside your morning drink.
- Eggs Any Style: Scrambled, poached, or fried eggs pair naturally with a creamy coffee. The protein in eggs helps balance the caffeine boost.
Pairing your frothy coffee with a simple breakfast creates a complete morning ritual. It does not have to be complicated. Even a quick piece of toast and a cup of creamy foam coffee can make your morning feel special.
If you want to explore more breakfast ideas, check out our article on how to make bread without oven and yeast for easy, no-fuss breakfast bread recipes that pair perfectly with your morning frothy coffee.
Maintaining Your Milk Frother for Long-Lasting Performance
A good milk frother can last for years with proper care. Regular maintenance keeps your frother working at its best and ensures every cup of frothy coffee tastes great. Here is how to care for your frother.
- Rinse after every use. Run the frother under warm water immediately after frothing. Do not let milk dry on the whisk or wand.
- Deep clean weekly. Soak the frother parts in warm, soapy water for 10 minutes. Scrub gently with a soft brush to remove any residue.
- Descale monthly. If you live in an area with hard water, mineral buildup can affect performance. Run a cycle with equal parts water and white vinegar to remove scale.
- Store properly. Keep your frother in a dry place. Moisture can damage the motor and electrical components over time.
- Replace worn parts. Whisk attachments wear out over time. If the foam quality declines, it may be time to replace the frother head.
Taking a few minutes to care for your frother pays off in better-tasting coffee and a longer-lasting device. A clean frother produces smoother foam and heats milk more evenly.
Frequently Asked Questions About Frothy Coffee
Can I make frothy coffee without a milk frother?
Yes, you can make frothy coffee without a dedicated frother. A French press works well. Just heat your milk, pour it into the French press, and pump the plunger up and down rapidly for 30 to 60 seconds. You can also use a hand whisk or a blender to froth milk. These methods produce a lighter foam than a milk frother, but they still work well for adding creaminess to your coffee.
What is the best milk for frothy coffee?
Whole milk is widely considered the best milk for frothy coffee because its fat content creates a rich, stable foam. However, oat milk has become a popular alternative, especially among plant-based drinkers. Oat milk froths beautifully and has a naturally creamy taste. Almond milk and coconut milk also work well but produce a lighter foam.
How long should I froth milk for the best results?
For a single serving, froth milk for 20 to 30 seconds. This creates a smooth, velvety foam with the right amount of air. If you prefer a thicker foam, froth for up to 45 seconds. Over-frothing beyond this point can create large bubbles and a dry, stiff texture. Practice and timing will help you find your preferred froth consistency.
Can I froth milk in the microwave first?
Yes, you can warm milk in the microwave before frothing it. Heat the milk in a microwave-safe container for 30 to 45 seconds until it is warm but not hot. Then use your frother to create the foam. Just be careful not to boil the milk, as scorched milk will not froth properly and will taste bitter.
Why is my frothy coffee foam disappearing so quickly?
Thin foam that disappears fast usually means the milk was too warm before frothing or the frothing time was too short. Cold milk froths better and holds its shape longer. Also, the type of milk matters. Skim milk creates airy foam that dissipates quickly, while whole milk or oat milk produces a denser, longer-lasting froth. Cleaning your frother regularly also helps maintain its frothing power.
Is frothy coffee healthy?
Frothy coffee can be a healthy part of your morning routine. Milk provides calcium, protein, and vitamins. The foam itself is simply aerated milk, so it carries the same nutritional benefits. If you watch your calorie intake, use low-fat or plant-based milk. Adding sugar or flavored syrups increases the calorie count, so enjoy those in moderation. Overall, a plain frothy coffee made with milk and no added sweeteners is a light, nutritious way to start your day.
Conclusion
Making frothy coffee with a milk frother at home is one of the simplest ways to elevate your daily coffee routine. With the right frother, the right milk, and a little practice, you can enjoy cafe-quality drinks every single morning. The process is quick, affordable, and endlessly customizable.
Start with the basics. Choose your favorite milk, heat it to the right temperature, and froth it using the technique that works best for your device. Once you feel comfortable, experiment with flavors, temperatures, and serving styles. Soon, making frothy coffee will become second nature.
The beauty of frothy coffee is that it fits into any lifestyle. Whether you prefer a simple cappuccino, a flavored latte, or an iced cold foam drink, a milk frother gives you the tools to create it all. So grab your frother, pick up your favorite milk, and start making frothy coffee at home today. Your mornings will never taste the same again.