How To Fix Oven Not Heating With These Proven Steps
Is your oven not heating up? Don’t panic. This guide walks you through proven steps to diagnose and fix common oven heating problems yourself. You will learn how to check the heating element, thermal fuse, thermostat, and more with simple tools. Most oven not heating issues are easy to repair without calling a technician. Follow along and get your oven back to cooking temperature fast.
Your oven is one of the most important appliances in your kitchen. It handles everything from Sunday roasts to simple weeknight dinners. So when your oven not heating up becomes a problem, it throws your whole routine off track.
Maybe you preheated the oven for an hour and your pizza dough still won’t rise. Or perhaps you set the temperature and the oven stays cold. Whatever the situation, a broken oven is frustrating. But here is the good news: most heating problems have simple causes and even simpler fixes.
In this guide, we will walk you through proven steps to troubleshoot and repair an oven that is not heating. We will cover electric and gas models alike. You will learn how to identify the problem, test the parts, and decide whether to fix it yourself or call for help. By the end, you will have the confidence to tackle this common household issue head-on.
Key Takeaways
- Identify the root cause: A broken heating element, blown thermal fuse, or faulty thermostat are the most common reasons an oven stops heating.
- Test with a multimeter: You can quickly check if your bake element, broil element, or thermal fuse is working using a simple multimeter.
- Safety first: Always disconnect power before inspecting any electrical components inside your oven.
- Gas vs. electric matters: Gas ovens rely on an igniter, while electric ovens use heating elements. The fix depends on your oven type.
- DIY fixes save money: Replacing a heating element or thermal fuse costs far less than hiring a professional repair service.
- Know when to call a pro: Control board failures and complex wiring issues are best left to experienced technicians.
📑 Table of Contents
- Why Your Oven Won’t Heat Up
- How to Check the Heating Element
- Inspecting the Thermal Fuse
- Testing the Oven Thermostat and Control Board
- Gas Oven Igniter Problems
- Common Mistakes to Avoid When Fixing an Oven
- When to Call a Professional
- Preventing Future Oven Heating Problems
- Oven Not Heating: Electric vs. Gas Quick Comparison
- Final Thoughts on Fixing an Oven Not Heating
Why Your Oven Won’t Heat Up
Before you start poking around inside your oven, it helps to understand what could be going wrong. An oven not heating can stem from several different causes. Each one points to a different fix.
Let us break down the most common culprits so you know exactly what to look for.
Heating Element Failure
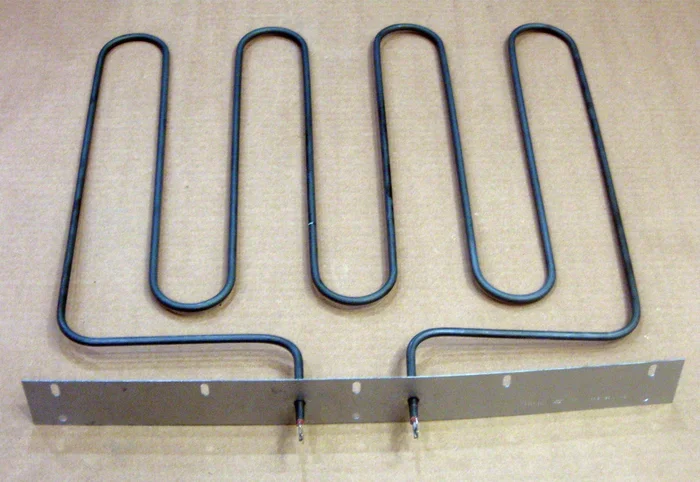
The bake element sits at the bottom of your oven. It glows red when the oven is heating. If your oven not heating during bake mode, a burned-out element is often the reason. The broil element works the same way but is located at the top. Both can fail over time due to normal wear and tear.
Blown Thermal Fuse
Every oven has a thermal fuse. It acts as a safety device. If the oven overheats, the fuse blows to prevent a fire. Once the thermal fuse is blown, the oven will not heat at all. This is one of the most common reasons for an oven not heating problem.
Faulty Oven Thermostat
The thermostat controls the oven temperature. It tells the heating element when to turn on and off. A broken thermostat means the oven cannot regulate heat properly. Sometimes it stops heating entirely.
Control Board Malfunction
Modern ovens rely on an electronic control board. It sends power to the heating elements based on your temperature settings. If the control board fails, the oven may not respond at all. This is a less common but more serious issue.
Igniter Problems in Gas Ovens
Gas ovens use an igniter to light the gas and produce heat. Over time, the igniter can weaken or break. A faulty igniter means the gas will not light, and the oven stays cold. This is the most frequent cause of a gas oven not heating.
How to Check the Heating Element
The heating element is the first thing you should inspect. It is also the easiest to test and replace. Whether you have a bake element or a broil element, the testing process is the same.
What You Need
Before you begin, gather these tools:
- A screwdriver set
- A multimeter (digital)
- Replacement element (if needed)
- Work gloves for safety
Step-by-Step Testing
First, turn off the power to your oven. You can switch off the circuit breaker for safety. Do not skip this step. Working with electrical components can be dangerous.
Next, remove the screws that hold the heating element in place. Carefully pull the element forward. You should see two wire connectors at the back. Disconnect them gently.
Now set your multimeter to the ohms setting. Place one probe on each terminal of the element. A working element will show a reading between 20 and 40 ohms. If the reading is zero or shows no continuity, the element is broken and needs replacement.
While you have the element out, inspect it visually. Look for cracks, blistering, or spots where the metal has burned through. These are clear signs of a failed oven element.
Replacing the Element
Replacing a bake element is straightforward. Connect the new element wires to the same terminals. Secure the element with screws. Restore power and test the oven. If the new element glows red, you have fixed the problem.
Quick Tip: Always match the replacement element to your oven model. Check the owner manual or look up the model number online before ordering.
Inspecting the Thermal Fuse
A blown thermal fuse is one of the top reasons an oven stops working. The good news is that checking it is simple. The bad news is that a blown fuse cannot be repaired. You must replace it.
Locating the Thermal Fuse
The thermal fuse is usually found near the back of the oven or close to the heating element. On some models, it is mounted on the top of the oven cavity. Check your owner manual for the exact location.
Testing the Fuse
Again, make sure the oven is disconnected from power. Remove the fuse from its mounting bracket. Set your multimeter to the continuity setting. Touch the probes to each end of the fuse.
If the multimeter shows no continuity, the fuse is blown. This confirms that the thermal fuse is why your oven not heating problem exists.
Replacing the Fuse
Buy a replacement fuse that matches your oven model. Disconnect the old fuse wires and connect the new ones in the same positions. Secure the new fuse in place. Restore power and test the oven.
Important: A blown thermal fuse is often a sign of a deeper problem. If your oven overheated before the fuse blew, find and fix that issue too. Otherwise, the new fuse may blow again.
Testing the Oven Thermostat and Control Board
If the heating element and thermal fuse both check out fine, the problem may lie deeper inside the oven. The thermostat and control board are the next things to examine.
Testing the Thermostat
The oven thermostat is the sensor that monitors internal temperature. It sends signals to the control board. To test it, set your multimeter to ohms and disconnect the thermostat wires. Touch the probes to the thermostat terminals.
At room temperature, a working thermostat should show a reading close to zero ohms. If it shows infinite resistance, the thermostat is faulty and needs replacement.
Checking the Control Board
The control board is the brain of your oven. It receives input from the thermostat and sends power to the heating elements. A damaged control board will prevent the oven from heating.
Inspecting the control board requires more care. Look for visible signs of damage like burn marks, cracked solder joints, or burnt components. If you see any of these, the control board likely needs to be replaced.
Control board replacement is more complex than element or fuse replacement. If you are not comfortable with this step, it is okay to call a professional. Oven repair professionals can handle control board issues safely and efficiently.
Gas Oven Igniter Problems
If you have a gas oven, the igniter is your prime suspect. Gas ovens do not use heating elements the way electric models do. Instead, they rely on an igniter to light the gas burner.
Signs of a Failing Igniter
Watch for these symptoms:
- The oven takes a very long time to heat up
- The oven does not reach the set temperature
- The igniter glows dimly or not at all
- The gas smell is present but no flame ignites
If you notice any of these, the igniter is likely the problem. A weak igniter cannot open the gas valve properly, so no heat is produced.
Testing the Igniter
Disconnect power to the oven. Remove the igniter from its mounting. Use your multimeter to check for continuity. A working igniter should read between 1000 and 2500 ohms. If the reading is outside this range, replace the igniter.
Replacing the Igniter
Buy a replacement igniter that matches your oven model. Remove the old igniter and install the new one in the same position. Reconnect the wires securely. Restore power and test the oven. The igniter should glow and the gas should ignite within a minute or two.
Quick Tip: Never try to light a gas oven manually if the igniter is not working. This is a safety hazard. Always use the proper ignition system.
Common Mistakes to Avoid When Fixing an Oven
DIY oven repair can save you a lot of money. But mistakes can make things worse. Here are some common errors to avoid.
Skipping Safety Steps
The most important rule is to always disconnect power before working on your oven. Some people forget to turn off the circuit breaker. Working on a live oven can cause electric shock or even death. Never take this risk.
Guessing Instead of Testing
It is tempting to just swap parts until something works. But that wastes money and time. Always test each component with a multimeter before replacing it. This way, you know exactly what is broken and what is not.
Ignoring the Manual
Every oven model is different. The owner manual provides specific instructions for troubleshooting and part replacement. Ignoring it can lead to mistakes. Keep your manual handy or look up a digital copy online.
Using the Wrong Replacement Parts
Not all heating elements or fuses are the same. Using a part that does not match your oven model can cause further damage. Always verify the part number before purchasing a replacement.
Overlooking Simple Fixes
Sometimes the problem is not a broken part. A tripped breaker, a loose wire connection, or a faulty power outlet can mimic a broken oven. Check the basics first before diving into complex repairs.
When to Call a Professional
Not every oven problem is a DIY job. Some issues require professional expertise. Here is when you should call in the experts.
If you have tested the heating element, thermal fuse, thermostat, and igniter, and everything checks out fine, the problem may be the control board. Control board replacement is complex and requires electrical knowledge. A professional oven repair technician can handle this safely.
Also, if your oven is still under warranty, do not attempt DIY repairs. Opening the oven may void the warranty. Contact the manufacturer or an authorized service center instead.
Finally, if you smell gas near a gas oven, stop immediately. Do not attempt any repairs. Gas leaks are dangerous. Evacuate the area and call your gas company or emergency services right away.
Preventing Future Oven Heating Problems
Once you have fixed your oven, you want to keep it running smoothly. Regular maintenance goes a long way toward preventing future issues.
- Clean the oven regularly: Food debris and grease can affect oven performance. Clean spills promptly and do a deep clean every few months.
- Check the seals: A worn door gasket lets heat escape. Inspect the seal around the oven door and replace it if it looks damaged.
- Avoid overloading the oven: Blocking airflow with too many dishes can cause uneven heating or overheating.
- Use the right cookware: Metal pans conduct heat better than glass or ceramic. Using the right cookware helps the oven maintain temperature more efficiently.
- Schedule annual maintenance: A professional inspection once a year can catch small problems before they become big ones.
These simple habits keep your oven in top shape. They also extend the life of your appliance and save you from unexpected breakdowns.
Oven Not Heating: Electric vs. Gas Quick Comparison
Here is a quick side-by-side look at the most common causes based on oven type.
| Issue | Electric Oven | Gas Oven |
|---|---|---|
| Heating element | Burned-out bake or broil element | N/A |
| Igniter | N/A | Weak or broken igniter |
| Thermal fuse | Blown fuse stops all heating | Blown fuse stops all heating |
| Thermostat | Faulty thermostat stops heat | Faulty thermostat stops heat |
| Control board | Prevents power to elements | Prevents power to igniter and valve |
| Wiring | Loose or damaged wires | Loose or damaged wires |
This table helps you narrow down the problem based on your oven type. Start with the most common cause for your model and work from there.
Final Thoughts on Fixing an Oven Not Heating
Dealing with an oven that will not heat up is stressful. But most of the time, the fix is simpler than you think. Whether it is a burned-out heating element, a blown thermal fuse, a weak igniter, or a faulty thermostat, the steps in this guide will help you identify and resolve the issue.
Always put safety first. Disconnect power before opening the oven. Use the right tools. Test each component carefully. And do not hesitate to call a professional when a repair is beyond your comfort level.
With the right approach, you can save money, learn a valuable skill, and get back to cooking your favorite meals. Fixing an oven not heating is one of the most rewarding DIY repairs you can do. Now go ahead and give it a try.
Frequently Asked Questions
Why is my oven not heating up but the light works?
This usually means the heating element or igniter has failed while the oven’s electrical system is still partially working. Check the bake element for visible damage or test it with a multimeter to confirm the issue.
How much does it cost to fix an oven that is not heating?
If you replace the heating element yourself, it typically costs between $30 and $100 for the part. Hiring a professional for oven repair may cost $150 to $300 depending on the problem and your location.
Can a tripped circuit breaker cause an oven not heating?
Yes, absolutely. A tripped breaker cuts power to the oven, which prevents it from heating. Check your electrical panel first before assuming a more serious internal problem.
How do I know if my oven thermal fuse is blown?
Use a multimeter to test the fuse for continuity. If the multimeter shows no continuity, the thermal fuse is blown and needs replacement. This is a quick and inexpensive fix.
Is it safe to use an oven with a broken heating element?
No, it is not safe. A damaged heating element can cause uneven heating, sparking, or electrical hazards. Replace the element as soon as possible to ensure safe operation.
How long does it take to fix an oven not heating?
Most fixes take between 30 minutes and two hours. Replacing a heating element or thermal fuse is usually quick. Control board repairs may take longer and are best left to professionals.
=== CONCLUSION ===
Fixing an oven not heating is within reach for most homeowners. You have the tools, the knowledge, and the confidence to tackle this repair yourself. Start by identifying the most likely cause based on your oven type. Test each component carefully and replace only the parts that are actually broken.
Remember that safety comes first every time. And when in doubt, reach out to a qualified technician. Your oven is a workhorse in the kitchen, and with proper care and timely repairs, it will serve you well for years to come.