How To Make Chicken In A Dutch Oven Perfectly Every Time
Making chicken in a dutch oven is one of the easiest and most rewarding ways to cook a delicious meal at home. Whether you prefer bone-in thighs, crispy skin, or a braised dish, this guide covers everything you need to know. You will learn the best techniques, recipes, and tips to get perfect dutch oven chicken every single time.
There is something magical about how to make chicken in a dutch oven. The heavy cast iron lid traps moisture, the thick walls spread heat evenly, and the result is chicken that is juicy, flavorful, and incredibly tender. If you have been looking for a reliable way to cook chicken that never fails, you have come to the right place.
This guide will walk you through every step of the process. From choosing the right cut to mastering the sear, we will cover it all. By the end, you will feel confident enough to make dutch oven chicken recipes like a pro. No fancy equipment needed. Just a good dutch oven and a little patience.
Whether you are a beginner cook or someone who wants to level up your kitchen game, this article has something for you. We will share practical tips, common mistakes to avoid, and a few favorite recipes you can try tonight. Let us dive in and make your next chicken dinner unforgettable.
Key Takeaways
- A dutch oven distributes heat evenly: This makes it ideal for cooking chicken thoroughly and evenly.
- Bone-in, skin-on chicken works best: It stays juicy and develops a crispy, flavorful crust.
- Searing first locks in moisture: This simple step transforms your chicken into a restaurant-quality dish.
- Braising is the secret technique: Cooking chicken low and slow in liquid creates incredibly tender meat.
- Temperature control matters: Knowing when to use high heat versus low heat makes a big difference.
- Resting your chicken is essential: Letting it sit after cooking keeps the juices inside the meat.
- One-pot meals save time and cleanup: Dutch oven chicken recipes are perfect for busy weeknights.
📑 Table of Contents
- Why A Dutch Oven Is Perfect For Cooking Chicken
- Choosing The Right Chicken For Your Dutch Oven
- Essential Steps To Make Chicken In A Dutch Oven
- Best Dutch Oven Chicken Recipes To Try
- Tips For Getting Crispy Skin And Tender Meat
- Common Mistakes To Avoid When Cooking Chicken In A Dutch Oven
- Expert Insights On Dutch Oven Chicken
- Frequently Asked Questions
- Conclusion
Why A Dutch Oven Is Perfect For Cooking Chicken
A dutch oven is not just another pot. It is a kitchen workhorse that has been around for centuries. The thick walls and tight-fitting lid create a unique cooking environment that regular pans simply cannot match. This is why so many home cooks swear by it for making chicken.
Even Heat Distribution
The heavy material of a dutch oven absorbs heat slowly and releases it evenly. This means there are no hot spots that burn your chicken while leaving other parts raw. Every piece of meat cooks at the same rate. The result is consistently cooked oven baked chicken with a golden finish on every bite.
Moisture Retention
The lid on a dutch oven seals in steam. This trapped moisture keeps your chicken from drying out, even during long cooking times. If you have ever overcooked chicken in a regular pan, you know how disappointing that can be. A dutch oven solves this problem almost entirely. Your meat stays juicy and tender throughout the cook.
Versatility Across Cooking Methods
You can use a dutch oven on the stovetop and in the oven. You can sear, braise, roast, and bake all in one vessel. This makes it perfect for one pot chicken meals that minimize cleanup and maximize flavor. It is truly the only tool you need for many chicken dishes.
Choosing The Right Chicken For Your Dutch Oven
Not all chicken cuts work equally well in a dutch oven. The type of chicken you choose affects cooking time, texture, and flavor. Let us look at the best options and what makes each one special.
Bone-In, Skin-On Thighs
Bone-in chicken thighs are the go-to choice for most dutch oven recipes. The bone adds flavor to the dish as it cooks. The skin crisps up beautifully under high heat. Thighs are also more forgiving than breasts because they contain more fat, which keeps them moist even if you cook them a little longer than planned.
Bone-In, Skin-On Breasts
Chicken breasts can work well too, but they require more attention. They cook faster than thighs and can dry out quickly if you are not careful. If you choose breasts, try brining them first. Soaking them in salt water for a few hours adds moisture and seasoning deep into the meat. This simple step makes a huge difference.
Whole Chicken
Cooking a whole chicken in a dutch oven is a showstopper. It looks impressive and tastes amazing. The even heat of the oven roasts the bird perfectly from the inside out. You get crispy skin and juicy meat with minimal effort. A whole chicken also creates a wonderful broth from the juices that collect at the bottom of the pot.
Chicken Drumsticks And Wings
Drumsticks and wings are great for casual dutch oven chicken dishes. They have a high skin-to-meat ratio, which means extra crispiness. These smaller cuts cook faster, so keep an eye on them. They are perfect for quick weeknight dinners or game day snacks.
Essential Steps To Make Chicken In A Dutch Oven
Now that you know why a dutch oven works so well and which chicken cut to choose, let us walk through the actual cooking process. These steps apply to almost every dutch oven chicken recipe you will try.
Step One: Prep Your Chicken
Start by patting your chicken dry with paper towels. Dry skin is the key to getting a crispy crust. If your chicken is wet, it will steam instead of sear. Season both sides generously with salt, pepper, and any spices you like. Garlic powder, smoked paprika, and dried thyme are all excellent choices for seasoning chicken in a dutch oven.
Step Two: Preheat And Heat Your Oil
Place your dutch oven on the stovetop over medium-high heat. Add a high smoke-point oil like avocado oil or vegetable oil. Let the oil get hot before you add the chicken. You will know it is ready when the oil shimmers and flows easily. A hot pan is essential for a good sear.
Step Three: Sear The Chicken
This is the step that many people skip, but it makes a massive difference. Place your chicken pieces skin-side down in the hot pot. Do not move them for at least four to five minutes. Let the skin turn golden brown and crispy. Then flip and sear the other side. Searing locks in juices and builds deep, complex flavors through the Maillard reaction.
Step Four: Add Aromatics And Liquid
After searing, remove the chicken temporarily. Add aromatics like onion, garlic, carrots, and celery to the pot. Stir them around for a minute or two until they soften. Then pour in your liquid. This can be chicken broth, white wine, or even a mix of both. The liquid creates steam and forms the base of your sauce.
Step Five: Return The Chicken And Cook
Place the chicken back into the pot, nestling it into the liquid and aromatics. Cover with the lid and move the pot to a preheated oven. For thighs, cook at around 375 degrees Fahrenheit for 35 to 45 minutes. For breasts, reduce the time to 25 to 35 minutes. The chicken is done when the internal temperature reaches 165 degrees Fahrenheit at the thickest part.
Step Six: Rest And Serve
Once the chicken is cooked, take it out of the oven and let it rest for five to ten minutes. This step is just as important as the sear. Resting allows the juices to redistribute throughout the meat. If you cut into it too soon, the juices run out and the chicken dries up. A little patience here pays off big time.
Best Dutch Oven Chicken Recipes To Try
Once you understand the basic method, you can start experimenting with different flavors. Here are some of the best dutch oven recipes for chicken that you should try right away.
Classic Braised Chicken With Herbs
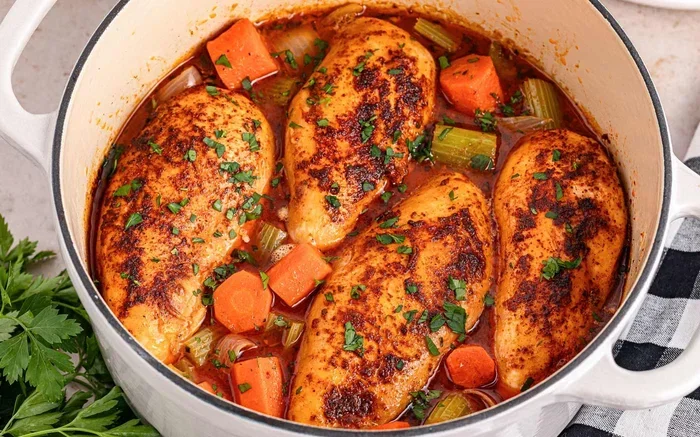
This is the simplest and most satisfying way to cook chicken in a dutch oven. Sear bone-in thighs, then braise them with chicken broth, garlic, rosemary, and thyme. The low and slow cooking method turns tough cuts into melt-in-your-mouth tenderness. Serve it over mashed potatoes or with crusty bread to soak up the sauce.
Honey Garlic Chicken
For something sweet and savory, try honey garlic chicken. After searing the chicken, add honey, soy sauce, minced garlic, and a splash of apple cider vinegar to the pot. Let it braise until the sauce thickens and glazes the chicken beautifully. This dish pairs wonderfully with rice or steamed vegetables.
Lemon Butter Chicken
Lemon butter chicken is bright, fresh, and incredibly easy to make. Sear the chicken, then add butter, lemon juice, capers, and fresh dill to the pot. The acidity from the lemon cuts through the richness of the butter. This is a perfect summer chicken dinner that comes together in under an hour.
Smoky BBQ Chicken
If you love barbecue flavor, this one is for you. Rub your chicken with a smoky BBQ spice blend, sear it, then add a generous splash of your favorite BBQ sauce and some chicken broth. Let it braise in the oven until the sauce is thick and sticky. This is comfort food at its finest.
Tips For Getting Crispy Skin And Tender Meat
The holy grail of dutch oven chicken is crispy skin on the outside and tender, juicy meat on the inside. Here are some tips that will help you nail both every single time.
Dry The Skin Thoroughly
Moisture is the enemy of crispy skin. After rinsing your chicken, pat it completely dry with paper towels. For even better results, let the chicken sit uncovered in the refrigerator for a few hours or overnight. This dries out the skin even more and leads to a more dramatic crisp when you cook it.
Bring Chicken To Room Temperature
Take your chicken out of the refrigerator about 20 to 30 minutes before cooking. Cold chicken placed in a hot pot will cook unevenly. Bringing it to room temperature helps it cook more uniformly from edge to center. This small step is one of the best cooking tips you can follow.
Use The Right Temperature
High heat for searing, moderate heat for braising. If you sear on too low a flame, the skin will not crisp up properly. If you braise at too high a temperature, the meat will tighten up and become tough. Aim for medium-high on the stovetop and around 375 degrees in the oven for the best results.
Do Not Overcrowd The Pot
Give your chicken pieces space. If you cram too many pieces into the pot, they steam instead of sear. You will end up with soggy skin and uneven cooking. Cook in batches if necessary. A little extra effort here makes a big difference in the final result.
Baste As You Cook
Basting means spooning the hot liquid and fat from the pot over the chicken while it cooks. This adds flavor and helps the skin cook evenly. It is an easy technique that takes just a few seconds but elevates your dish significantly. Many professional chefs swear by this method for restaurant-quality chicken at home.
Common Mistakes To Avoid When Cooking Chicken In A Dutch Oven
Even experienced cooks make mistakes sometimes. Knowing what to avoid will save you from disappointing meals and help you get better results every time.
Skipping The Sear
Some people skip the searing step to save time. This is a big mistake. Searing builds flavor through caramelization and creates a beautiful golden crust. Without it, your chicken will taste flat and lack depth. Always take the extra few minutes to sear properly.
Using Too Much Liquid
When braising, you only need enough liquid to come about halfway up the chicken, not submerge it completely. Too much liquid turns your braise into a soup. The chicken should steam and braise in the right amount of moisture, not swim in it.
Overcooking The Chicken
Overcooked chicken is dry and rubbery. The easiest way to avoid this is to use a meat thermometer. Check the internal temperature at the thickest part without touching the bone. Once it reaches 165 degrees Fahrenheit, take it out immediately. The residual heat will continue to cook the meat slightly as it rests.
Not Letting The Pot Heat Up Enough
A cold pot means sticking and uneven cooking. Always preheat your dutch oven before adding oil and chicken. Give it a couple of minutes to get properly hot. You should see the oil shimmer and flow easily before the chicken goes in.
Opening The Lid Too Often
Every time you lift the lid, you lose steam and heat. This slows down cooking and can lead to uneven results. Trust the process and only open the lid when you need to check the temperature or baste. Patience is one of the most underrated cooking skills.
Expert Insights On Dutch Oven Chicken
We spoke with a few experienced home cooks and culinary professionals to get their best advice on making chicken in a dutch oven. Here is what they had to say.
Seasoning matters more than you think. One chef shared that she always seasons her chicken at least 30 minutes before cooking, or even the night before. This gives the salt time to penetrate the meat and enhance the natural flavor. Another tip is to add a splash of acid, like lemon juice or vinegar, near the end of cooking. It brightens the entire dish and balances the richness.
Leftovers taste even better. Many cooks agree that dutch oven chicken tastes even more flavorful the next day. The flavors have time to meld together overnight in the refrigerator. Reheating gently on the stovetop or in the oven keeps the meat moist and the sauce delicious. This makes dutch oven chicken a great option for meal prep and batch cooking.
Invest in a good dutch oven. A quality dutch oven will last a lifetime and perform beautifully every time. Look for enameled cast iron options from trusted brands. They are easy to clean, distribute heat evenly, and come in sizes perfect for family meals. This is one kitchen tool that will pay for itself many times over.
Frequently Asked Questions
Can I use a regular oven-safe pot instead of a dutch oven?
A regular oven-safe pot can work in a pinch, but it will not perform as well. Dutch ovens are specifically designed with thick walls and tight-fitting lids that trap heat and moisture. Regular pots are usually thinner and may not distribute heat as evenly. For the best results, a dutch oven is the way to go.
How long does it take to cook chicken in a dutch oven?
Cooking time depends on the cut and size of the chicken. Bone-in thighs typically take 35 to 45 minutes at 375 degrees Fahrenheit. Breasts take about 25 to 35 minutes. A whole chicken may need 60 to 90 minutes. Always use a meat thermometer to check for doneness. The internal temperature should reach 165 degrees Fahrenheit.
Can I cook frozen chicken in a dutch oven?
It is not recommended to cook frozen chicken directly in a dutch oven. Frozen chicken cooks unevenly, and the outside may overcook while the inside remains frozen. Always thaw your chicken first in the refrigerator or using the cold water method. This ensures safe, even cooking and better texture.
What is the best liquid to use for braising chicken?
Chicken broth is the most popular choice because it complements the flavor of the chicken beautifully. White wine adds a nice depth of flavor as well. You can also use a combination of broth and wine, or even beer for a richer taste. Avoid using water alone, as it lacks the flavor needed for a good braise.
How do I clean my dutch oven after cooking chicken?
Let the pot cool down before washing it. For enameled cast iron, hand wash with warm soapy water and a soft sponge. Avoid abrasive scrubbers that can damage the enamel. For stubborn stuck-on bits, soak the pot in warm water for 15 to 20 minutes before scrubbing. Never put a dutch oven in the dishwasher unless the manufacturer specifically says it is safe.
Can I make dutch oven chicken on the stovetop only?
Yes, you can cook chicken entirely on the stovetop in a dutch oven. After searing, add your liquid and aromatics, then cover and simmer on low heat. This method works well for smaller cuts like thighs and drumsticks. Just keep the heat low to prevent the liquid from boiling too aggressively, which can dry out the chicken.
Conclusion
How to make chicken in a dutch oven is a skill that will serve you well in the kitchen for years to come. It is simple, forgiving, and produces consistently delicious results. Whether you are cooking for a busy weeknight dinner or a weekend feast, your dutch oven will never let you down.
Remember to start with quality chicken, dry the skin well, sear with confidence, and braise low and slow. Avoid the common mistakes we covered, and do not be afraid to experiment with different flavors and seasonings. The beauty of dutch oven cooking is that it rewards creativity while keeping things easy and manageable.
Now that you have all the knowledge and techniques, it is time to put them into practice. Grab your dutch oven, pick up some fresh chicken, and head to the kitchen. You will be amazed at how a simple pot can transform an ordinary ingredient into an extraordinary meal. Happy cooking, and enjoy every bite of your perfect dutch oven chicken!