How To Roast Perfectly Crispy Chickpeas In Toaster Oven
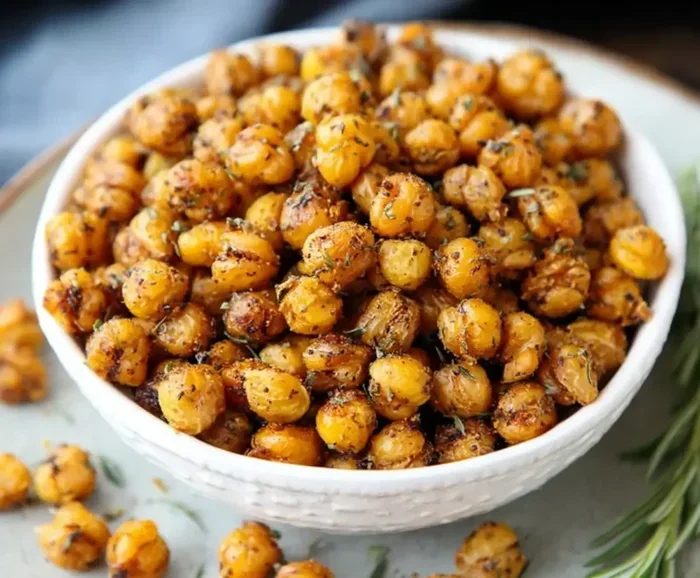
How To Roast Chickpeas In Toaster Oven is the simplest way to get crunchy, protein-packed snacks at home. This guide walks you through every step, from choosing chickpeas to perfect seasoning. You’ll learn the ideal temperature, timing, and common mistakes to avoid for consistently crispy results.
How To Roast Chickpeas In Toaster Oven is one of the easiest kitchen skills you can learn. In just half an hour, you can turn simple legumes into a crunchy, satisfying snack. This method uses a toaster oven, which heats up fast and uses less energy than a full-sized oven.
Roasted chickpeas are a great source of protein and fiber. They make a perfect crunchy alternative to chips or crackers. Whether you are looking for a healthy movie snack or a salad topper, this guide will show you how to get them just right. I will share simple steps, helpful tips, and common mistakes to avoid.
The beauty of a toaster oven is its convenience. You do not need to preheat a large oven for a small batch. The compact space circulates heat efficiently, which helps chickpeas turn out evenly crispy. Let’s dive into the process and turn your kitchen into a snack paradise.
Key Takeaways
- Toaster ovens make crispy chickpeas effortlessly: They use less energy and deliver even heat for perfect roasting.
- Dried chickpeas often roast better than canned: They are drier and crisp up more easily.
- Patting chickpeas dry is crucial: Moisture is the enemy of crunch.
- Season after tossing with oil: This helps spices stick evenly.
- Shake the pan halfway through: It ensures all sides become golden and crispy.
- Store in an open container: Keeping them sealed traps steam and softens them.
- You can customize flavors endlessly: From savory to sweet, the options are limitless.
📑 Table of Contents
Why Roasting Chickpeas In A Toaster Oven Is A Smart Choice
Using a toaster oven for roasted chickpeas has many advantages. First, it saves time. A toaster oven preheats in minutes, not the 15 to 20 minutes a regular oven needs. This means you can whip up a batch of crispy chickpeas quickly whenever a craving hits.
Second, a toaster oven uses less electricity. It heats only the small interior space, so your energy bill stays low. This makes it an eco-friendly choice for your oven-roasted chickpeas. Third, cleanup is easy. You will likely use just one baking sheet and some parchment paper.
The circulating fan in most toaster ovens creates a convection effect. This means hot air flows around the chickpeas from all sides. The result is a uniform crunch without needing to flip them constantly. If you love baked chickpeas but find the regular oven too bulky, a toaster oven is your best friend.
The Benefits Of A Toaster Oven For Crunchy Snacks
- Fast preheating: Ready in 3 to 5 minutes.
- Energy efficient: Uses a fraction of the power of a full oven.
- Even heat distribution: The fan promotes consistent browning.
- Easy to monitor: You can watch the chickpeas through the glass door.
- Minimal cleanup: One tray and parchment paper do the job.
Crispy Chickpeas Vs. Soft Chickpeas
The goal of how to roast chickpeas in toaster oven is to drive out moisture. Soft chickpeas have a lot of water inside. When you apply heat, that water turns to steam and escapes. If the steam leaves quickly, the chickpea skin dries and hardens. This creates the satisfying crunch we love.
If you leave too much moisture, the chickpeas will stay soft or even chewy. That is not necessarily bad, but it is not the crispy snack we are aiming for. The toaster oven’s dry, circulating heat is perfect for this dehydration process. It pulls out water faster than a conventional oven, giving you crunchy chickpeas in less time.
Picking The Right Chickpeas For Roasting
Not all chickpeas are created equal when it comes to roasting. The type you choose can make a big difference in the final texture. For the best roasted chickpeas, you want a variety that is low in moisture and has a sturdy skin.
Canned Vs. Dried Chickpeas
Canned chickpeas are super convenient. They are already cooked and ready to use. However, they contain a lot of liquid and can be soft. If you use canned chickpeas, you must dry them very thoroughly. Pat them with a clean kitchen towel and let them air-dry for 15 minutes.
Dried chickpeas need to be soaked and cooked first, but they often yield a crunchier result. The drying process removes more moisture from the bean itself. When you roast them, they puff up and crackle, creating a satisfying sound and texture. If you have time, try both and see which you prefer for your chickpeas recipe.
Draining And Drying Tips
No matter which type you use, removing surface moisture is the most important step. Here is how to do it right:
- Drain the chickpeas in a fine-mesh strainer.
- Rinse them under cold water to remove any slimy residue.
- Spread them on a clean, lint-free kitchen towel.
- Pat them firmly to absorb as much water as possible.
- Let them sit for 15 to 20 minutes, tossing occasionally.
Some people even roast them on a baking sheet for 10 minutes before seasoning. This extra step drives off hidden moisture. Trust me, this little extra effort is the secret to perfectly crispy chickpeas.
Essential Equipment And Prep
You do not need fancy tools to make great oven-roasted chickpeas. A few basic items will set you up for success. Having the right equipment makes the process smoother and the results more consistent.
Parchment Paper And Baking Sheets
Always line your baking sheet with parchment paper. It prevents the chickpeas from sticking and makes cleanup a breeze. A light-colored sheet is best because it reflects heat and prevents the bottoms from burning.
Use a baking sheet with a rim. This keeps the chickpeas from rolling off if you need to shake the pan. A single layer is key. Do not crowd the pan. If you spread the chickpeas too tightly, they will steam instead of roast. You want hot air to flow around each bean.
Preheating Your Toaster Oven
Preheating is essential for even roasting. Set your toaster oven to 400°F (200°C). Let it heat for at least 5 minutes before the chickpeas go in. A hot oven immediately starts crisping the outside, which seals in the texture.
If your toaster oven has a convection setting, use it. The fan will circulate the hot air and promote even browning. If it does not have a fan, just use the regular bake setting. You may need to rotate the pan halfway through to ensure even cooking.
Seasoning Ideas To Elevate Your Snack
Plain roasted chickpeas are delicious, but seasoning takes them to the next level. The oil helps the spices adhere to the chickpeas. You can keep it simple or get creative with global flavors. Here are some ideas for your healthy snack.
Classic Savory Blend
This is my go-to for a perfect protein snack:
- 1 tablespoon olive oil
- 1 teaspoon salt
- 1 teaspoon garlic powder
- 1 teaspoon smoked paprika
- ½ teaspoon cumin
- ¼ teaspoon black pepper
Toss the dried chickpeas with the oil first, then sprinkle the spices. Mix well with your hands. The oil acts as a glue for the seasonings.
Spicy And Sweet Options
For a kick, try a spicy blend:
- 1 teaspoon chili powder
- ½ teaspoon cayenne pepper
- 1 teaspoon smoked paprika
- ½ teaspoon salt
For something sweet, mix:
- 1 tablespoon coconut oil, melted
- 2 tablespoons maple syrup
- 1 teaspoon cinnamon
- Pinch of salt
The sweet version is amazing on its own or sprinkled over yogurt. Both options show how versatile roasted chickpeas can be.
Comparison Of Three Popular Seasoning Blends
| Blend Name | Key Flavors | Best Pairing | Heat Level |
|---|---|---|---|
| Mediterranean | Oregano, lemon zest, garlic, olive oil | Salads, grain bowls | Mild |
| Ranch | Powdered ranch, dill, onion powder, salt | Dipping, snacking | Mild |
| Tiger Spice | Smoked paprika, cumin, cayenne, salt | Spicy snack lovers | Medium |
You can also try a simple sea salt and olive oil version. Sometimes less is more. The natural nutty flavor of the chickpea shines through. This is a great starting point if you are new to making crispy chickpeas.
Step-By-Step Roasting Guide
Now that your chickpeas are prepped and seasoned, it is time to roast them. Follow these steps for the best results. This method works every time for how to roast chickpeas in toaster oven.
Temperature And Time Settings
- Preheat your toaster oven to 400°F (200°C).
- Line a baking sheet with parchment paper.
- Spread the seasoned chickpeas in a single layer.
- Place the sheet on the middle rack.
- Roast for 20 to 30 minutes.
The exact time depends on your toaster oven and whether you used canned or dried chickpeas. Start checking at the 20-minute mark. You want them to be golden brown and firm. They will continue to crisp up as they cool.
Shaking The Pan For Even Crispiness
Every 10 minutes, open the door and gently shake the pan. This moves the chickpeas around so they roast evenly on all sides. If you notice some pieces are browning faster than others, use tongs to rotate them.
Do not open the door too often. Each time you open it, heat escapes, and the oven needs to recover. But shaking the pan twice is a good balance. The sound of the chickpeas crackling is a great sign. It means moisture is escaping and you are on track for perfectly crispy chickpeas.
Quick Tips For The Best Texture
- Do not skip the drying step: Wet chickpeas will steam and stay soft.
- Use a small amount of oil: Just enough to coat lightly. Too much oil makes them greasy.
- Let them cool completely: They will firm up as they sit. Do not eat them straight from the oven if you want maximum crunch.
- One layer is key: Overcrowding leads to uneven roasting.
- Use the convection setting if available: It promotes faster, crispier results.
Troubleshooting: Why Your Chickpeas Aren’t Crispy
Sometimes, despite your best efforts, the roasted chickpeas turn out soft or chewy. Do not worry. This is a common issue and easy to fix. Understanding the cause helps you adjust for next time.
Common Mistakes To Avoid
The number one mistake is not drying the chickpeas enough. Even if they look dry on the outside, trapped moisture will steam them in the oven. Always pat them thoroughly and let them air-dry if possible.
Another mistake is using too much oil. The chickpeas only need a light coating. Excess oil pools at the bottom and creates soggy spots. A teaspoon of oil per cup of chickpeas is usually sufficient. Also, do not skip the salt. Salt draws out moisture, but when applied after oiling, it helps the skin dry and crisp.
Overcrowding the pan is a third culprit. If the chickpeas are piled on top of each other, the hot air cannot reach them. They will cook unevenly and turn soft. Give them space. A single layer with a little room between each bean is ideal.
Expert Insight: The Secret To Crunch
Professional chefs often say the secret is a two-stage roast. Roast the chickpeas at 400°F for 20 minutes, then increase the temperature to 425°F (220°C) for the final 5 to 10 minutes. The higher heat blasts the surface and creates an extra-crunchy shell. This technique works beautifully in a toaster oven because the small space intensifies the heat.
Another pro tip is to add a pinch of cornstarch to the chickpeas before seasoning. The cornstarch absorbs surface moisture and helps the outside become extra crispy. It is a small change that makes a big difference in your chickpeas recipe.
Storing And Using Your Roasted Chickpeas
Once you have mastered how to roast chickpeas in toaster oven, you will want to make them often. Storing them properly keeps them crunchy for days. You can also use them in many creative ways beyond snacking.
How Long Do They Last?
Stored in an open container at room temperature, roasted chickpeas stay crispy for about 3 to 4 days. If you seal them in an airtight container, they will soften faster because trapped steam has nowhere to go. An open bowl or a loosely covered container is best.
You can also store them in the fridge. They will last up to a week, but they may lose some crunch. A quick 5-minute toast in the toaster oven will revive them. Do not freeze roasted chickpeas if you want to maintain their texture. Freezing introduces moisture that ruins the crunch.
Creative Ways To Enjoy Them
Roasted chickpeas are not just a standalone snack. Try them in these ways:
- Salad topper: Add crunch to green salads or grain bowls.
- Soup garnish: Float them on creamy soups for texture.
- Trail mix: Combine with nuts and dried fruit for a protein-packed hike snack.
- Crouton substitute: Toss them on avocado toast or salads instead of bread.
- Yogurt or oatmeal topping: The sweet-spiced version works wonderfully here.
They are also a great air fryer alternative. If you do not have an air fryer, the toaster oven does the same job with equally delicious results. This makes roasted chickpeas accessible to everyone with a compact kitchen appliance.
Quick Tips For Serving
- Serve them warm for the most intense crunch.
- Offer a variety of seasoning flavors at a party.
- Pack them in a small jar for a portable protein snack.
- Use them as a topping for creamy dips like hummus or Greek yogurt.
Conclusion
How To Roast Chickpeas In Toaster Oven is a simple, rewarding skill that anyone can master. In less than half an hour, you can create a batch of crispy chickpeas that are healthier than chips and more satisfying than most snacks. The toaster oven makes the process fast, energy-efficient, and easy to monitor.
Remember to dry your chickpeas well, use a light coating of oil, and season generously. Roast them at 400°F, shake the pan halfway, and let them cool completely. These small steps make the difference between soft and crunchy. Once you start making oven-roasted chickpeas, you will never go back to store-bought snacks.
Experiment with different spices and blends to keep things interesting. From savory to sweet, the possibilities are endless. Enjoy your crunchy creation as a standalone snack or as a versatile ingredient in your meals. Happy roasting!
Frequently Asked Questions
Can I roast chickpeas in a toaster oven without parchment paper?
Yes, you can, but parchment paper makes cleanup much easier and prevents sticking. If you skip it, use a very light coat of oil on the baking sheet. The chickpeas may stick more, and you might have to soak the pan to remove them.
Do I need to preheat the toaster oven before roasting chickpeas?
Yes, preheating is important. A hot oven immediately starts crisping the outside of the chickpeas, which helps them become crunchy. Preheating for 5 minutes at 400°F ensures even cooking from the start.
How long does it take to roast chickpeas in a toaster oven?
It usually takes 20 to 30 minutes at 400°F. The exact time depends on whether you used canned or dried chickpeas and how crispy you like them. Start checking at 20 minutes and roast longer if needed.
Why are my roasted chickpeas still soft after cooking?
The most common reason is too much moisture. Make sure you dry the chickpeas thoroughly after rinsing. Also, avoid overcrowding the pan. If they are touching, they will steam instead of roast. Try the two-stage roast method for extra crunch.
Can I make roasted chickpeas ahead of time?
Yes, you can make them a day or two in advance. Store them in an open container at room temperature. They will stay crunchy for about 3 to 4 days. If they soften, a quick 5-minute toast in the toaster oven will restore their crispiness.
Are roasted chickpeas a healthy snack?
Absolutely. They are high in protein and fiber, which help keep you full. They are also low in fat if you use just a small amount of oil. They are a great alternative to processed snacks and can be part of a balanced diet.