Should I Cover My Pot Roast In The Oven For Best Results
Should I Cover My Pot Roast In The Oven? The answer depends on the texture you want. Covering keeps the meat moist and tender, while uncovering creates a delicious, crispy crust. This guide will show you exactly when to cover your pot roast in the oven for fall-apart tender results.
If you’ve ever wondered should I cover my pot roast in the oven, you’re not alone. This question pops up in kitchens every day. A pot roast is a classic comfort food. It’s perfect for Sunday dinners. But the cooking method can make or break the dish. One big decision is whether to cover it or not.
Covering traps steam. It keeps the meat juicy. But uncovering lets the surface brown. Both methods have their place. This guide will help you decide. You’ll learn the science behind covering. You’ll get step-by-step instructions. And you’ll discover the best times to uncover. By the end, you’ll know exactly how to cook a perfect pot roast every time.
Key Takeaways
- Covering traps moisture: A lid keeps juices inside, making your pot roast incredibly tender.
- Uncovering adds a crust: Removing the foil or lid in the last 30-45 minutes lets the surface brown and crisp.
- Low and slow is best: Cook at 300-325°F for a covered pot roast to break down tough fibers.
- Use the right pan: A Dutch oven or oven-safe pot with a tight-fitting lid works perfectly.
- Check internal temperature: Aim for 195-205°F for fall-apart tender beef.
- Rest the roast: Let it rest 15-20 minutes before slicing to retain juices.
- Braising liquid matters: Use broth, wine, or tomatoes to keep the meat flavorful.
📑 Table of Contents
Why Covering Your Pot Roast in the Oven Makes a Difference
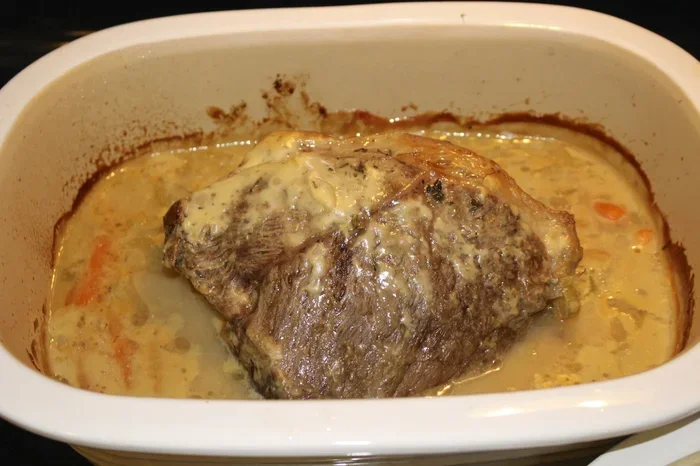
The way you cover your pot roast changes everything. When you use a lid or foil, you create a sealed environment. Steam builds up inside the pot. This moist heat breaks down tough muscle fibers. It also melts collagen into gelatin. The result is incredibly tender meat. Without a cover, the moisture escapes. The surface dries out. The meat can become tough.
Braising is the cooking method that makes this work. Braising combines dry heat with wet heat. You sear the meat first. Then you add liquid and cover it. The oven provides gentle, even warmth. This slow cooking process is ideal for tough cuts like chuck roast. The covered pot roast stays submerged in its own juices. Those juices baste the meat constantly.
Quick Tips for a Moist Pot Roast
- Always use a tight-fitting lid or heavy-duty foil.
- Add braising liquid halfway up the meat, not fully submerged.
- Place a rack at the bottom of the pot to lift the meat.
- Use oven-safe pots like cast iron or ceramic Dutch ovens.
- Avoid peeking too often. Every lift releases steam.
Covered vs. Uncovered: Which Method Should You Choose?
The debate between covered and uncovered pot roast is old. Both methods have strong advantages. The choice depends on your goal. Do you want melt-in-your-mouth tenderness? Or a rich, crispy crust? Let’s break it down.
| Factor | Covered Pot Roast | Uncovered Pot Roast |
|---|---|---|
| Moisture Level | Very high. Steam keeps meat juicy. | Lower. Surface dries and firms up. |
| Texture | Soft, fall-apart tender. | Crispy exterior, juicy interior. |
| Crust | None. Meat stays pale. | Deep brown, flavorful crust. |
| Cooking Time | Slightly faster. Heat stays trapped. | Slightly slower. Heat escapes. |
| Best For | Tough cuts, slow Sunday meals. | Finishing a roast for color. |
Most cooks use a two-step approach. They cover the roast for most of the cooking time. Then they uncover it near the end. This gives you the best of both worlds. The meat stays tender inside. The outside gets a beautiful crust.
What the Pros Say About Covering
Professional chefs often recommend a foil tent. A foil tent is not a tight seal. It allows some steam to escape. This prevents the meat from boiling. Instead, it gently braises. Chef Michael Smith says, “A loose foil cover is your best friend for pot roast. It traps enough moisture without turning the roast into a boil.”
Another expert tip is to use a Dutch oven. A Dutch oven has a heavy lid. It seals in moisture better than a baking pan with foil. The thick walls distribute heat evenly. This reduces hot spots. Your pot roast cooks more uniformly.
Step-by-Step: How to Properly Cover a Pot Roast
Covering a pot roast seems simple. But there is a right way and a wrong way. Follow these steps for perfect results every time.
Step 1: Sear the Roast. Pat the beef dry with paper towels. Season generously with salt and pepper. Heat oil in an oven-safe pot over medium-high heat. Sear all sides until browned. This step adds deep flavor.
Step 2: Add Aromatics and Liquid. Remove the roast. Add onions, carrots, and garlic to the pot. Pour in beef broth, red wine, or tomato juice. The liquid should reach about halfway up the roast. Do not cover the meat completely.
Step 3: Create the Cover. Place the lid on the pot. If your pot lacks a lid, use a double layer of heavy-duty aluminum foil. Crimp the foil tightly around the edges. This creates a seal that traps steam. Some cooks call this a foil tent. It’s loose enough to allow a little airflow.
Step 4: Place in the Oven. Put the covered pot on the center rack. The low heat will do the work. Resist the urge to open the lid. Every peek releases valuable steam and extends cooking time.
Covering Hacks for Better Results
- Use a double layer of foil if your lid is loose.
- Crisp the foil under the lid to improve the seal.
- Place a small towel between the pot and the lid to absorb excess condensation.
- For a Dutch oven, the built-in lid is usually perfect. No need for extra foil.
- Use oven-safe glass lids to check the roast without lifting the cover.
Oven Temperature and Timing for a Covered Pot Roast
Temperature control is the secret to a great pot roast. High heat dries out the outside before the inside is done. Low and slow is the golden rule. The ideal oven temperature for a covered pot roast is between 300°F and 325°F. At this range, the collagen in the beef slowly breaks down. The meat becomes fall-apart tender.
A general guideline is 30-35 minutes per pound. A 3-pound chuck roast will take about 1.5 to 2 hours covered. Use a meat thermometer to be precise. Insert it into the thickest part of the roast. The target internal temperature is 195°F to 205°F. At this range, the connective tissue has fully dissolved. The roast will be incredibly tender.
The Low-and-Slow Secret
Why does low heat work so well? High heat causes the muscle fibers to seize up. They squeeze out moisture. Low heat allows the fibers to relax. They release collagen into the braising liquid. This turns tough cuts into succulent, juicy meat. The covered environment keeps the humidity high. It prevents the surface from drying out during the long cook.
Expert Insight: “I always cook my pot roast at 325°F for 4 hours,” says food writer Sarah Johnson. “The covered pot roast comes out perfect every time. I never need to add more liquid.”
Here is a quick reference for cooking times:
- 3-pound roast: 3-3.5 hours covered at 325°F.
- 4-pound roast: 4-4.5 hours covered at 325°F.
- 5-pound roast: 5-5.5 hours covered at 300°F.
When to Leave the Pot Roast Uncovered
Leaving the pot roast uncovered is just as important as covering it. The uncovered phase adds a crispy, flavorful crust. It also reduces the braising liquid into a rich sauce. You should uncover the roast for the final 30 to 45 minutes of cooking. This timing works for most sizes.
When you remove the cover, the surface is exposed to dry oven heat. The moisture evaporates quickly. The proteins and sugars on the surface caramelize. This is called the Maillard reaction. It creates deep, complex flavors and a beautiful brown color. The roast juices also concentrate. They become a perfect base for gravy.
Uncovering for Browning
To get the best crust, place the uncovered roast on the upper oven rack. The top heat will brown the surface evenly. Baste the roast with the pan juices halfway through the uncovered time. Use a spoon to spoon the hot liquid over the meat. This adds flavor and speeds up browning.
Not all pot roasts need the uncovered phase. If you prefer a very soft, stew-like texture, you can leave it covered the entire time. This is common for traditional braised beef. The meat will be tender but pale. Some people love that soft texture. Others want a bit of crunch.
Quick Tips for the Uncovered Finish:
- Increase the oven temperature slightly to 350°F for the last 30 minutes.
- Brush the roast with a little olive oil or melted butter for extra browning.
- Watch the roast closely. It can go from golden to burnt quickly.
- Use the broiler for the last 5 minutes if you want a deep crust. Stay by the oven.
Common Mistakes That Ruin Your Pot Roast
Even with the best intentions, mistakes happen. Avoiding these common errors will save your pot roast. Here are the top pitfalls and how to fix them.
Mistake 1: Using the Wrong Pan. A thin baking sheet does not retain heat well. It creates hot spots. The meat cooks unevenly. Always use a heavy Dutch oven or a deep, oven-safe ceramic pot. These hold heat steady. They distribute warmth evenly around the roast.
Mistake 2: Overfilling with Liquid. Some recipes say to cover the meat completely. This is a mistake for pot roast. The liquid should reach about one-third to one-half of the meat. If the meat is fully submerged, it will boil instead of braise. Boiling makes the texture mushy. The flavor becomes diluted.
Mistake 3: Skipping the Sear. Searing adds a layer of flavor you cannot get any other way. It creates a fond on the bottom of the pot. That fond deglazes into the braising liquid. Without it, the roast tastes flat. Take the extra 10 minutes to brown the meat well.
Mistake 4: Cooking at Too High a Temperature. High heat makes the outside tough before the inside is done. The collagen needs time to break down. Stick to 300-325°F. Patience is the key to a tender pot roast.
Mistake 5: Not Resting the Roast. When the roast is done, take it out of the oven. Let it rest for 15-20 minutes before slicing. The juices redistribute throughout the meat. If you cut too soon, the juices run out onto the cutting board. The roast becomes dry. Tent it loosely with foil during the rest.
Avoid These Errors
- Do not use a glass lid if it is not oven-safe. Check the manufacturer’s rating.
- Do not add cold liquid to a hot pot. It can crack ceramic. Bring the broth to room temperature first.
- Do not skip the meat thermometer. Visual cues are not reliable for internal doneness.
- Do not crowd the pot. Leave room for the liquid to circulate around the roast.
- Do not forget to deglaze the pot after searing. Those browned bits are flavor gold.
The perfect pot roast comes from understanding both covered and uncovered cooking. Should I cover my pot roast in the oven? The answer is yes, for most of the cook. Then uncover it at the end for a gorgeous crust. This method gives you tender, juicy meat with a rich, caramelized exterior. It works for chuck roast, brisket, and even pork shoulder. The principles remain the same.
Remember the basics. Use a heavy pot with a tight lid. Keep the oven temperature low. Cook until the internal temp hits 195-205°F. Uncover for the last half hour. Rest the meat before serving. Follow these steps and you will never have a dry pot roast again. Your family and guests will rave about the braised beef you pull from the oven.
Now you have all the tools to decide should I cover my pot roast in the oven. The choice is yours based on the texture you love. Try the covered method first for a classic, tender result. Then experiment with the uncovered finish for a crispy crust. Each batch will teach you something new. Happy cooking!
Frequently Asked Questions
Should I cover my pot roast in the oven for the entire cooking time?
No, you should not cover it the entire time. Covering for most of the cook keeps the meat tender and juicy. Then uncover it for the last 30-45 minutes to develop a crispy, brown crust. This two-step method gives you the best of both worlds.
What is the best oven temperature for a covered pot roast?
The best temperature is between 300°F and 325°F. This low and slow heat breaks down tough fibers without drying out the meat. It allows the collagen to melt into gelatin, making the roast fall-apart tender.
Can I use aluminum foil instead of a lid to cover my pot roast?
Yes, aluminum foil works perfectly as a cover. Use a double layer of heavy-duty foil and crimp it tightly around the edges of the pot. This creates a good seal that traps steam. A loose foil tent is even better because it allows a little moisture to escape.
How do I know when my pot roast is done?
Use a meat thermometer inserted into the thickest part of the roast. The internal temperature should reach 195°F to 205°F. At this range, the connective tissue has fully broken down. The meat will be tender and easy to shred with a fork.
Why is my pot roast tough even after long cooking?
Toughness usually means the roast was not cooked long enough or at too high a temperature. Collagen needs time and low heat to turn into gelatin. Also, make sure you are using the right cut of meat. Chuck roast and bottom round are ideal for braising. Lean cuts like sirloin can become dry and tough.
Do I need to add liquid if I am covering the pot roast?
Yes, you need some liquid for braising. The liquid creates steam and flavor. Add beef broth, wine, or tomato juice until it reaches about halfway up the roast. The meat should not be fully submerged. The covered environment keeps the liquid from evaporating too quickly.