How To Bake Duck Breast In Oven Perfectly Every Time
Learning how to bake duck breast in oven is easier than most people think. With the right temperature, a little patience, and a few simple tricks, you can achieve crispy skin and juicy, pink meat at home. This guide covers every step, from preparation and seasoning to baking time and serving ideas. You will walk away feeling confident and ready to make duck breast in the oven your new favorite recipe.
There is something truly special about how to bake duck breast in oven and pulling a beautiful, golden piece of meat out of your oven. Duck breast has a rich, buttery flavor that feels both elegant and comforting at the same time. Whether you are cooking for a special dinner party or simply want to elevate your weeknight meals, mastering this cut is a real game changer in the kitchen.
Many home cooks think duck breast is difficult to prepare. They picture expensive restaurant dishes and complicated techniques that only professional chefs can pull off. But the truth is, how to bake duck breast in oven is one of the simplest and most rewarding cooking methods you can learn. With just a few basic steps, the right tools, and a little patience, you can achieve crispy skin, juicy meat, and stunning results right in your own kitchen. This guide will walk you through everything you need to know.
You will learn how to prepare the breast properly, what temperature to use, how long to bake it, and how to avoid the most common mistakes. By the end of this guide, you will feel completely confident making baked duck breast recipe after baked duck breast recipe. The best part is that once you nail the technique, you can get creative with different sauces and side dishes. Let us dive in and make your next duck breast in the oven dinner absolutely perfect.
Key Takeaways
- Score the skin before baking: This allows fat to render and creates perfectly crispy duck skin every single time.
- Use a meat thermometer: Pull the duck breast out at 130-135°F for the ideal medium-rare, juicy result.
- Let the duck rest for 5-8 minutes: Resting locks in the juices and makes every slice moist and flavorful.
- Start with a dry surface: Pat the skin completely dry before seasoning for the best possible crispiness.
- Pair with sweet and tangy sauces: Cherry, orange, and plum sauces complement the rich duck flavor beautifully.
- Save the rendered duck fat: It is incredibly versatile and adds amazing flavor to vegetables, eggs, and potatoes.
📑 Table of Contents
Why Oven-Baked Duck Breast Is a Game Changer
Baking duck breast in the oven offers benefits that stovetop cooking simply cannot match. When you roast duck breast in the oven, the heat surrounds the meat evenly from every direction. This means every slice cooks consistently, from the outer edge all the way to the center. There is no hot spot to worry about and no need to flip the meat halfway through.
Even Heat Distribution
Ovens circulate hot air around the duck breast, cooking it gently and evenly from all sides. On a stovetop, you have to manage heat zones and flip the meat carefully. With an oven, you set the temperature and let the appliance do the work. This hands-off approach frees you up to prepare side dishes or a simple sauce while your duck breast recipe comes together beautifully. The result is more consistent cooking with less effort.
Better Skin Crisping
One of the biggest challenges with duck breast is getting the skin perfectly crispy. Oven baking solves this problem in a wonderful way. The dry heat slowly renders the fat beneath the skin, creating that satisfying crunch and golden color everyone loves. When you learn how to bake duck breast in oven properly, the skin turns beautifully crispy and golden without any extra fuss. The rendered fat drips away from the meat, leaving you with a crackling exterior and tender interior.
Consistent and Repeatable Results
Oven baking gives you predictable, repeatable outcomes every time you cook. Once you find the right duck breast temperature and timing, you can recreate the same excellent results on any given night. This consistency is exactly why so many home cooks prefer the oven method for oven-baked duck dishes. You do not have to guess or hover over the stove. Just set the temperature, set the timer, and let the oven work its magic.
Quick Tip: Place the duck breast skin-side up on a wire rack set over a baking sheet. This allows air to circulate underneath and helps the rendered fat drip away, giving you even crispier skin and more even cooking throughout.
Essential Tools and Ingredients for Baking Duck Breast
Before you start cooking, make sure you have everything you need. Having the right tools and quality ingredients makes the entire process smoother and much more enjoyable. Here is a complete list for a great duck breast recipe.
Tools You Will Need
- A sharp knife: You need this for scoring the duck skin in a crosshatch pattern without cutting into the meat.
- A sturdy baking sheet: A rimmed sheet works best for even heat distribution and easy cleanup.
- A wire rack: This elevates the duck and allows rendered fat to drain away during baking.
- A meat thermometer: This is absolutely essential for checking the duck breast internal temp accurately and avoiding overcooking.
- Parchment paper or aluminum foil: These make cleanup much easier after all that delicious duck fat renders out.
- A sharp cutting board and slicing knife: You want clean, precise cuts for a beautiful presentation on the plate.
Ingredients for a Basic Duck Breast
- Fresh duck breast: One whole breast, about 8 to 12 ounces, with the skin left on for maximum crispiness.
- Kosher salt: Generous seasoning is key to bringing out the natural, rich flavor of the duck.
- Freshly cracked black pepper: Adds a gentle, warm heat that complements the rich, buttery meat perfectly.
- Fresh thyme or rosemary: Optional aromatic herbs that add a lovely, savory depth to the duck breast seasoning.
- A small drizzle of honey or maple syrup: This helps caramelize the skin beautifully during the baking process.
Optional Sauce Ingredients
While plain baked duck breast is absolutely delicious on its own, a simple sauce can take your dish to the next level. Popular options include duck breast with cherry sauce, a bright orange glaze, or a classic plum reduction. These pairings work so well because they balance the rich, slightly gamey flavor of the duck with sweet, tangy, and fruity notes. You do not need to be an expert sauce maker to pull these off either.
Step-by-Step: How to Bake Duck Breast in Oven
Now comes the fun part. Following these steps will help you master how to bake duck breast in oven like a professional chef. Each step is simple, but together they create something truly special on your plate.
Step 1: Prepare the Duck Breast
Remove the duck breast from the refrigerator about 15 to 20 minutes before you plan to cook it. Letting it come closer to room temperature helps it cook more evenly throughout. Pat the breast completely dry with paper towels on all sides. Moisture is the single biggest enemy of crispy skin, so make sure the surface is as dry as possible before you do anything else.
Next, use a sharp knife to score the skin in a crosshatch or diamond pattern. Cut shallow slits, about one-eighth of an inch deep, being very careful not to cut into the meat underneath. Scoring the skin helps the fat render out during baking and gives you that beautiful crispy texture everyone loves. It also allows your duck breast seasoning to penetrate deeper into the meat for more flavor in every bite.
Step 2: Season Generously
Season the duck breast generously on both sides with kosher salt and freshly cracked black pepper. Do not be shy with the salt, as it draws out moisture and helps dry the skin further. If you are using fresh herbs like thyme or rosemary, place them on the flesh side of the breast. Some cooks like to press a small piece of garlic into each score mark for an extra layer of savory flavor. Keep the seasoning simple and let the quality of the duck shine through.
Step 3: Preheat and Set Up the Oven
Preheat your oven to 425°F (220°C). While the oven is heating up, line a baking sheet with parchment paper and place a wire rack on top. Set the duck breast skin-side up on the rack. This setup allows hot air to flow all around the breast and lets the rendered fat drip away from the meat. It is a small step that makes a surprisingly big difference in the final texture of your crispy duck skin.
Step 4: Bake at the Right Temperature
Place the duck breast in the preheated oven on the middle rack. Bake for about 15 to 20 minutes, depending on the thickness of the breast and how done you prefer the meat. For a juicy, medium-rare result, aim for an internal temperature of 135°F (57°C). The skin should be deep golden brown and visibly crispy when it is done. Here is a helpful reference for baking times based on thickness:
- Thin breast (under 1 inch thick): Bake for 12 to 15 minutes at 425°F.
- Standard breast (1 to 1.5 inches thick): Bake for 15 to 20 minutes at 425°F.
- Thick breast (over 1.5 inches thick): Bake for 20 to 25 minutes at 425°F.
Remember that the duck breast cooking time can vary based on your specific oven, so always rely on the internal temperature rather than the clock alone. Every oven runs a little differently, and the thermometer never lies.
Step 5: Let It Rest
Once the duck breast reaches the right temperature, remove it from the oven immediately. Transfer it to a clean cutting board and let it rest for 5 to 8 minutes before slicing. This resting period is absolutely crucial. It allows the juices to redistribute evenly throughout the meat, ensuring every slice is moist, tender, and full of flavor. Cutting into it too soon releases all those precious juices onto the cutting board instead of keeping them locked inside the meat where they belong.
Step 6: Slice and Serve
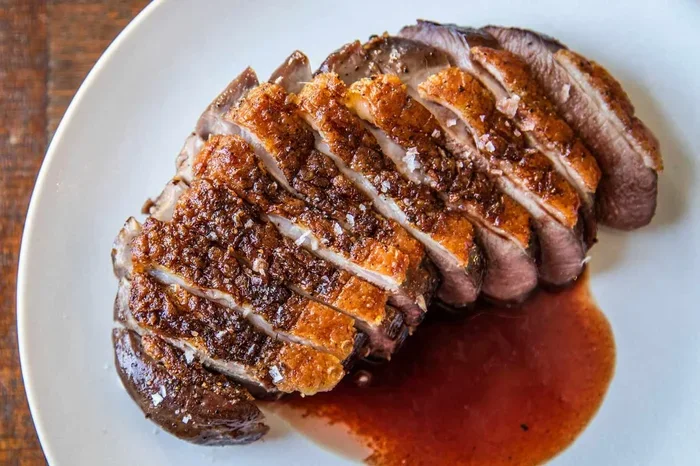
Using a sharp slicing knife, cut the duck breast against the grain into thin medallions. Aim for slices about one-quarter inch thick for the best texture and presentation. Arrange them on a warm plate with the crispy skin on top. Serve immediately with your favorite sauce and side dishes. The contrast between the crunchy skin and the tender, juicy meat is what makes oven-baked duck breast so incredibly special.
Expert Insight: Professional chefs often recommend scoring the skin in a diamond pattern rather than a simple crosshatch. This creates more surface area for the fat to escape and gives you even more crispy, golden pieces of skin in every single slice. It is a small technique change that makes a noticeable difference in the final presentation.
Perfect Temperature and Timing for Duck Breast
Getting the duck breast temperature right is the single most important factor in achieving perfect results every time. Too high a heat and the outside burns before the inside cooks through. Too low and the skin never crisps properly and the fat does not render out. Finding the sweet spot is what separates good duck from great duck.
Internal Temperature Guide
Here is a simple and clear temperature guide for duck breast in the oven that you can reference every time you cook:
- 125°F (52°C) Rare: Very red and cool in the center. Not recommended for food safety reasons.
- 130°F (54°C) Medium-Rare: Deep pink center. This is the sweet spot that most chefs and home cooks prefer.
- 135°F (57°C) Medium: Slightly pink center. Juicy and tender with a beautiful blush color throughout.
- 140°F (60°C) Medium-Well: Minimal pink remaining. Still moist but starting to firm up noticeably.
- 145°F (63°C) Well Done: Gray color throughout. Tends to be dry and significantly less flavorful than medium-rare.
For the absolute best results, pull the duck breast out of the oven when it reaches 130 to 135°F. The temperature will rise by about 5 degrees during the resting period. This carryover cooking brings it to the perfect medium-rare range where the meat is at its most juicy and flavorful.
Why Medium-Rare Works Best for Duck Breast
Duck breast is best served medium-rare, much like a high-quality steak. At this temperature, the meat remains juicy, tender, and absolutely full of flavor. The fat has had enough time to render completely, giving you that melt-in-your-mouth texture without any greasiness. Overcooking duck breast is the most common mistake home cooks make, which is exactly why using a reliable meat thermometer is completely non-negotiable. Do not skip this tool if you want consistent, perfect results every single time.
Comparison Table: Duck Breast Doneness Levels and Characteristics
| Temperature | Doneness | Color | Texture | Recommended |
|---|---|---|---|---|
| 125°F | Rare | Deep red | Very soft, cool center | Not recommended |
| 130°F | Medium-Rare | Pink | Tender, juicy, warm center | Highly recommended |
| 135°F | Medium | Blush pink | Moist, slightly firm | Recommended |
| 140°F | Medium-Well | Slight pink | Firmer, less juicy | Acceptable |
| 145°F | Well Done | Gray | Dry, tough texture | Not recommended |
Delicious Sauces and Serving Ideas for Duck Breast
A great sauce can transform a simple baked duck breast recipe into a truly memorable dining experience. The rich, slightly gamey flavor of duck pairs wonderfully with sweet, tangy, and fruity sauces. These flavor combinations balance the natural richness of the duck and add brightness to every bite. Here are some of the best sauce options to try with your next duck breast in the oven dinner.
Classic Cherry Sauce
Duck breast with cherry sauce is a timeless pairing that never gets old. Fresh or frozen cherries simmered with a splash of red wine, a touch of sugar, and a pinch of salt create a beautiful, jewel-toned sauce that looks as stunning as it tastes. The natural sweetness of the cherries balances the rich, fatty duck meat perfectly. This sauce takes only about 15 minutes to prepare while your duck is resting, making it the ideal accompaniment for a weeknight dinner that feels special.
Orange and Honey Glaze
Fresh orange juice, honey, and a hint of fresh ginger make a bright, sticky glaze that complements duck beautifully. Reduce the mixture in a small saucepan over medium heat until it thickens to a syrupy consistency, then drizzle it generously over the sliced duck. The natural citrus cuts through the richness of the meat and adds a refreshing, zesty contrast that keeps every bite exciting.
Rich Plum Reduction
A plum reduction is deep, slightly tart, and incredibly satisfying. Simmer pitted plums with a splash of balsamic vinegar and a bit of brown sugar until the mixture thickens into a luscious, jam-like sauce. This pairs especially well with duck breast that has a more pronounced, gamey flavor. The tanginess of the plums provides a wonderful counterpoint to the rich, buttery meat.
Simple Pan Sauce
Do not throw away the flavorful juices left on the baking sheet after removing the duck. After you pour off the excess fat, deglaze the pan with a splash of chicken broth or white wine. Scrape up all the beautiful browned bits from the bottom of the pan and simmer until the liquid reduces by about half. This quick and easy pan sauce is incredibly flavorful and takes just a few minutes to prepare. It is the easiest way to elevate your oven-baked duck from simple to restaurant-worthy.
Quick Tip: Save the rendered duck fat! Strain it through a fine mesh sieve and store it in a jar in the refrigerator. Duck fat is liquid gold in the kitchen. Use it for roasting vegetables, frying eggs, or making the crispiest roasted potatoes you have ever tasted. It adds an incredible depth of flavor to absolutely any dish you cook with it.
Common Mistakes and Expert Tips
Even experienced home cooks sometimes make mistakes when preparing duck breast in the oven. Knowing what to avoid saves you from dry, overcooked, or soggy results. Here are the most common pitfalls and exactly how to steer clear of them every time you cook.
Mistake 1: Not Scoring the Skin
Skipping the scoring step is the number one mistake people make when baking duck breast. Without scores, the fat has nowhere to escape, and you end up with rubbery, chewy skin instead of the crispy perfection you are aiming for. Always score the skin in a crosshatch or diamond pattern before seasoning and placing it in the oven. It only takes a minute and makes a dramatic difference in the final texture.
Mistake 2: Not Drying the Skin Properly
Moisture on the surface of the skin is the enemy of crispiness. Always pat the duck breast completely dry with paper towels before scoring and seasoning. For even better results, leave the uncovered breast in the refrigerator overnight. This dries the skin further and produces the crispiest possible result when it hits the hot oven. This simple extra step separates good duck from absolutely great duck.
Mistake 3: Overcooking the Duck Breast
Duck breast dries out incredibly fast once it passes the medium stage. Without a reliable meat thermometer, it is very easy to overcook and end up with tough, dry meat. Always use a probe thermometer and pull the breast out when it reaches 130 to 135°F. Trust the resting period to bring it up to the final perfect temperature. This one tool will completely transform your duck breast cooking time results.
Mistake 4: Cutting Into the Duck Too Soon
Cutting into the duck breast immediately after removing it from the oven releases all those precious juices onto the cutting board instead of staying in the meat. Give it at least 5 to 8 minutes to rest on the board before slicing. This simple step makes a huge, noticeable difference in the juiciness and overall flavor of every single slice. Patience really does pay off here.
Mistake 5: Using a Cold Duck Breast
Placing a cold, refrigerator-temperature duck breast directly into a hot oven leads to uneven cooking. The outside may burn while the inside remains undercooked. Always let the duck breast sit at room temperature for 15 to 20 minutes before baking. This small step ensures more even cooking throughout and helps you achieve that perfect duck breast pink center consistently.
Expert Insight: Chef Thomas Keller, one of the most respected names in the culinary world, recommends salting the duck breast and leaving it uncovered in the refrigerator overnight before baking. This technique, known as dry-brining, seasons the meat deeply from the inside out and dries the skin to an almost paper-like crispness when it finally hits the oven. It is a game-changing technique that takes your duck breast recipe to the next level.
Mastering how to bake duck breast in oven is one of the most rewarding cooking skills you can develop. The process is simpler than most people imagine, and the results are consistently impressive. From scoring the skin to checking the internal temperature and letting the meat rest properly, each step plays a vital role in achieving that perfect balance of crispy skin and juicy, pink meat. With a little practice, baking duck breast will become second nature in your kitchen, and you will never go back to ordering it at a restaurant again.
Frequently Asked Questions
Can I bake duck breast without scoring the skin?
You can, but scoring is highly recommended. Scoring allows the fat to render out evenly, which gives you crispy skin instead of chewy, rubbery skin. It also helps the seasoning penetrate deeper into the meat for more flavor. If you skip this step, you will still get cooked duck, but the texture will not be as enjoyable or crispy as it should be.
How long should I let duck breast rest after baking?
Let the duck breast rest for 5 to 8 minutes after removing it from the oven. This resting period allows the juices to redistribute evenly throughout the meat, making every slice moist and flavorful. Cutting too soon causes those precious juices to run out onto the cutting board, leaving you with noticeably drier meat in every bite.
What is the best internal temperature for duck breast?
The ideal internal temperature for duck breast is 130 to 135°F for medium-rare. At this temperature, the meat is juicy, tender, and has a beautiful pink center. Remember that the temperature will rise by about 5 degrees during the resting period, so pull the duck out when it hits 130°F on your thermometer for the perfect result.
Can I use frozen duck breast for baking?
Yes, but it is best to thaw the duck breast completely before baking. Frozen duck cooks unevenly and the skin will not crisp properly in the oven. Thaw it safely in the refrigerator overnight for the best results. Pat it completely dry before seasoning and placing it in the oven for optimal crispy skin.
How do I store leftover baked duck breast?
Store leftover duck breast in an airtight container in the refrigerator for up to 3 days. Reheat it gently in a low oven or a skillet to preserve the crispy skin as much as possible. Avoid using the microwave, as it can make the skin soggy and the meat tough. Sliced leftover duck also works wonderfully in salads, sandwiches, and pasta dishes for easy meals the next day.
What sauces pair best with oven-baked duck breast?
Cherry sauce, orange honey glaze, plum reduction, and simple pan sauce all pair wonderfully with baked duck breast. The rich, slightly gamey flavor of duck stands up beautifully to sweet and tangy sauces. Choose a sauce based on your personal flavor preferences, and do not be afraid to experiment with different combinations until you find your favorite pairing.
=== CONCLUSION ===
Learning how to bake duck breast in oven opens up a world of delicious, restaurant-quality meals you can create right at home. With the right temperature, proper technique, and a little patience, you can achieve crispy skin and juicy, pink meat every single time you cook. This guide has given you all the tools and knowledge you need to succeed in the kitchen.
Remember to always score the skin, use a meat thermometer, and never skip the resting period. These three simple steps make the biggest difference in your final result. With a little practice, baking duck breast will become one of your most reliable and impressive go-to recipes. Now it is your turn to get in the kitchen, pick up a fresh duck breast, and give it a try. Your next dinner is going to be absolutely perfect, and everyone at the table will be impressed.