How To Cook Ribs In A Dutch Oven For Tender Results
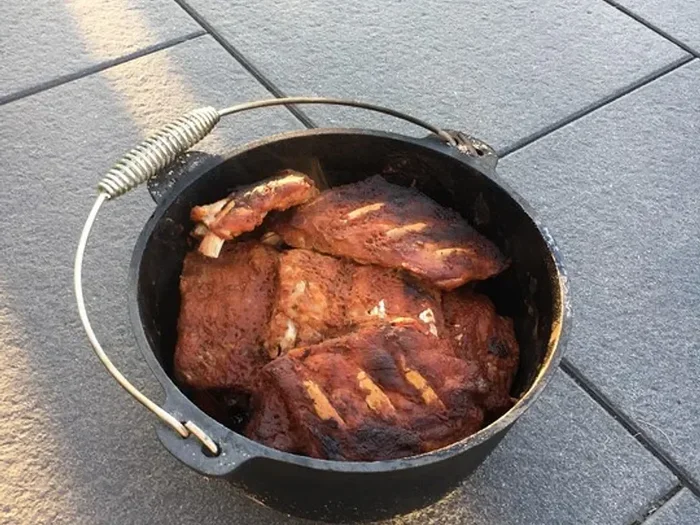
Cooking ribs in a Dutch oven is the easiest way to get tender, juicy, and flavorful ribs right in your kitchen. This guide walks you through every step, from choosing the right ribs to finishing them with a delicious glaze. Whether you prefer pork or beef, these methods guarantee restaurant-quality results at home with minimal effort.
There is nothing quite like ribs done right. They are juicy, tender, and packed with flavor that makes every bite feel like a celebration. But here is the thing — many people think you need a fancy smoker or hours of babysitting to get ribs this good. That is simply not true.
Learning how to cook ribs in a Dutch oven changes everything. A Dutch oven traps heat beautifully and creates a self-contained cooking environment that turns tough cuts into melt-in-your-mouth perfection. You do not need any special equipment. You do not need to stand outside in the cold. You just need a Dutch oven, some ribs, and a little patience.
This guide covers everything you need to know. We will talk about choosing the right ribs, building a great rub, nailing the cooking temperature, and finishing with a glaze that will have your whole neighborhood knocking on your door. By the end, you will feel confident enough to make Dutch oven ribs a regular part of your cooking rotation.
Key Takeaways
- A Dutch oven locks in moisture, creating perfectly tender ribs through even, gentle heat.
- Bone-in ribs cook more evenly and develop deeper flavor compared to boneless cuts.
- Low and slow cooking at 300°F to 325°F is the sweet spot for fall-off-the-bone tenderness.
- Searing ribs before braising builds a rich, caramelized crust that adds complex flavor.
- Resting ribs for 10 to 15 minutes after cooking lets the juices redistribute for a better bite.
- Adding liquid like broth or beer creates steam and infuses the meat with extra depth.
- A simple three-ingredient rib rub can deliver bold, smoky flavor without complicated steps.
📑 Table of Contents
Why A Dutch Oven Is Perfect For Ribs
A Dutch oven is one of the most versatile tools in any kitchen. It is heavy, thick-walled, and designed to hold heat steady. That combination is exactly what slow cooked ribs need to turn out perfectly.
The Science Behind Dutch Oven Cooking
When you cook ribs in a Dutch oven, the heavy lid traps moisture inside. This creates a small steam environment that keeps the meat from drying out. The thick walls distribute heat evenly, so there are no hot spots that could burn one side of your ribs while leaving the other side undercooked.
This method is called braising, and it works wonders on tough cuts of meat. The low, steady heat breaks down collagen in the rib meat over time. Collagen is the connective tissue that makes ribs tough when cooked quickly. When it breaks down, it turns into gelatin, which gives ribs that silky, tender texture people love.
Braising ribs in a Dutch oven also lets flavors meld together beautifully. The rub, the liquid, and the meat all cook in the same sealed space. Every bite absorbs layers of flavor that you simply cannot get from grilling alone.
What Kind Of Ribs Work Best
Not all ribs are created equal, but most types work wonderfully in a Dutch oven. Here is a quick look at your options:
- Pork baby back ribs — The most popular choice. They are lean, tender, and cook relatively fast.
- Pork spare ribs — Meatier and fattier than baby backs. They hold up well to long cooking times.
- Beef back ribs — Thick and beefy with a rich flavor profile that pairs well with bold rubs.
- Beef short ribs — Smaller and more tender. They practically dissolve when braised properly.
For beginners, pork baby back ribs are the easiest to work with. They cook faster and are more forgiving. But if you love a hearty, beefy flavor, do not hesitate to try bone in ribs like beef back ribs or short ribs.
Essential Ingredients And Prep Work
Great ribs start before they ever hit the heat. The prep work you do beforehand sets the foundation for everything that follows. Taking a little extra time here pays off big time later.
Choosing The Right Ribs
When you are at the store or butcher, look for ribs that have an even thickness throughout. Uneven ribs mean some pieces will be overcooked while others are still tough. Also, check the color — the meat should be a healthy pinkish-red, not gray or brown.
Buy ribs that are already trimmed of the membrane on the bone side. If yours are not, use a butter knife to slide under the membrane and peel it off. This thin layer blocks seasoning from reaching the meat and can create a chewy texture after cooking.
Building Your Rib Rub
A great rib rub is simple but powerful. You do not need a grocery list that stretches across the page. Here is a basic formula that works every time:
- Brown sugar — adds sweetness and helps create a beautiful crust
- Paprika — provides color and a mild, smoky sweetness
- Garlic powder — adds savory depth
- Onion powder — brings a subtle aromatic warmth
- Cumin — adds an earthy, slightly smoky note
- Black pepper — sharpens all the other flavors
- Salt — the most important ingredient of all
Mix these together in a bowl and store extras in a jar. You can make a big batch ahead of time and have it ready whenever ribs night comes around. The sugar in the rub also helps with caramelization, which is key to getting that gorgeous caramelized ribs exterior.
Step By Step Cooking Process
Now for the fun part — actually cooking the ribs. The process is straightforward, but each step matters. Follow along and you will have incredible results.
Searing The Ribs
Preheat your oven to 325°F. While it heats up, remove your ribs from the refrigerator and pat them dry with paper towels. Dry meat sears better. Season the ribs generously with your rub, pressing it into the meat so it sticks.
Place your Dutch oven on the stove over medium-high heat. Add a small amount of oil and let it get hot. Lay the ribs bone-side down in the pot. You want to get a deep golden-brown sear on each side. This usually takes about 3 to 4 minutes per side. Do not rush this step. The sear creates a flavorful crust through the Maillard reaction, which is that beautiful browning that adds complexity to the final dish.
Once all sides are seared, remove the ribs and set them aside on a plate.
Adding Liquid And Slow Cooking
Now it is time to build the braising liquid. This is the secret to juicy, tender braised ribs. Pour off excess fat from the Dutch oven, leaving about two tablespoons behind. Add the following:
- One cup of beef or chicken broth
- Half a cup of apple cider vinegar
- One tablespoon of Worcestershire sauce
- Two cloves of garlic, smashed
- One bay leaf
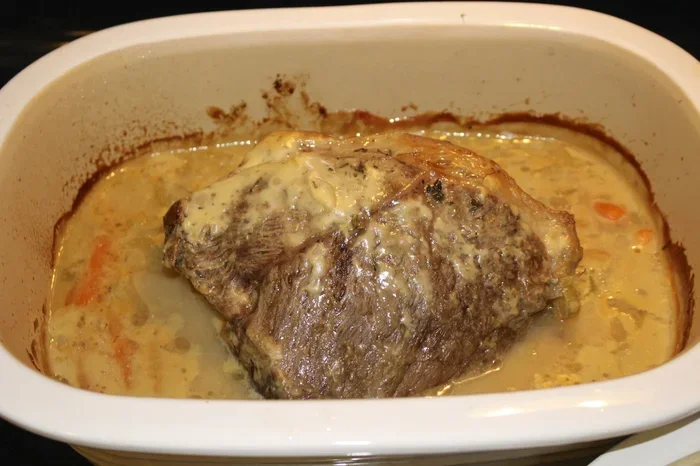
The liquid should come about one-third of the way up the side of the ribs. You do not want to submerge them completely. The ribs will cook through the steam and gentle heat, not by sitting in liquid.
Place the seared ribs back in the Dutch oven, meat side up. Cover with the lid and put the pot in the preheated oven. Cook for about 2.5 to 3 hours for pork ribs and 3 to 3.5 hours for beef ribs. The low temperature and sealed environment do all the hard work for you.
Temperature And Timing Guide
Getting the temperature right is the most important factor in oven ribs recipe success. Too high and the meat dries out. Too low and it takes forever without proper breakdown of the connective tissue.
| Rib Type | Temperature | Cook Time | Internal Temp Target |
|---|---|---|---|
| Pork Baby Back Ribs | 325°F | 2.5 – 3 hours | 195°F – 203°F |
| Pork Spare Ribs | 325°F | 3 – 3.5 hours | 195°F – 203°F |
| Beef Back Ribs | 300°F | 3 – 3.5 hours | 200°F – 205°F |
| Beef Short Ribs | 300°F | 2.5 – 3 hours | 200°F – 210°F |
The target internal temperatures listed here ensure the collagen has fully broken down and the meat is fall-apart tender. Use a meat thermometer for accuracy. Do not rely on time alone — every oven is slightly different.
Low And Slow Vs High Heat
Some recipes call for higher temperatures to speed things up. While you can cook ribs at 375°F, the results are noticeably different. Higher heat dries out the outer layers before the collagen has time to fully break down. The meat can end up chewy near the bone even if the surface looks done.
Low and slow cooking at 300°F to 325°F gives you the best results every time. The gentle heat allows the fat to render slowly and the connective tissue to transform into silky gelatin. This is the difference between ribs that are merely cooked and ribs that are truly fall off the bone perfect.
Finishing And Serving Your Ribs
The cooking process is not quite done once you pull the ribs from the oven. A few finishing touches take your ribs from great to absolutely unforgettable.
Glazing And Saucing Tips
After the ribs come out of the oven, let them rest for about 10 minutes. This resting period allows the juices to settle back into the meat. Cutting too early means losing all that hard-earned moisture.
If you want to add a glaze, now is the time. Brush your favorite barbecue sauce on the ribs and return them to the oven for 10 to 15 minutes at 400°F. This gives the sauce time to caramelize and form a sticky, glossy coating.
Here are some glaze ideas to try:
- Classic BBQ glaze — ketchup, brown sugar, apple cider vinegar, and smoked paprika
- Honey bourbon glaze — honey, bourbon, a splash of soy sauce, and garlic
- Spicy chipotle glaze — chipotle peppers in adobo, honey, lime juice, and cumin
You do not have to use sauce at all. Many people prefer their Dutch oven ribs naked, with just the rub and the natural juices from the braising liquid. Both approaches are delicious. It is all about personal preference.
Serving Suggestions
Ribs pair wonderfully with simple sides that let the meat shine. Consider serving them with:
- Coleslaw for a fresh, crunchy contrast
- Cornbread to soak up the braising juices
- Baked beans for a classic comfort food combo
- Grilled corn on the cob for a summery touch
- Mac and cheese for a rich, indulgent side
Set out extra sauce on the side so people can add as much as they like. Some folks love a heavy hand with sauce, and others prefer to let the natural flavors of the rib meat speak for themselves.
Common Mistakes To Avoid
Even experienced cooks make mistakes when preparing ribs. Knowing what to avoid saves time, ingredients, and frustration.
Overcooking And Undercooking
Overcooking is the number one enemy of great ribs. When ribs cook too long, the meat shrinks away from the bone and becomes dry and stringy. On the flip side, undercooked ribs are tough and chewy, especially near the bone.
The best way to avoid both problems is to use a meat thermometer. Pull your ribs when the internal temperature reaches 195°F to 203°F for pork and 200°F to 205°F for beef. At these temperatures, the collagen has broken down completely, and the meat is tender but not dried out.
Skipping The Sear
It might be tempting to skip the searing step and go straight to the oven. Do not do it. The sear adds a layer of flavor that braising alone cannot replicate. That golden-brown crust on the outside of the ribs creates a depth of flavor that makes the final dish so much more interesting.
Using Too Much Liquid
It is a common mistake to fill the Dutch oven with too much liquid. The ribs should not be submerged. You need just enough liquid to create steam and prevent burning, but not so much that the ribs end up boiling instead of braising. Boiling makes the meat mushy and washes away all those concentrated flavors.
Expert Tips For Perfect Dutch Oven Ribs
Here are a few extra insights from experienced cooks that will elevate your rib game:
- Let ribs come to room temperature before cooking. This ensures even cooking throughout the meat.
- Use the braising liquid as a base for gravy. After the ribs are done, strain the liquid and simmer it on the stove until it thickens. It makes an amazing dipping sauce.
- Wrap ribs in foil halfway through cooking if you find the surface drying out. This traps extra moisture and speeds up the tenderizing process.
- Add wood chips to the braising liquid for a subtle smoky flavor without needing an actual smoker.
- Cook ribs the day before and reheat gently before serving. The flavors deepen overnight, and the meat absorbs even more of the braising liquid.
Dutch oven cooking rewards patience and attention to detail. Follow these tips and your ribs will consistently turn out better than anything you can order at a restaurant.
Frequently Asked Questions
Can I Use A Different Type Of Pot If I Do Not Have A Dutch Oven?
A heavy oven-safe pot with a tight-fitting lid can work as a substitute. Cast iron pots and enameled stockpots are good alternatives. However, a Dutch oven is specifically designed for this type of cooking, and nothing quite replicates its heat retention and even distribution. If you plan to make ribs regularly, investing in a quality Dutch oven is well worth it.
How Do I Know When Ribs Are Done In The Dutch Oven?
The best indicator is internal temperature. Pork ribs should reach 195°F to 203°F, and beef ribs should hit 200°F to 205°F. Another test is to insert a fork between the bones and twist gently. If the meat pulls back from the bone easily and the fork slides in with no resistance, your ribs are done. The meat should feel tender and almost fall apart.
Can I Cook Frozen Ribs In A Dutch Oven?
It is not recommended. Frozen ribs cook unevenly, and the outside can overcook while the inside is still thawing. Always thaw ribs in the refrigerator overnight before cooking. If you are in a pinch, you can use the cold water method to speed up thawing, but make sure the ribs are fully thawed before seasoning and cooking them.
What Is The Best Liquid To Use For Braising Ribs?
Beef broth and chicken broth are both excellent choices. Apple cider vinegar adds brightness and helps tenderize the meat. Beer works wonderfully too, especially darker beers like stout or porter, which add a rich, malty flavor. You can also mix and match liquids for a more complex braising base.
Do I Need To Flip The Ribs While They Cook?
No, you do not need to flip the ribs during braising. The sealed environment of the Dutch oven ensures even cooking from all sides. The steam circulates around the meat and cooks it uniformly. Simply place the ribs meat side up when you first put them in the oven and leave them undisturbed until they are done.
Can I Make Dutch Oven Ribs On The Stovetop Instead Of In The Oven?
Absolutely. You can sear the ribs on the stovetop, add the braising liquid, and then cover the pot and cook on the lowest heat setting for 2.5 to 3 hours. Stovetop cooking gives you more control over the temperature, but it requires more attention to maintain a consistent low heat. An oven provides more even, hands-off cooking, which is why most people prefer the oven method.
Conclusion
Learning how to cook ribs in a Dutch oven is one of the most rewarding skills you can add to your kitchen repertoire. It is simple, forgiving, and produces consistently outstanding results. You do not need a smoker, a backyard, or years of experience. All you need is a Dutch oven, a good rack of ribs, and the willingness to let time do the heavy lifting.
From searing to braising to glazing, every step in this process builds flavor and tenderness. The low and slow method transforms tough, humble cuts into something truly extraordinary. Whether you are cooking for a family dinner, a holiday gathering, or just because you are craving ribs on a Tuesday night, this method delivers every single time.
Start with the basic recipe and make it your own. Experiment with different rubs, try new braising liquids, and find your perfect level of doneness. Once you master Dutch oven ribs, you will never go back to overcooked, dry ribs again. Your taste buds — and everyone sitting at your table — will thank you.
Now grab a rack of ribs, fire up your oven, and get ready to make the best ribs you have ever tasted. Happy cooking!