How To Build Outdoor Fireplace With Pizza Oven at Home
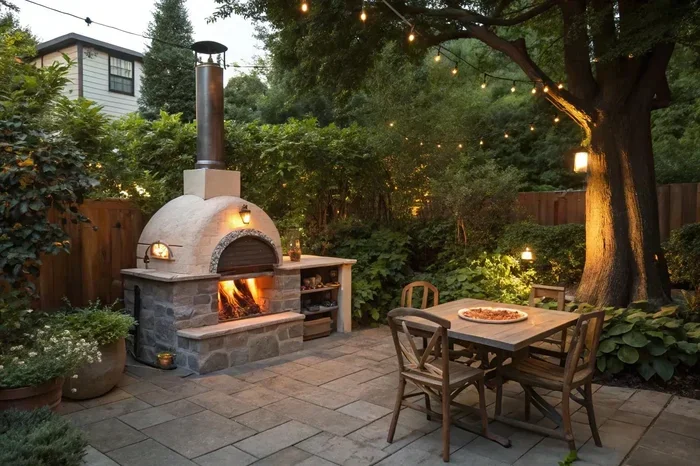
Building an outdoor fireplace with pizza oven at home is easier than you think. This guide walks you through every step, from choosing materials to lighting your first fire. You will learn how to create a beautiful and functional backyard cooking station that brings family and friends together.
There is something magical about gathering around a fire with friends and family. Now imagine adding fresh, crispy wood-fired pizza to that experience. Building an outdoor fireplace with pizza oven at home transforms your backyard into a gathering spot everyone will love.
You do not need to be a professional mason to pull this off. With the right guidance, basic tools, and a weekend of effort, you can have a stunning cooking setup ready to go. This guide breaks everything down into simple, actionable steps. Whether you are a complete beginner or a seasoned DIYer, you will find practical advice here.
Let us dive into how to create your very own backyard pizza oven fireplace from scratch.
Key Takeaways
- Plan Your Layout First: A clear design saves time, money, and headaches during the build.
- Choose the Right Materials: Fire bricks, steel doors, and quality mortar make a huge difference in durability.
- Build a Strong Base: A concrete slab or cinder block foundation keeps your structure safe and level.
- Master the Chimney: Proper ventilation ensures clean smoke flow and better pizza cooking.
- Insulate for Efficiency: Adding insulation retains heat and improves wood-fired pizza performance.
- Enjoy Outdoor Entertaining: A finished pizza oven fireplace becomes the centerpiece of any backyard gathering.
📑 Table of Contents
- Why Build an Outdoor Fireplace With Pizza Oven?
- Planning Your Outdoor Fireplace With Pizza Oven Design
- Gathering Materials and Tools for Your Pizza Oven Fireplace
- Step-by-Step Guide to Building Your Outdoor Pizza Oven Fireplace
- Common Mistakes to Avoid When Building a Fireplace Pizza Oven
- Expert Tips for the Best Wood-Fired Pizza Experience
- Key Takeaways
- Conclusion
Why Build an Outdoor Fireplace With Pizza Oven?
More homeowners are discovering the joy of outdoor cooking. A combined fireplace and pizza oven adds both function and beauty to any yard. It becomes a natural gathering point for dinners, parties, and quiet evenings alike.
Benefits You Will Love
- Versatile Cooking: You can roast meats, bake bread, and of course, make amazing pizza at high temperatures.
- Increased Home Value: A well-built outdoor kitchen area boosts curb appeal and property value.
- Year-Round Use: Fireplaces extend your outdoor season into cooler months.
- Social Hub: People naturally gravitate toward fire. A pizza oven keeps everyone engaged and entertained.
- Cost Savings: Making pizza at home is far cheaper than ordering delivery every week.
The beauty of a DIY approach is that you customize everything. You pick the size, the style, and the features that fit your space and budget. This is your project, your pace, your creativity.
Planning Your Outdoor Fireplace With Pizza Oven Design
Before you buy a single brick, take time to plan. A solid plan makes the actual build smoother and more enjoyable. Skipping this step often leads to costly mistakes and rework.
Choosing the Right Location
Pick a flat, stable area in your yard. Stay clear of overhanging trees, fences, and your home’s walls. Local building codes often require specific setback distances from structures. Check with your city or homeowners association before you start.
Think about wind direction too. You want smoke blowing away from seating areas. A spot that gets some natural wind protection works best for a backyard fireplace.
Deciding on Size and Shape
Most DIY pizza ovens range from 36 to 48 inches wide. Consider how many people you typically cook for. A larger oven holds more pizzas at once but requires more firewood and takes longer to heat up.
Common shapes include:
- Rectangular: Great for cooking multiple pizzas side by side.
- Dome-shaped: Traditional design that circulates heat evenly.
- Square: Modern look that fits well in contemporary outdoor spaces.
Sketching Your Layout
Draw a simple diagram of your planned setup. Include the base, the oven chamber, the chimney, and the surrounding seating area. This visual reference keeps you on track during construction. Many builders also find it helpful to look at DIY pizza oven plans online for inspiration.
Gathering Materials and Tools for Your Pizza Oven Fireplace
Having everything ready before you start saves frustration. Here is a detailed list of what you need for a standard outdoor fireplace with pizza oven build.
Essential Materials
- Fire bricks: These special bricks withstand extreme heat without cracking. They line the oven interior.
- Concrete blocks or cinder blocks: Used for the base and support structure.
- Refractory cement: This high-heat mortar bonds fire bricks together securely.
- Steel pizza oven door: Controls airflow and retains heat inside the oven.
- Chimney pipe and cap: Directs smoke upward and away from the cooking area.
- Insulation material: Vermiculite or ceramic fiber blankets keep heat inside the oven.
- Concrete mix: For pouring the foundation slab.
- Mortar mix: Standard mortar for block work and exterior finishing.
- Gravel and sand: Used for drainage and leveling the base.
Tools You Will Need
- Shovel and wheelbarrow
- Level and tape measure
- Trowel and pointing trowel
- Mixing bucket or mortar mixer
- Safety glasses and gloves
- Hammer and chisel
- Drill with masonry bits
- String line and stakes
Buying quality materials may cost a bit more upfront, but it pays off in durability. Cheap materials often crack under heat or degrade quickly. Your masonry fireplace should last for years with the right supplies.
Step-by-Step Guide to Building Your Outdoor Pizza Oven Fireplace
Now comes the fun part. Let us walk through each phase of the build process clearly and simply.
Step 1: Prepare the Foundation
A strong base supports the entire structure. Start by marking out your footprint with stakes and string. Dig down about 6 to 8 inches into the ground within the marked area.
Fill the hole with a layer of gravel for drainage. Then pour a concrete slab about 4 inches thick. Use a level to make sure the surface is perfectly flat. Let the concrete cure for at least 48 hours before moving on.
Quick Tip: Some builders use a pre-made steel fire pit bowl as the base. This shortcut works well and still provides a solid foundation for your pizza oven fireplace.
Step 2: Build the Base and Hearth
Stack concrete blocks or lay fire bricks to create the base platform. This platform should be sturdy and level. The height depends on your preference, but most people build it between 36 and 42 inches high. This height allows comfortable pizza making without bending over too much.
Lay a layer of sand on top of the base. Then place your fire bricks in a tight pattern to form the oven floor. The pizza stone or fire brick floor needs to be perfectly flat for even cooking.
Step 3: Construct the Oven Dome
This is where the magic happens. Build the dome shape using fire bricks and refractory cement. Start from the edges and work your way to the top center. The dome shape naturally circulates heat, which is exactly what makes wood-fired pizza so delicious.
Use a template or form to help shape the dome evenly. Many builders use a dome-shaped mold made from sand or foam. After the dome is built, let the mortar cure for at least 72 hours.
Step 4: Install the Chimney
Cut an opening in the dome for the chimney. This opening should be positioned at the top front of the oven. Attach a stainless steel chimney pipe through the opening and secure it with high-heat mortar.
A proper chimney creates the draft needed for clean burning. Without good ventilation, smoke fills the oven and makes cooking difficult. Test the draft before you start cooking by lighting a small fire and checking smoke flow.
Step 5: Add Insulation and Finish
Wrap the dome in insulation material. This layer traps heat inside the oven and improves cooking efficiency. Ceramic fiber blankets work great for this purpose. Then add an outer layer of mortar or stucco for weather protection.
Some builders add a decorative stone veneer for a polished look. This step is optional but gives your outdoor kitchen a more refined appearance. Let everything cure for a full week before the first firing.
Step 6: The First Fire and Curing Process
Start with a small fire and gradually increase the size over several days. This curing process drives out moisture from the mortar and insulation. Rushing this step can cause cracks and weaken the structure.
On the first day, burn a small fire for just 2 to 3 hours. Each day, increase the fire size slightly. By day five or six, you should be ready for a full-size fire and your first pizza.
Common Mistakes to Avoid When Building a Fireplace Pizza Oven
Even with the best plans, mistakes happen. Here are the most common errors and how to avoid them.
Skipping the Foundation
Some builders place their oven directly on the ground or a flimsy base. This leads to settling, cracking, and instability. Always invest time in a proper concrete foundation. It is the backbone of your entire build.
Using Regular Bricks Instead of Fire Bricks
Standard bricks crack under high heat. Fire bricks are specifically designed to handle extreme temperatures. They may cost more, but they are essential for a lasting backyard fireplace that actually cooks pizza properly.
Underestimating Chimney Height
A short chimney causes smoke to spill back into the cooking area. Your chimney should extend at least 2 to 3 feet above the dome for proper draft. This simple detail makes a world of difference in performance.
Forgetting Insulation
Without insulation, heat escapes quickly and cooking times increase. Insulation keeps your oven hot and efficient. It also protects the outer shell from heat damage over time.
Rushing the Curing Process
Patience is key. The mortar and insulation need time to dry completely. Lighting large fires too early causes thermal shock and cracking. Follow the gradual curing schedule for the best results.
Expert Tips for the Best Wood-Fired Pizza Experience
Once your oven is built and cured, it is time to start cooking. A few expert tips will help you get the most out of your new pizza oven fireplace.
Get Your Dough Right
Use a high-gluten flour for your pizza dough. This creates the chewy, slightly crispy crust that wood-fired pizza is known for. Let your dough cold-ferment in the fridge for at least 24 hours. This develops flavor and makes the dough easier to stretch.
Achieve the Right Temperature
A well-built oven can reach temperatures between 700 and 900 degrees Fahrenheit. For classic Neapolitan-style pizza, aim for around 800 degrees. Use an infrared thermometer to monitor the oven floor temperature accurately.
Use the Right Firewood
Hardwoods like oak, maple, and hickory burn hottest and produce the best flavor. Avoid softwoods like pine because they create excessive soot and resin. Seasoned, dry firewood burns cleaner and more efficiently.
Keep It Clean
Regular maintenance keeps your oven performing at its best. Sweep out ash between uses. Inspect the chimney for blockages. Check the mortar joints annually and repair any cracks promptly.
Quick Tip: Keep a small brush and ash shovel near the oven at all times. This makes cleanup quick and keeps your cooking surface ready for the next pizza night.
Key Takeaways
- Plan Before You Build: A thoughtful design prevents costly mistakes and ensures a smooth construction process.
- Invest in Quality Materials: Fire bricks, refractory cement, and a good chimney make all the difference in durability and performance.
- Build on a Solid Foundation: A level concrete base keeps your structure stable and safe for years of use.
- Do Not Skip Insulation: Proper insulation retains heat and makes your outdoor fireplace with pizza oven more energy-efficient.
- Cure Slowly and Carefully: Gradual firing prevents cracks and ensures the mortar sets properly.
- Enjoy the Process: Building a pizza oven fireplace is a rewarding project that brings joy every time you use it.
Conclusion
Building an outdoor fireplace with pizza oven at home is one of the most rewarding DIY projects you can tackle. It combines craftsmanship, creativity, and the simple joy of cooking with fire. The result is a stunning outdoor feature that your family and friends will enjoy for years to come.
Start with a solid plan. Gather your materials. Follow each step carefully. And remember, patience during the curing process pays off in the end. Soon enough, you will be pulling fresh, bubbling, wood-fired pizza out of your very own backyard oven.
So grab your tools, clear some space in your yard, and get started. Your dream outdoor kitchen is closer than you think.
Frequently Asked Questions
How much does it cost to build an outdoor fireplace with pizza oven?
Costs typically range from 500 to 3000 dollars depending on materials and size. Using reclaimed fire bricks or concrete blocks can significantly reduce expenses. A basic DIY setup with standard materials usually falls between 800 and 1500 dollars.
How long does it take to build a pizza oven fireplace?
A weekend or two is typical for experienced DIYers. First-time builders should plan for three to four weekends to account for curing time. The actual construction takes one to two days, but the foundation and mortar need several days to set properly.
Can I use a gas pizza oven instead of wood-fired?
Yes, gas options are available and work well for those who want convenience. Gas pizza ovens heat up faster and require less cleanup than wood-fired models. However, many enthusiasts prefer the authentic flavor that comes from burning real firewood in a traditional masonry setup.
What type of bricks are best for a pizza oven?
Fire bricks are the clear choice because they withstand temperatures above 1000 degrees Fahrenheit without cracking. Regular building bricks may crack and crumble under the intense heat of wood-fired cooking. Always look for bricks specifically rated for high-heat applications.
Do I need a permit to build an outdoor fireplace?
Many areas require a building permit for permanent outdoor fireplaces and pizza ovens. Check your local zoning laws and homeowners association rules before starting construction. Some jurisdictions also have restrictions on fuel type and chimney height.
How do I maintain my outdoor pizza oven fireplace?
Regular maintenance includes sweeping out ash, checking mortar joints, and inspecting the chimney for blockages. Cover the oven when not in use to protect it from rain and snow. An annual inspection helps catch small issues before they become costly repairs.