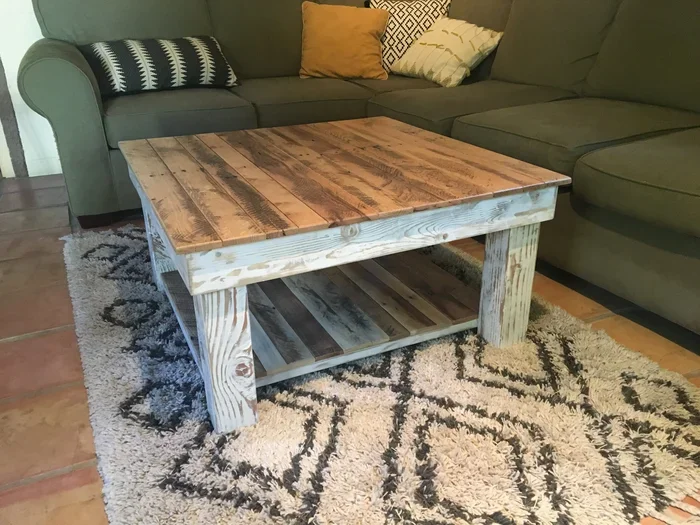
How To Make A Vintage Coffee Table With Rustic Charm
Building a vintage coffee table is one of the most rewarding DIY woodworking projects you can tackle this year. This guide walks you through every step, from choosing the right reclaimed wood to applying a beautiful distressed finish that brings rustic charm into any room. Whether you are a beginner or a seasoned crafter, you will find practical tips and clear instructions to create a stunning piece of living room furniture.
Key Takeaways
- Choose the right wood: Reclaimed wood and pallet wood give your vintage coffee table an authentic, rustic look that new lumber simply cannot replicate.
- Distressing is key: Sanding techniques and a patina finish create that aged, hand-carved character that makes each piece unique.
- Finishing matters: Wood stain and polyurethane sealant protect your DIY coffee table while enhancing its vintage aesthetic.
- Styling elevates the piece: Pair your farmhouse style table with shiplap walls, industrial design elements, and warm living room furniture for a cohesive look.
- Avoid common mistakes: Skipping proper sanding, using too much stain, or neglecting sealant are the top errors beginners make.
- It is easier than you think: With basic tools and a weekend of time, you can build beautiful coffee table plans that become the centerpiece of your home.
📑 Table of Contents
- Why A Vintage Coffee Table Brings Rustic Charm To Any Room
- Materials And Tools You Will Need
- Step-By-Step Guide To Building Your Vintage Coffee Table
- Finishing Techniques For An Authentic Vintage Look
- Styling Your Vintage Coffee Table In Any Room
- Common Mistakes To Avoid When Building A Coffee Table
- Conclusion
Why A Vintage Coffee Table Brings Rustic Charm To Any Room
There is something magical about a vintage coffee table sitting in the middle of a cozy living room. It does more than hold your morning mug or a stack of magazines. A vintage coffee table tells a story. It carries the warmth of old wood, the character of hand-carved details, and the kind of rustic charm that mass-produced furniture simply cannot match.
If you have been looking for a way to bring that warmth into your home, building your own piece is the answer. A DIY coffee table project lets you control every detail, from the type of wood to the finish. You choose the vintage aesthetic that fits your space, and you get the satisfaction of creating something with your own hands.
What makes a vintage coffee table so special? It is the combination of aged materials and timeless design. Unlike trendy pieces that fall out of style in a few years, a well-built vintage table lasts for decades. It becomes a family heirloom. It becomes the spot where everyone gathers for coffee, conversation, and quiet evenings at home.
Whether your taste leans toward farmhouse style or industrial design, a handmade table fits right in. You can place it in a sunlit living room, a cozy reading nook, or even a rustic kitchen setup. When you are ready to upgrade your kitchen appliances, consider checking out what to do when you get a new oven to make sure your whole space feels cohesive and intentional.
The best part? You do not need a professional workshop or years of experience. With a few basic tools, some reclaimed wood, and this guide, you can build a table that looks like it has been in your home for generations.
Materials And Tools You Will Need
Before you start cutting wood, gather everything you need. Having all your materials ready makes the building process smoother and more enjoyable. Here is a complete list to get you started.
Wood Options For Your Vintage Coffee Table
The wood you choose sets the foundation for your entire project. Each option brings a different look and feel to the finished piece.
- Reclaimed wood: This is the gold standard for a vintage coffee table. Old barn wood, salvaged fence boards, and repurposed shelving all work beautifully. The wood already has character, weathering, and history built right in.
- Pallet wood: Affordable and widely available, pallet wood gives an authentic rustic look. Look for heat-treated pallets marked with HT for safety.
- Solid pine boards: A budget-friendly option that takes stain well. Pine is soft and easy to work with, making it perfect for beginners.
- Oak or maple: These hardwoods are more durable and have beautiful grain patterns. They cost more but deliver a premium look.
Essential Tools
- Circular saw or hand saw
- Drill and drill bits
- Sandpaper in various grits (80, 120, and 220)
- Wood glue
- Screws and nails
- Clamps
- Measuring tape and pencil
- Paintbrush or foam applicator
Finishing Supplies
- Wood stain in a shade that matches your vision (dark walnut, natural, or weathered gray)
- Polyurethane sealant for protection
- Sanding block or electric sander
- Tack cloth for dust removal
- Rags or old towels for applying stain
Step-By-Step Guide To Building Your Vintage Coffee Table
Now comes the fun part. Building your vintage coffee table is a straightforward process when you break it into clear steps. Take your time, measure twice, and enjoy the process.
Step 1: Plan Your Coffee Table Plans
Start by sketching your design. Decide on the dimensions. A standard coffee table is about 18 to 20 inches tall and 48 inches long. But your coffee table plans should match your space. Measure the area where the table will sit and write down your target dimensions.
Think about the shape too. A rectangular table works well in most living rooms. A round table creates a softer feel and is great for smaller spaces. Square tables make a bold statement in large rooms.
Step 2: Cut Your Wood Pieces
Using your saw, cut the wood pieces to size. You will need a top panel, four legs, and optional side aprons for extra support. Make sure each cut is straight and clean. Sanding techniques start here too, so remove any rough edges as you go.
If you are using reclaimed wood, inspect each board carefully. Remove any old nails or staples. Check for soft spots or rot. The best pieces for your DIY coffee table will be sturdy and free of major damage.
Step 3: Assemble The Base
Attach the legs to the aprons using wood glue and screws. Pre-drill your holes to prevent the wood from splitting. Make sure the base is square by measuring the diagonals. If both diagonal measurements are equal, your base is perfectly square.
Let the glue dry completely before moving on. This usually takes about 30 minutes to an hour depending on the type of glue you use.
Step 4: Attach The Tabletop
Place the top panel onto the base. Secure it with screws from underneath, or use wood glue and clamps for a cleaner look on the top surface. Make sure the top is centered and flush with all sides.
For a more authentic vintage coffee table feel, consider using slightly mismatched boards for the top. This creates a patchwork look that adds to the upcycled furniture appeal.
Step 5: Apply Your Finish
This is where the magic happens. The finish transforms raw wood into a piece that looks like it has a rich history.
Start by sanding the entire table with 120-grit sandpaper, then finish with 220-grit for a smooth surface. Wipe away all dust with a tack cloth.
Apply your wood stain using a brush or rag. Work in the direction of the grain. Let it sit for a few minutes, then wipe off the excess. For a deeper patina finish, apply a second coat after the first dries completely.
Once the stain is dry, apply polyurethane sealant to protect the surface. Use thin, even coats and let each coat dry fully before applying the next. Two to three coats will give your vintage coffee table a beautiful, durable finish.
Finishing Techniques For An Authentic Vintage Look
The finish is what separates a good coffee table from a great one. To truly capture that vintage aesthetic, you need to go beyond simply applying stain. Here are some proven techniques that bring out the best in your upcycled furniture.
Create A Distressed Finish
To make your DIY coffee table look genuinely aged, try distressing the wood. After applying your stain and sealant, lightly sand the edges and corners with 80-grit sandpaper. This reveals the lighter wood underneath and mimics years of natural wear and tear.
You can also use a chain or hammer to create small dents and marks. Gently tap the wood surface in random patterns. This technique adds authentic character without looking forced.
Add Hand-Carved Details
For an extra touch of craftsmanship, consider adding hand-carved details to the legs or apron. Simple scrollwork or geometric patterns elevate the piece from homemade to handcrafted. Even basic carving with a chisel can make a big difference in the overall vintage coffee table design.
Use A Whitewash Or Liming Wax
A whitewash finish gives wood a soft, weathered look that works beautifully with farmhouse style. Mix white paint with water and apply it lightly with a rag. Wipe off the excess quickly to let the wood grain show through.
Alternatively, use a liming wax for a more subtle effect. This fills the grain with a white or gray tone and creates a chalky, aged appearance that pairs well with industrial design elements.
Styling Your Vintage Coffee Table In Any Room
Your table is built and finished. Now it is time to style it. How you decorate your vintage coffee table can completely change the feel of your room.
Create A Cozy Display
Start with a tray in the center. A wooden or woven tray keeps small items organized and adds another layer of texture. Place a candle, a small potted plant, and a stack of books on the tray. This simple arrangement makes the table feel inviting and lived-in.
When hosting friends, you can serve warm dishes like homemade chicken in a Dutch oven on your vintage coffee table for a rustic dining experience that everyone will love.
Mix Textures And Materials
A great styled table combines different textures. Think about adding a linen runner, a ceramic vase, and a small stack of old magazines. Mix metals like brass or copper with wood for an industrial design touch that feels both modern and timeless.
Keep It Functional
Remember that a coffee table is a working piece of furniture. Leave some space for remotes, coasters, and everyday items. The goal is to make the table look beautiful and useful at the same time. A cluttered table kills the vintage aesthetic faster than anything else.
Pair With Your Room Decor
Your vintage coffee table should complement the rest of your room. If your walls feature shiplap, let the table be the warm, wooden anchor in the space. If your room has a modern minimalist style, choose a table with clean lines and a lighter stain. The table should feel like it belongs, not like it was dropped in randomly.
After a big meal, you can easily use your oven to reheat food and bring it back to the table for seconds, making your coffee table the heart of your entertaining space.
Common Mistakes To Avoid When Building A Coffee Table
Even experienced builders make mistakes. Knowing what to avoid saves you time, money, and frustration. Here are the most common errors people make when building a DIY coffee table.
- Skipping proper sanding: Skipping sanding leads to an uneven finish and splinters. Always sand in the direction of the grain and progress through finer grits for the smoothest result.
- Using too much stain: More stain does not mean a better finish. Apply thin coats and wipe off the excess. You can always add another coat, but you cannot easily remove too much stain.
- Neglecting the sealant: Without polyurethane sealant, your table is vulnerable to water rings, scratches, and daily wear. Sealant is not optional, it is essential.
- Ignoring wood movement: Wood expands and contracts with humidity changes. Leave small gaps between boards on the tabletop to allow for movement and prevent warping.
- Rushing the assembly: Take your time with each step. Measuring once and cutting twice saves wood and reduces frustration. A well-built table takes patience.
By avoiding these mistakes, your vintage coffee table will turn out looking professional and last for many years. Each piece of upcycled furniture tells its own story, and yours will be one worth telling.
Conclusion
Building a vintage coffee table is more than a weekend project. It is an opportunity to bring handmade warmth and rustic charm into your home. From selecting the right reclaimed wood to applying that perfect distressed finish, every step adds character and personality to the final piece.
Your new DIY coffee table becomes more than furniture. It becomes the centerpiece of your living room, the gathering spot for family and friends, and a reflection of your personal style. Whether you lean toward farmhouse style or industrial design, the principles remain the same, choose quality materials, take your time with finishing, and let the wood tell its story.
Start your next woodworking project this weekend. Gather your tools, find some reclaimed wood, and follow these steps. You will be amazed at what you can create. A beautiful, handmade vintage coffee table is waiting to become the heart of your home.
Frequently Asked Questions
What type of wood is best for a vintage coffee table?
Reclaimed wood and pallet wood are the best choices for achieving an authentic vintage look. They already have character, weathering, and history that new lumber cannot replicate. Solid pine works well for beginners, while oak and maple offer a more premium finish.
Do I need advanced woodworking skills to build a vintage coffee table?
No, this is a beginner-friendly project. You only need basic tools like a saw, drill, sandpaper, and clamps. The key is taking your time with measurements and sanding. Even first-time builders can create a stunning piece with patience and attention to detail.
How long does it take to build a vintage coffee table?
Most people can complete the project over a weekend, or about 6 to 8 hours of active building time. The finishing and drying process may add an extra day or two. Plan for a relaxed pace to enjoy the process and ensure quality results.
What finish gives the best vintage look?
A combination of wood stain and polyurethane sealant works best. Apply the stain in thin coats and use a patina finish technique to create that aged appearance. The sealant protects the surface while enhancing the warm, weathered look of your vintage coffee table.
Can I build a vintage coffee table on a budget?
Absolutely. Reclaimed wood and pallet wood are often free or very inexpensive. Basic tools can be borrowed or purchased affordably. The total cost can be as low as 30 to 50 dollars for a beautiful DIY coffee table that looks far more expensive than it was to build.
How do I maintain my vintage coffee table?
Wipe the surface with a damp cloth and dry it immediately. Avoid placing hot items directly on the wood. Reapply polyurethane sealant once a year to keep the finish protected. Regular care keeps your upcycled furniture looking beautiful for decades.