How Do You Cook Costco Ribs In The Oven For Best Results
Cooking Costco ribs in the oven is one of the easiest ways to get restaurant-quality ribs at home. This guide walks you through every step, from choosing the right rack to nailing the perfect temperature and timing. You will learn simple techniques that turn budget-friendly ribs into a show-stopping meal your whole family will love.
There is nothing quite like pulling a rack of ribs out of the oven and seeing that perfect pink smoke ring. Whether you are feeding a crowd or meal prepping for the week, cooking Costco ribs in the oven is a game-changer. The best part? You do not need a smoker or a fancy grill to get incredible results. Your home oven can do all the heavy lifting.
Costco is known for selling high-quality ribs at prices that are hard to beat. Their pork spare ribs and baby back ribs come in generous portions that are perfect for oven cooking. But the key to great ribs lies in knowing the right technique. This guide will show you exactly how to do it, step by step.
We will cover everything from picking the best rack at the store to getting that sweet, sticky glaze just right. By the end, you will feel confident enough to make Costco oven ribs like a pro. Let’s get started.
Key Takeaways
- Low and slow is the secret: Cooking Costco ribs at 275°F to 300°F ensures tender, fall-off-the-bone meat.
- Choose the right cut: Pork spare ribs and baby back ribs from Costco both work great in the oven.
- Season generously: A good dry rub or marinade adds deep flavor before the ribs even hit the heat.
- Use foil for moisture: Wrapping ribs in foil during cooking keeps them juicy and prevents drying out.
- A meat thermometer is essential: Internal temperature of 195°F to 203°F signals perfectly cooked ribs.
- Glaze at the end: A sweet BBQ glaze applied in the last 15 minutes adds a beautiful caramelized bark.
- Rest before serving: Letting ribs rest for 10 minutes redistributes juices for the best texture.
📑 Table of Contents
- Why Cook Costco Ribs In The Oven?
- Choosing the Right Costco Ribs for Oven Cooking
- Step-by-Step: How to Cook Costco Ribs In The Oven
- Common Mistakes to Avoid When Cooking Costco Ribs In The Oven
- Best Oven Temperatures and Times for Different Rib Cuts
- Tips and Tricks for Perfect Oven Ribs Every Time
- How to Tell When Costco Ribs Are Done
- Serving Suggestions for Oven-Cooked Costco Ribs
- Storing and Reheating Leftover Ribs
- Final Thoughts on Cooking Costco Ribs In The Oven
Why Cook Costco Ribs In The Oven?
You might be wondering why anyone would choose the oven over a grill or smoker. The truth is, oven cooking has some real advantages. It is consistent, easy to control, and works great year-round no matter the weather. When you bake ribs in the oven, you get even heat distribution that cooks the meat slowly and thoroughly.
Costco ribs are already trimmed and ready to go. They come in convenient racks that fit perfectly in most standard ovens. This makes them ideal for oven preparation. Plus, cooking ribs in the oven lets you focus on seasoning and glazing without worrying about managing charcoal or propane.
Oven-Baked Ribs vs. Grilled Ribs
Grilled ribs have a smoky flavor that is hard to replicate indoors. But oven-baked ribs have their own charm. The slow roasting process breaks down the connective tissue in the meat, making it incredibly tender. You also get more consistent results because the temperature stays steady throughout the cook.
If you are new to cooking ribs, the oven is the best place to start. It gives you more control and room for error. Once you master the basics, you can experiment with smoking or grilling later on.
Choosing the Right Costco Ribs for Oven Cooking
Costco carries several types of pork ribs that work beautifully in the oven. Knowing which cut to pick makes a big difference in your final result. Here are the most popular options you will find at the store.
Pork Spare Ribs
These are the classic barbecue ribs. They come from the belly area of the pig and have more fat and connective tissue. This extra fat makes them perfect for low and slow oven cooking. The fat renders down during the cook, basting the meat from the inside out.
Costco’s Kirkland Signature pork spare ribs are a top pick. They are well-trimmed and come in large racks that feed a family easily. These ribs respond well to dry rubs and glazes, making them a favorite for oven baking.
Baby Back Ribs
Baby back ribs come from the top of the pig’s rib cage. They are leaner and more tender than spare ribs. They also cook a bit faster, which makes them great if you are short on time.
Costco baby back ribs are typically smaller and more uniform in size. This means they cook more evenly in the oven. They are a lighter option if you want ribs that are tender but not as heavy on the palate.
St. Louis Style Ribs
St. Louis style ribs are spare ribs that have been trimmed to remove the sternum and rib tips. This gives them a neat, rectangular shape that fits perfectly in a roasting pan. They are a favorite among oven rib enthusiasts because of their even thickness.
Costco sometimes carries St. Louis style ribs in their meat section. These are excellent for oven cooking since the uniform shape ensures consistent results throughout the rack.
Step-by-Step: How to Cook Costco Ribs In The Oven
Now let us get into the heart of the matter. Here is a clear, detailed process for making Costco oven ribs that are juicy, flavorful, and tender every single time.
Step 1: Prep the Ribs
Start by removing the ribs from their packaging. Pat them dry with paper towels. This helps the seasoning stick better and promotes a nice caramelized bark during cooking.
Next, use a sharp knife to trim off any excess fat. You want to leave about a quarter-inch of fat on top. This layer will melt during cooking and keep the meat moist. Flip the ribs over and remove the thin membrane on the bone side. This membrane can block seasoning and create a chewy texture.
Once the ribs are prepped, lay them out on a cutting board and get ready to season.
Step 2: Apply the Seasoning
A great dry rub is the backbone of amazing oven ribs. You can use a store-bought rib rub or make your own. A simple blend of brown sugar, paprika, garlic powder, onion powder, cumin, salt, and black pepper works wonderfully.
Rub the seasoning generously over all sides of the ribs. Press it into the meat so it adheres well. For even deeper flavor, let the seasoned ribs sit in the refrigerator for a few hours or overnight. This gives the spices time to penetrate the meat.
Step 3: Wrap in Foil
Before the ribs go into the oven, wrap them tightly in heavy-duty aluminum foil. This creates a sealed environment that traps moisture and heat. The ribs essentially steam inside the foil, which keeps them incredibly tender.
Place the foil-wrapped ribs meat-side down on a baking sheet or in a roasting pan. This prevents the seasoning from burning and keeps the juices flowing.
Step 4: Set the Temperature and Time
Preheat your oven to 275°F. This low temperature is the key to tender, fall-off-the-bone ribs. High heat will dry out the meat before the collagen has time to break down.
Place the ribs in the oven and cook for about 2.5 to 3 hours for spare ribs. Baby back ribs typically take 1.5 to 2 hours. The exact time depends on the thickness of the rack and your oven’s calibration.
Here is a quick reference for cooking times:
- Pork spare ribs: 2.5 to 3 hours at 275°F
- Baby back ribs: 1.5 to 2 hours at 275°F
- St. Louis style ribs: 2.5 to 3 hours at 275°F
Step 5: Unwrap and Glaze
After the initial cook, carefully remove the foil. Be careful, as steam will be hot. Open the foil away from your face to avoid the burn.
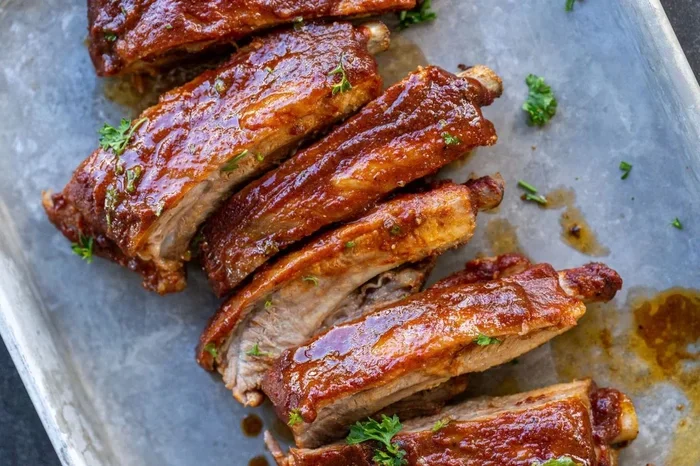
Increase the oven temperature to 375°F or 400°F. This higher heat will help set the glaze and create a beautiful caramelized crust. Brush a thin layer of your favorite BBQ sauce or rib glaze over all sides of the ribs.
Return the ribs to the oven uncovered for 15 to 20 minutes. This final step adds flavor and gives the ribs that sticky, glossy finish. Watch them closely so the glaze does not burn.
Step 6: Rest and Serve
Once the ribs are done, take them out of the oven and let them rest for 10 minutes. This resting period allows the juices to redistribute throughout the meat. Cutting too soon will cause those flavorful juices to run all over your cutting board.
Slice between the bones to serve individual portions. Serve with extra sauce on the side, coleslaw, and some cornbread for the full experience.
Common Mistakes to Avoid When Cooking Costco Ribs In The Oven
Even experienced cooks make mistakes when baking ribs in the oven. Here are some common pitfalls to watch out for.
Cooking at Too High a Temperature
One of the biggest mistakes is cranking up the heat to save time. Ribs need low, gentle heat to break down the tough connective tissue. If you cook them too fast, the outside will burn while the inside remains tough and chewy.
Stick to 275°F for the main cook. Yes, it takes longer, but the results are worth the wait. Patience is the secret ingredient in great ribs.
Skipping the Membrane Removal
The membrane on the bone side of the ribs is tough and rubbery. If you leave it on, it will not soften properly during cooking. It also blocks your dry rub from reaching the meat. Take the extra minute to peel it off. Your ribs will thank you.
Not Using Enough Seasoning
Costco ribs are lean and need plenty of flavor. A light dusting of seasoning will not be enough. Be generous with your rub. You want an even coat on every surface. The seasoning is what transforms plain ribs into something extraordinary.
Opening the Foil Too Often
During the main cook, resist the urge to peek inside the foil. Every time you open it, you release heat and moisture. This slows down the cooking process and can dry out the ribs. Trust the process and let the oven do its work.
Best Oven Temperatures and Times for Different Rib Cuts
Different types of ribs require slightly different cooking conditions. Here is a handy reference table to guide you.
| Rib Type | Oven Temperature | Cook Time | Internal Temp Target |
|---|---|---|---|
| Pork Spare Ribs | 275°F | 2.5 to 3 hours | 195°F to 203°F |
| Baby Back Ribs | 275°F | 1.5 to 2 hours | 195°F to 203°F |
| St. Louis Style Ribs | 275°F | 2.5 to 3 hours | 195°F to 203°F |
| Thin-Cut Ribs | 300°F | 1 to 1.5 hours | 190°F to 195°F |
Using a meat thermometer is the most reliable way to check doneness. The internal temperature should read between 195°F and 203°F. At this range, the collagen in the meat has fully broken down, giving you that melt-in-your-mouth texture.
Tips and Tricks for Perfect Oven Ribs Every Time
A few extra tips can take your Costco ribs oven recipe from good to outstanding. Here are some pro-level tricks that make a real difference.
Use a Rib Rack
A rib rack elevates the meat and allows hot air to circulate evenly around the rack. This prevents soggy spots and promotes uniform cooking. If you do not have a rib rack, you can place the ribs vertically in a large roasting pan or use a wire cooling rack set over a baking sheet.
Add Liquid to the Foil
Before sealing the foil, add a small amount of liquid to the pan. Apple cider vinegar, apple juice, or even beer works great. This liquid creates steam inside the foil, which keeps the ribs moist and adds a subtle depth of flavor.
Make a Dry Rub the Night Before
Preparing your dry rub ahead of time saves effort on cooking day. Mix up a big batch and store it in an airtight container. When you buy ribs from Costco, you can season them immediately and let them marinate in the fridge overnight.
Experiment with Different Glazes
While classic BBQ sauce is always a winner, do not be afraid to try other glazes. Honey mustard, maple syrup with a splash of hot sauce, or a tangy Carolina vinegar-based sauce all work beautifully. Brushing on a glaze during the final 15 minutes of cooking creates a sticky, flavorful crust.
Let the Ribs Rest
Resting is one of the most overlooked steps in rib cooking. When you pull the ribs out of the oven, the internal temperature will continue to rise slightly. This carryover cooking helps finish the job. More importantly, resting allows the juices to settle, making every bite more succulent.
How to Tell When Costco Ribs Are Done
Knowing when your oven ribs are ready can be tricky if you do not know what to look for. There are three reliable signs that your ribs are perfectly cooked.
First, check the internal temperature with a meat thermometer. The target range is 195°F to 203°F. This is the sweet spot where the meat is tender and the collagen has fully rendered.
Second, do the bend test. Pick up one end of the rack with tongs or oven mitts. If the ribs bend and crack slightly on the surface, they are done. If they still feel stiff, give them more time.
Third, look at the meat. It should have pulled back from the bone tips by about a quarter-inch. The surface should have a slightly dry, glossy appearance known as the bark. This is the sign of a well-cooked rack of ribs.
Serving Suggestions for Oven-Cooked Costco Ribs
Once your ribs are done, it is time to think about the sides. Great accompaniments round out the meal and make it feel complete.
Classic pairings include coleslaw, mac and cheese, baked beans, and cornbread. A fresh green salad cuts through the richness of the ribs nicely. For a summer vibe, try grilled corn on the cob and watermelon salad.
For sauces, offer a variety so everyone can customize their plate. A tangy vinegar-based sauce, a sweet and smoky BBQ sauce, and a spicy hot sauce give your guests options. Set them out in small bowls alongside the ribs.
Storing and Reheating Leftover Ribs
If you have leftovers, storing them properly keeps them delicious for days. Let the ribs cool to room temperature, then wrap them tightly in plastic wrap or aluminum foil. Place them in an airtight container and refrigerate within two hours.
Leftover ribs keep well in the fridge for up to four days. To reheat, wrap them in foil and warm them in the oven at 250°F for about 20 minutes. This gentle reheating method keeps the meat moist. Avoid microwaving, which can dry out the ribs quickly.
You can also freeze cooked ribs for up to three months. Wrap them tightly in foil and place them in a freezer-safe bag. Thaw overnight in the refrigerator before reheating.
Final Thoughts on Cooking Costco Ribs In The Oven
Making Costco ribs in the oven is one of the most rewarding things you can do in the kitchen. It is simple, affordable, and delivers results that rival any barbecue joint. The low and slow method transforms a humble rack of ribs into something truly spectacular.
Remember the key elements: a good dry rub, the right temperature, enough time, and a flavorful glaze. Follow these principles and you will have tender, juicy ribs with a beautiful caramelized bark every time. The process is forgiving, so do not be afraid to experiment and find your own style.
Next time you are at Costco, grab a rack of ribs and try this method at home. You will be amazed at how easy it is to create a memorable meal with just your oven and a little patience. Happy cooking!
Frequently Asked Questions
What temperature should I cook Costco ribs at in the oven?
The ideal oven temperature for cooking Costco ribs is 275°F. This low and slow approach breaks down the connective tissue and renders the fat, resulting in tender, juicy ribs. For the final glaze, increase the temperature to 375°F or 400°F for the last 15 to 20 minutes.
How long does it take to cook Costco ribs in the oven?
Cooking time depends on the type of ribs. Pork spare ribs and St. Louis style ribs take about 2.5 to 3 hours at 275°F. Baby back ribs cook faster, typically in 1.5 to 2 hours. Always use a meat thermometer to check that the internal temperature reaches 195°F to 203°F.
Should I wrap Costco ribs in foil when oven cooking?
Yes, wrapping ribs in foil during the main cook is highly recommended. The foil traps moisture and heat, creating a steaming effect that keeps the meat tender. After the initial cook, unwrap the ribs for the final glazing stage to develop a crispy bark.
Can I use frozen Costco ribs in the oven?
It is best to thaw ribs before cooking them in the oven. Thaw them in the refrigerator overnight for the safest method. Cooking frozen ribs can lead to uneven cooking, with the outside overcooking before the inside reaches a safe temperature.
What is the best BBQ sauce for oven ribs?
The best sauce is the one you enjoy most. A classic sweet and smoky tomato-based BBQ sauce works well for most people. For something different, try a honey mustard glaze, a tangy Carolina vinegar sauce, or a maple and cayenne blend. Apply the sauce in the last 15 minutes of cooking for the best results.
How do I know when oven ribs are done?
There are three clear signs. First, the internal temperature should read 195°F to 203°F on a meat thermometer. Second, the meat should have pulled back from the bone tips by about a quarter-inch. Third, the ribs should pass the bend test, where they crack slightly on the surface when you lift one end with tongs.
=== CONCLUSION ===
Cooking Costco ribs in the oven is a straightforward process that delivers incredible results. By following the steps outlined in this guide, you can turn an affordable rack of ribs from Costco into a mouthwatering meal that will impress everyone at your table.
Remember to choose the right cut, season generously, cook low and slow, and finish with a delicious glaze. Avoid the common mistakes, use your meat thermometer, and always let the ribs rest before serving. With a little practice, you will master oven ribs and never go back to dry, overcooked barbecue again.
Now it is your turn. Head to Costco, pick up a rack of ribs, and put these tips to work. Your kitchen will smell amazing, and your family will be asking you to make it again and again. Happy cooking!