How To Remove Your Whirlpool Oven Door For Cleaning
Removing your Whirlpool oven door for cleaning is easier than you think. This guide walks you through every step safely and quickly. You will learn the tools needed, the removal process, and how to clean each part. Regular oven door cleaning keeps your kitchen looking great and your oven running efficiently. Follow our tips to get professional results at home.
Your Whirlpool oven door collects grease, food splatters, and baked-on grime over time. When the door gets dirty, it affects how well your oven cooks. Removing the oven door for cleaning gives you full access to every surface. This simple maintenance task can make your kitchen look and feel brand new. You do not need any special skills or expensive tools to get the job done.
Many people avoid cleaning their oven door because they think it is too hard. They worry about breaking something or not getting it back on correctly. The truth is, Whirlpool oven door removal is designed to be user-friendly. Most models follow the same basic process. In this guide, we will show you exactly how to do it. By the end, you will feel confident tackling this chore yourself.
Regular oven door maintenance extends the life of your appliance. It also keeps your kitchen smelling fresh and looking clean. A dirty oven door can even affect cooking performance. Grease buildup around the edges can block heat distribution. So keeping the door clean is not just about looks. It is also about making sure your oven works its best.
Key Takeaways
- Easy Removal Process: Removing your Whirlpool oven door is a straightforward DIY task that takes under 30 minutes.
- Better Cleaning Results: Taking the door off lets you access every surface, including hinges and glass panels.
- Safety First: Always cool the oven completely and use the right tools before starting.
- Reassembly Is Simple: Putting the door back on follows the same steps in reverse order.
- Regular Maintenance Matters: Cleaning your oven door monthly prevents tough grease buildup.
- No Special Skills Needed: Anyone can do this with basic household tools and our guide.
📑 Table of Contents
- Why You Should Remove Your Whirlpool Oven Door for Cleaning
- Tools and Materials You Will Need
- Step-by-Step Guide to Removing Your Whirlpool Oven Door
- How to Clean Each Part of the Oven Door
- Reassembling and Reattaching Your Oven Door
- Common Mistakes to Avoid When Removing Your Oven Door
- Maintenance Tips to Keep Your Whirlpool Oven Door Clean
- Conclusion
Why You Should Remove Your Whirlpool Oven Door for Cleaning
Wiping down the outside of your oven door is not enough. Dirt and grease build up on the inside too. The glass panels, hinges, and frame all collect grime over time. When you remove the oven door for cleaning, you can reach every spot. This deep clean makes a huge difference in how your oven looks and performs.
Benefits of Deep Cleaning Your Oven Door
- Better Cooking Performance: Clean glass panels let you see your food without opening the door. This helps maintain steady heat inside.
- Longer Appliance Life: Regular cleaning prevents corrosion on metal parts and hinges. Your oven lasts longer when it is well maintained.
- Improved Kitchen Hygiene: Grease and food residue can harbor bacteria. A thorough clean eliminates these health concerns.
- Easier Daily Maintenance: When the door is clean, future wipe-downs take seconds instead of minutes.
- Fresh Kitchen Smell: Built-up grease can create odors. Removing and cleaning the door gets rid of these smells for good.
How Often Should You Clean Your Whirlpool Oven Door?
Most homeowners should clean their oven door at least once a month. If you use your oven frequently, consider cleaning it every two weeks. Heavy users who cook lots of greasy foods may need to clean more often. Pay attention to how your oven looks and smells. If you notice buildup, it is time for a cleaning session. Whirlpool oven maintenance is much easier when you stay on top of it.
Tools and Materials You Will Need
Before you start, gather everything you need. Having the right tools makes the process smooth and fast. You do not need anything fancy. Most items are probably already in your kitchen or garage.
Essential Cleaning Supplies
- Warm water for soaking and rinsing parts
- Dish soap or a gentle degreaser
- Baking soda for natural grease cutting
- White vinegar for disinfecting and shine
- Soft microfiber cloths for wiping surfaces
- Non-abrasive sponge to avoid scratching glass
- Soft-bristle brush for scrubbing hinges and frames
Tools for Door Removal
- Phillips-head screwdriver for removing hinge screws
- Flat-head screwdriver for prying clips if needed
- Adjustable wrench for stubborn hinge bolts
- Soft towel or blanket to protect the door when setting it down
- Gloves to keep your hands clean and protected
Pro Tip: Lay a soft towel on the floor or workbench before you remove the door. This prevents scratches and dents if the door gets set down accidentally. Whirlpool oven parts are durable, but they can still get damaged by hard surfaces.
Step-by-Step Guide to Removing Your Whirlpool Oven Door
Now comes the fun part. Follow these steps carefully to safely remove your oven door. Each step is designed to be simple and foolproof. Take your time, and do not rush the process.
Step 1: Turn Off and Cool the Oven
Safety comes first. Make sure your oven is completely turned off. If you have been cooking, let the oven cool for at least one hour. Hot oven surfaces can cause serious burns. Never attempt to remove the door while the oven is warm or hot. Check that the oven is at room temperature before you begin.
Step 2: Open the Door Fully
Open the oven door all the way to its maximum position. Most Whirlpool models have a stop that holds the door open. This position gives you the best access to the hinges. Look for any latches or locks on the door. Some models have a safety latch that needs to be released first.
Step 3: Locate the Hinges
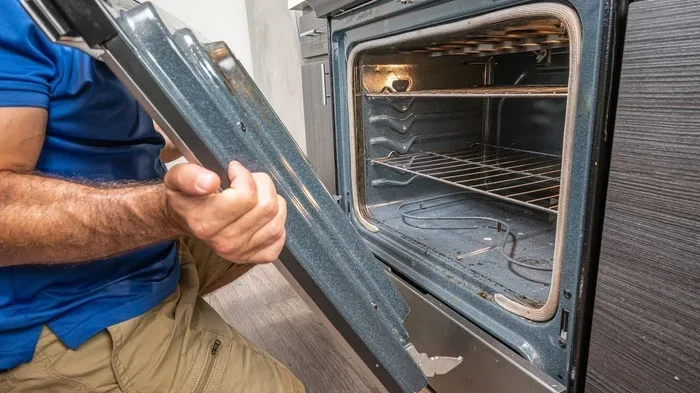
Look at both sides of the door where it connects to the oven. You will see the hinges. These are the metal brackets that hold the door in place. On most Whirlpool models, the hinges have a locking mechanism at the top. You need to unlock this before the door can come off.
Step 4: Unlock the Hinge Locks
Each hinge has a small lever or clip at the top. This is the lock. Push or pull the lever toward the center of the oven. You should hear a click or feel the lock release. Do this on both the left and right hinges. Some models require you to lift the lever straight up. Check your user manual if you are unsure about your specific model.
Step 5: Lift the Door Off the Hinges
Once both locks are released, gently lift the door upward. It will come off the hinge rods. Hold the door firmly with both hands. The door can be heavy, so be careful. Set it down gently on your towel or blanket. Do not lay it on a hard or uneven surface.
Quick Tip: If the door feels stuck, double-check that both locks are fully released. Sometimes one side releases before the other. Make sure you hear the click on both sides before trying to lift the door.
Step 6: Remove the Glass Panels (Optional)
With the door on a flat surface, you can remove the glass panels for deeper cleaning. Most doors have two or three glass layers. Look for screws or clips holding the inner and outer panels in place. Use your screwdriver to remove these. Gently pull the glass panels out. Place them on a soft cloth to avoid scratches.
How to Clean Each Part of the Oven Door
Now that your Whirlpool oven door is removed, it is time to clean every part. Each component needs a slightly different approach. Let us walk through the best cleaning methods for each piece.
Cleaning the Glass Panels
Glass panels are the dirtiest part of the oven door. Baked-on grease and food splatter cling to the glass. Start by soaking the panels in warm, soapy water for 15 to 20 minutes. This loosens the grime. After soaking, use your non-abrasive sponge to gently scrub the surface. For tough spots, make a paste of baking soda and water. Apply it to the stubborn areas and let it sit for 10 minutes. Then wipe it away with a damp cloth.
For really heavy buildup, try a mixture of baking soda and white vinegar. The fizzing action helps lift grease. Rinse the glass thoroughly with clean water and dry it with a microfiber cloth. This prevents water spots and streaks.
Cleaning the Metal Frame
The metal frame around the glass collects grease too. Wipe it down with a damp cloth and mild dish soap. For sticky spots, use a soft-bristle brush. Pay extra attention to the corners and edges where grease tends to build up. Dry the frame completely with a clean cloth to prevent rust.
Cleaning the Hinges
The hinges are small but important parts. They hold your door securely when it is attached to the oven. Remove any loose screws and soak them in warm soapy water. Use a brush to clean around the hinge mechanism. Grease and food particles can get trapped in the moving parts. Wipe everything down and dry it completely before reassembly.
Expert Insight: If your hinges are still sticky after cleaning, apply a small amount of food-safe lubricant. This keeps the door opening and closing smoothly. Avoid using too much lubricant, as excess can attract more dirt and grease.
Cleaning the Interior Door Surface
The inside of the door often gets overlooked. Wipe it down with a solution of warm water and dish soap. Use a soft cloth to avoid scratching the surface. For baked-on residue, the baking soda paste works great here too. Apply, let it sit, and then wipe clean.
Reassembling and Reattaching Your Oven Door
Once everything is clean and dry, it is time to put the door back on. Reassembly is simply the removal process in reverse order. Follow these steps carefully to make sure everything lines up correctly.
Step 1: Reinstall the Glass Panels
If you removed the glass panels, start by putting them back in place. Insert each panel into its frame. Replace any screws or clips you took out. Make sure the panels are snug but not overly tight. Over-tightening can crack the glass or damage the clips.
Step 2: Align the Door with the Hinges
Hold the door with both hands. Align the hinge rods with the slots on the oven frame. The rods should slide in smoothly. If they do not, check for any dried grease or debris in the hinge area. Clean it out before trying again.
Step 3: Lower the Door onto the Hinges
Gently lower the door down onto the hinge rods. The top of the door should sit flush with the oven frame. Make sure both sides are even. If one side is higher than the other, lift the door slightly and reposition it.
Step 4: Lock the Hinge Mechanisms
Push the hinge locks back into place. You should hear a click on both sides. This confirms the door is securely locked. Try opening and closing the door a few times. It should move smoothly without any sticking or scraping.
Quick Tip: After reassembly, wipe down the door one more time with a clean damp cloth. This removes any fingerprints or dust you may have left during the process. Your Whirlpool oven will look as good as new.
Common Mistakes to Avoid When Removing Your Oven Door
Even simple tasks can go wrong if you are not careful. Here are the most common mistakes people make when removing their oven door. Avoid these, and your cleaning experience will be much smoother.
Skipping the Cooling Step
The most dangerous mistake is removing the door while the oven is still hot. Burns can happen in seconds. Always wait for the oven to cool completely. Set a reminder if you need to. Safety should always come first.
Forcing the Door Off
If the door does not lift off easily, do not force it. Double-check that the hinge locks are fully released. Forcing the door can damage the hinges or the frame. Be patient and gentle. The door should come off with minimal effort once the locks are disengaged.
Using Harsh Cleaners
Avoid using abrasive cleaners or steel wool on your oven door. These can scratch the glass and damage the finish. Stick to gentle cleaners like baking soda, dish soap, and vinegar. They work just as well without the risk of damage.
Losing Small Parts
When you remove screws and clips, keep track of them. Use a small bowl or container to store them. Losing a screw can make reassembly difficult. It can also leave your door less secure when you put it back on.
Not Referring to the Manual
Every Whirlpool oven model is slightly different. Your user manual has specific instructions for your model. If you get stuck at any point, consult the manual. It is the best resource for your particular appliance.
Maintenance Tips to Keep Your Whirlpool Oven Door Clean
Prevention is the best approach. Once your oven door is clean, keep it that way with these simple habits. A little effort goes a long way in maintaining a spotless oven.
- Wipe spills immediately: When food splatters happen, clean them up right away. Do not let them sit and bake on.
- Use oven liners: Place a liner on the bottom rack to catch drips. This reduces the amount of grease that reaches the door.
- Do a quick wipe after each use: Spend 30 seconds wiping down the door after cooking. This prevents buildup over time.
- Deep clean monthly: Set a reminder to do a thorough cleaning once a month. This keeps your oven in top shape.
- Check the seals: Inspect the door seals regularly. Clean gunk off the rubber seals to maintain a proper seal.
Whirlpool self-cleaning oven owners should still remove the door for manual cleaning. The self-clean cycle handles the interior, but the door needs separate attention. The glass panels and frame collect grease that the self-clean cycle does not reach.
Conclusion
Removing your Whirlpool oven door for cleaning is a simple, rewarding task. It takes just a few minutes and makes a big difference. Your oven will look better, cook better, and last longer with regular care. Follow the steps in this guide, and you will have a sparkling clean oven door in no time.
Remember to gather your tools first. Cool the oven completely. Unlock the hinges gently. Clean each part thoroughly. And reassemble everything with care. These small steps add up to a well-maintained appliance that serves you well for years.
Do not let a dirty oven door discourage you from cooking. With the knowledge you have gained today, keeping your oven clean is easy. Make it part of your regular kitchen routine. Your Whirlpool oven will thank you with better performance and a longer lifespan. Start today, and enjoy the satisfaction of a kitchen that sparkles.
Frequently Asked Questions
Can I remove the oven door without any tools?
On most Whirlpool models, you do not need any tools to remove the door. The hinge locks release by hand. However, having a screwdriver nearby is helpful if you plan to remove glass panels or hinges for deeper cleaning.
Is it safe to clean the oven door glass with vinegar?
Yes, white vinegar is safe and effective for cleaning oven door glass. Mix it with warm water or baking soda for a natural cleaning solution. It cuts through grease without scratching the surface.
How do I know if my Whirlpool oven door is locked during the self-clean cycle?
During the self-clean cycle, the oven door locks automatically for safety. You cannot open it until the cycle finishes and the oven cools down. Refer to your user manual for specific lock indicators on your model.
What should I do if the door hinge feels stiff after reassembly?
Check for any leftover grease or debris in the hinge area. Clean it thoroughly and dry it completely. If stiffness continues, apply a small amount of food-safe lubricant to the moving parts. This should restore smooth operation.
How often should I replace my Whirlpool oven door seals?
Oven door seals typically last 3 to 5 years with regular use. Inspect them every few months for wear, cracks, or gaps. Replace them if you notice heat escaping or uneven cooking results. Clean seals regularly to extend their lifespan.
Will removing the oven door void my Whirlpool warranty?
No, removing the oven door for routine cleaning does not void your warranty. Whirlpool designs their ovens for user-friendly maintenance. However, if you damage any parts during removal, that may not be covered. Always follow the manufacturer’s instructions carefully.